
Ziipzaap’s Shaders 1.20, 1.19.4 → 1.18.2
| Developer | 👤Ziipzaap |
|---|---|
| Style | 🌅Realistic |
| Support GPUs | |
| Loaders | |
| Performance Impact | Low |
| Settings | 24 |
| Features | Cel Shading+32 |
| Created | Mar 4, 2014 |
| Updated | May 21, 2015 |
| Stats |
|
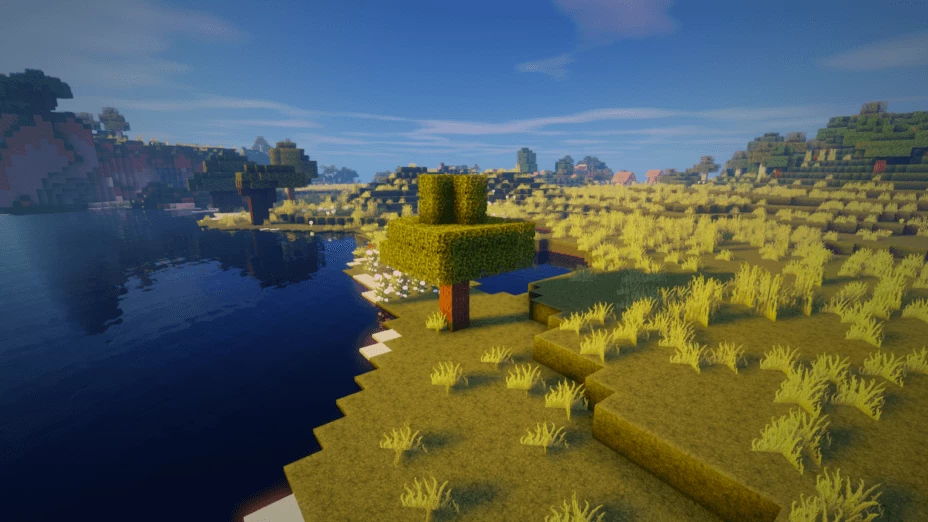
With over 100,000 downloads on Minecraft Forum alone, Ziipzaap’s Shaders is one of the older and most popular shader packs. Like many other shader packs, it contains plenty of unique content but started out as modifications to Chocopic13’s Shaders. You don’t need any extra software or add-ons besides the normal ones to make this shader pack work either. That means you need a compatible version of Optifine or the original GLSL Shaders Mod by Karyonix.
Though it was released a long time ago, Ziipzaap’s Shaders Pack works with the latest Minecraft versions, which means this shader pack is compatible with many older mods that have yet to update to work with more recent Minecraft clients. This makes Ziipzaap’s Shader Pack an excellent choice for players who use many older mods or those who like older versions of Minecraft when compared to newer ones.
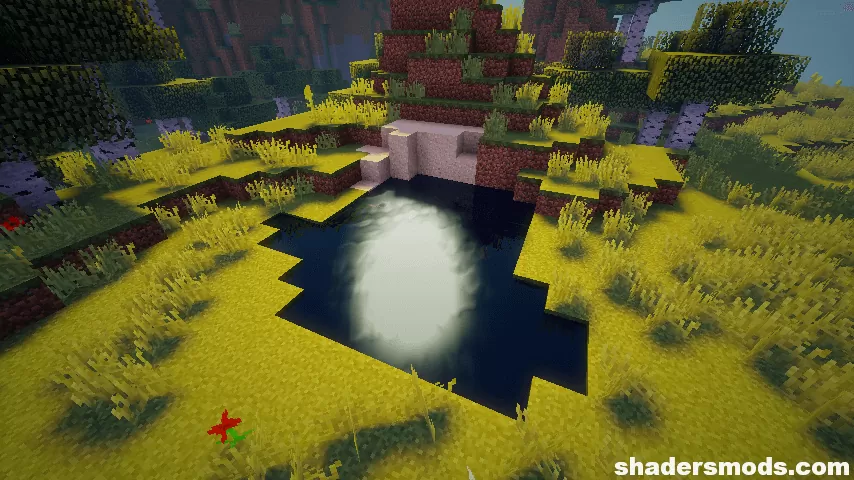
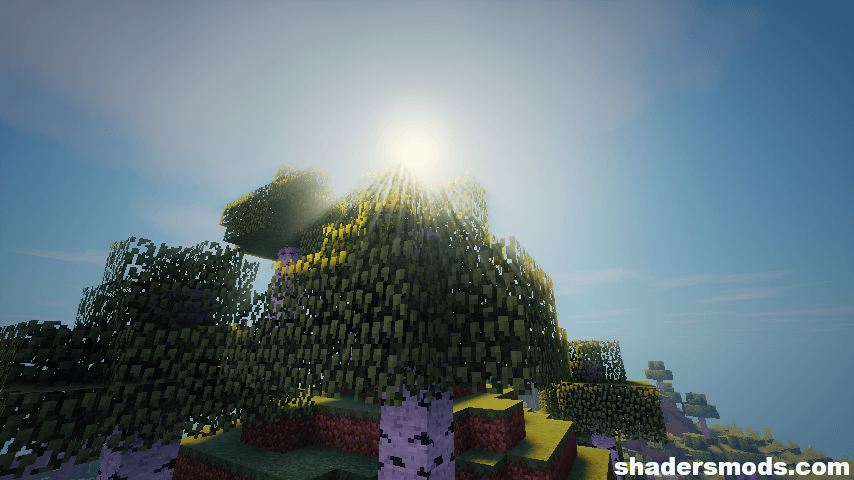
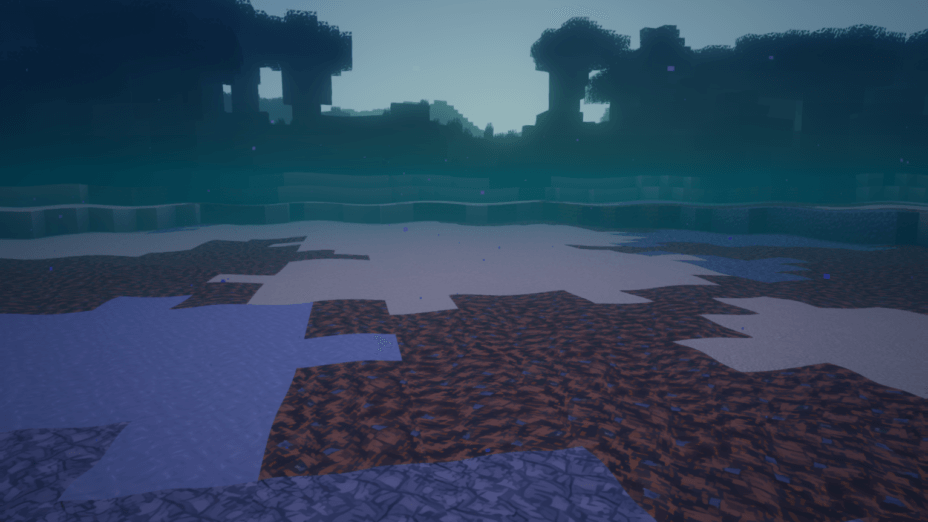
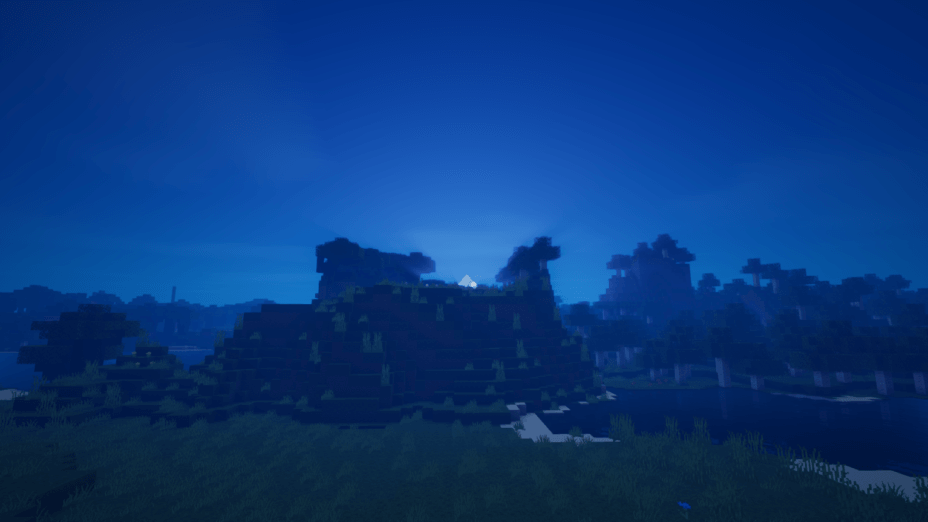
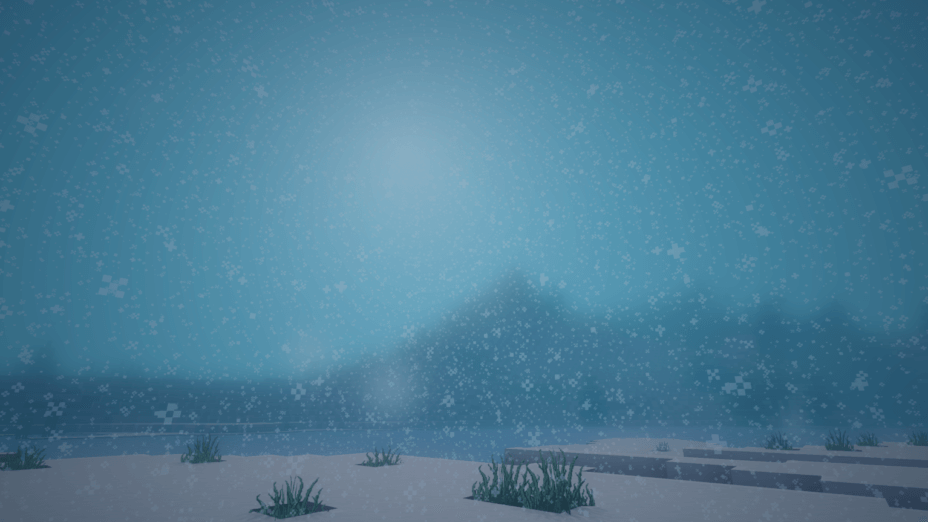
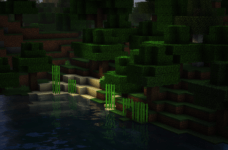
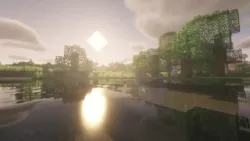
One thing you’re sure to notice from this shader pack is that everything seems a bit darker, even during the middle of the day when the sun is shining in the sky. You can adjust for this by turning up your brightness setting, but if you want the full Ziipzaap’s Shader Pack experience, you should leave things like they are natural. If the whole screen goes black when you enable this shader pack though, you probably need to update your graphics card drivers. That or your particular card is just incompatible with this particular shader pack. That does happen sometimes.
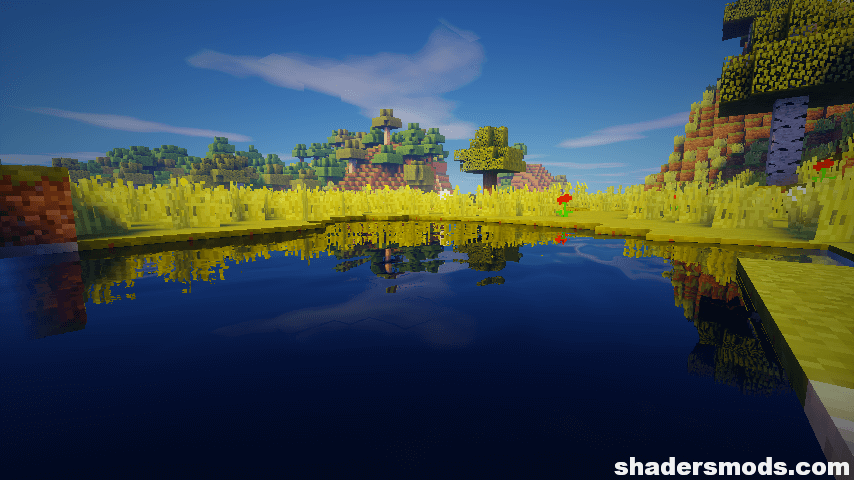
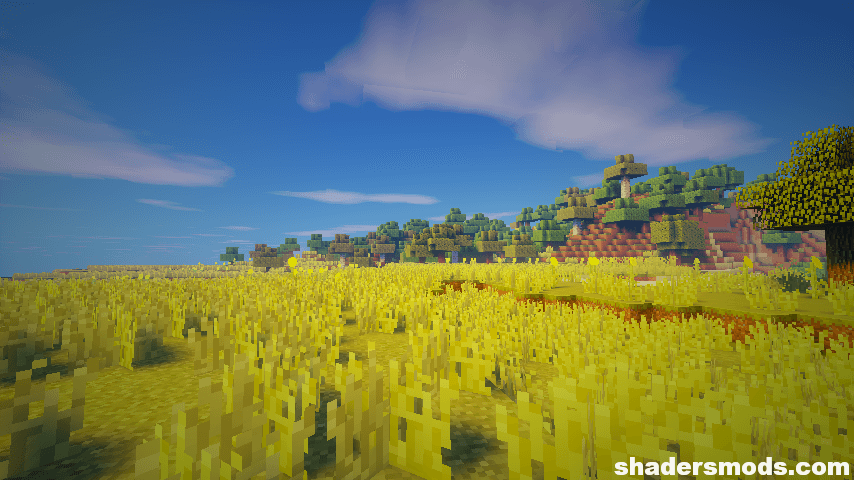
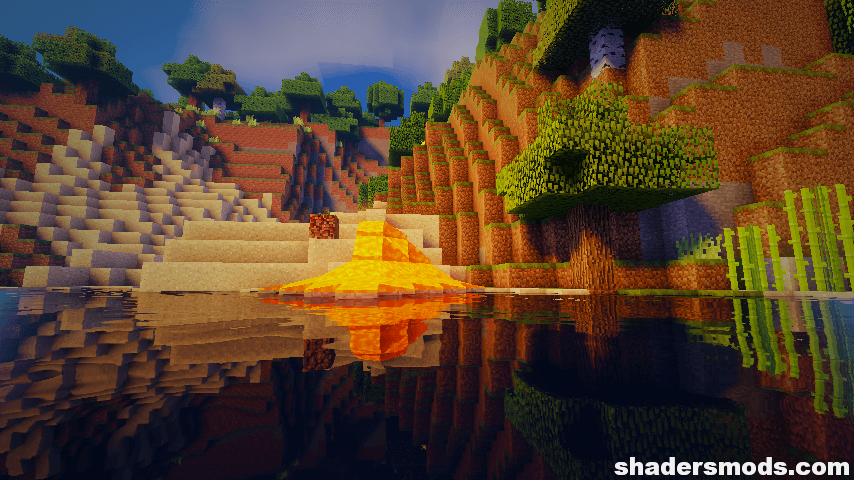
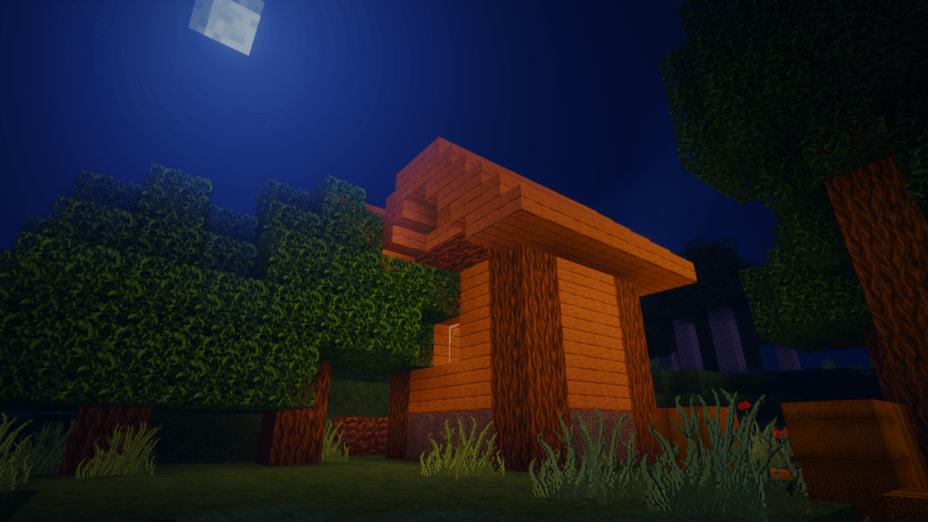
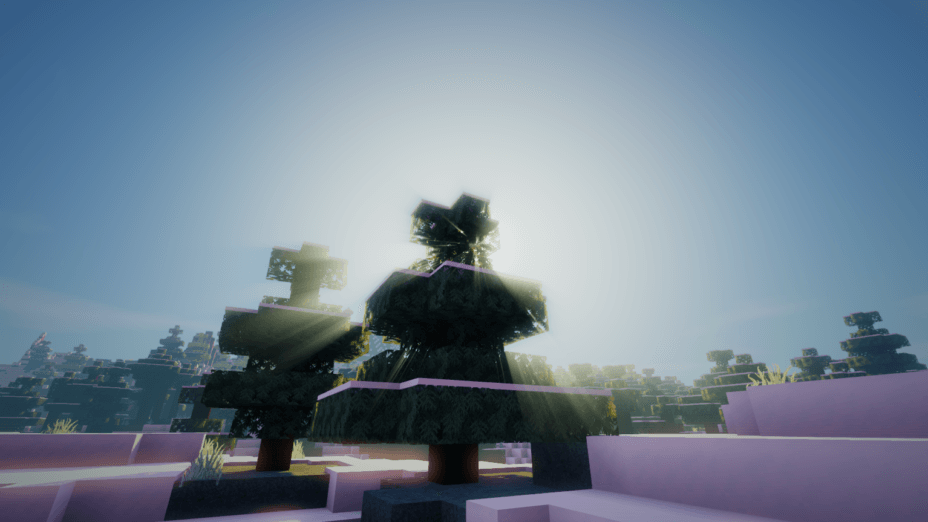
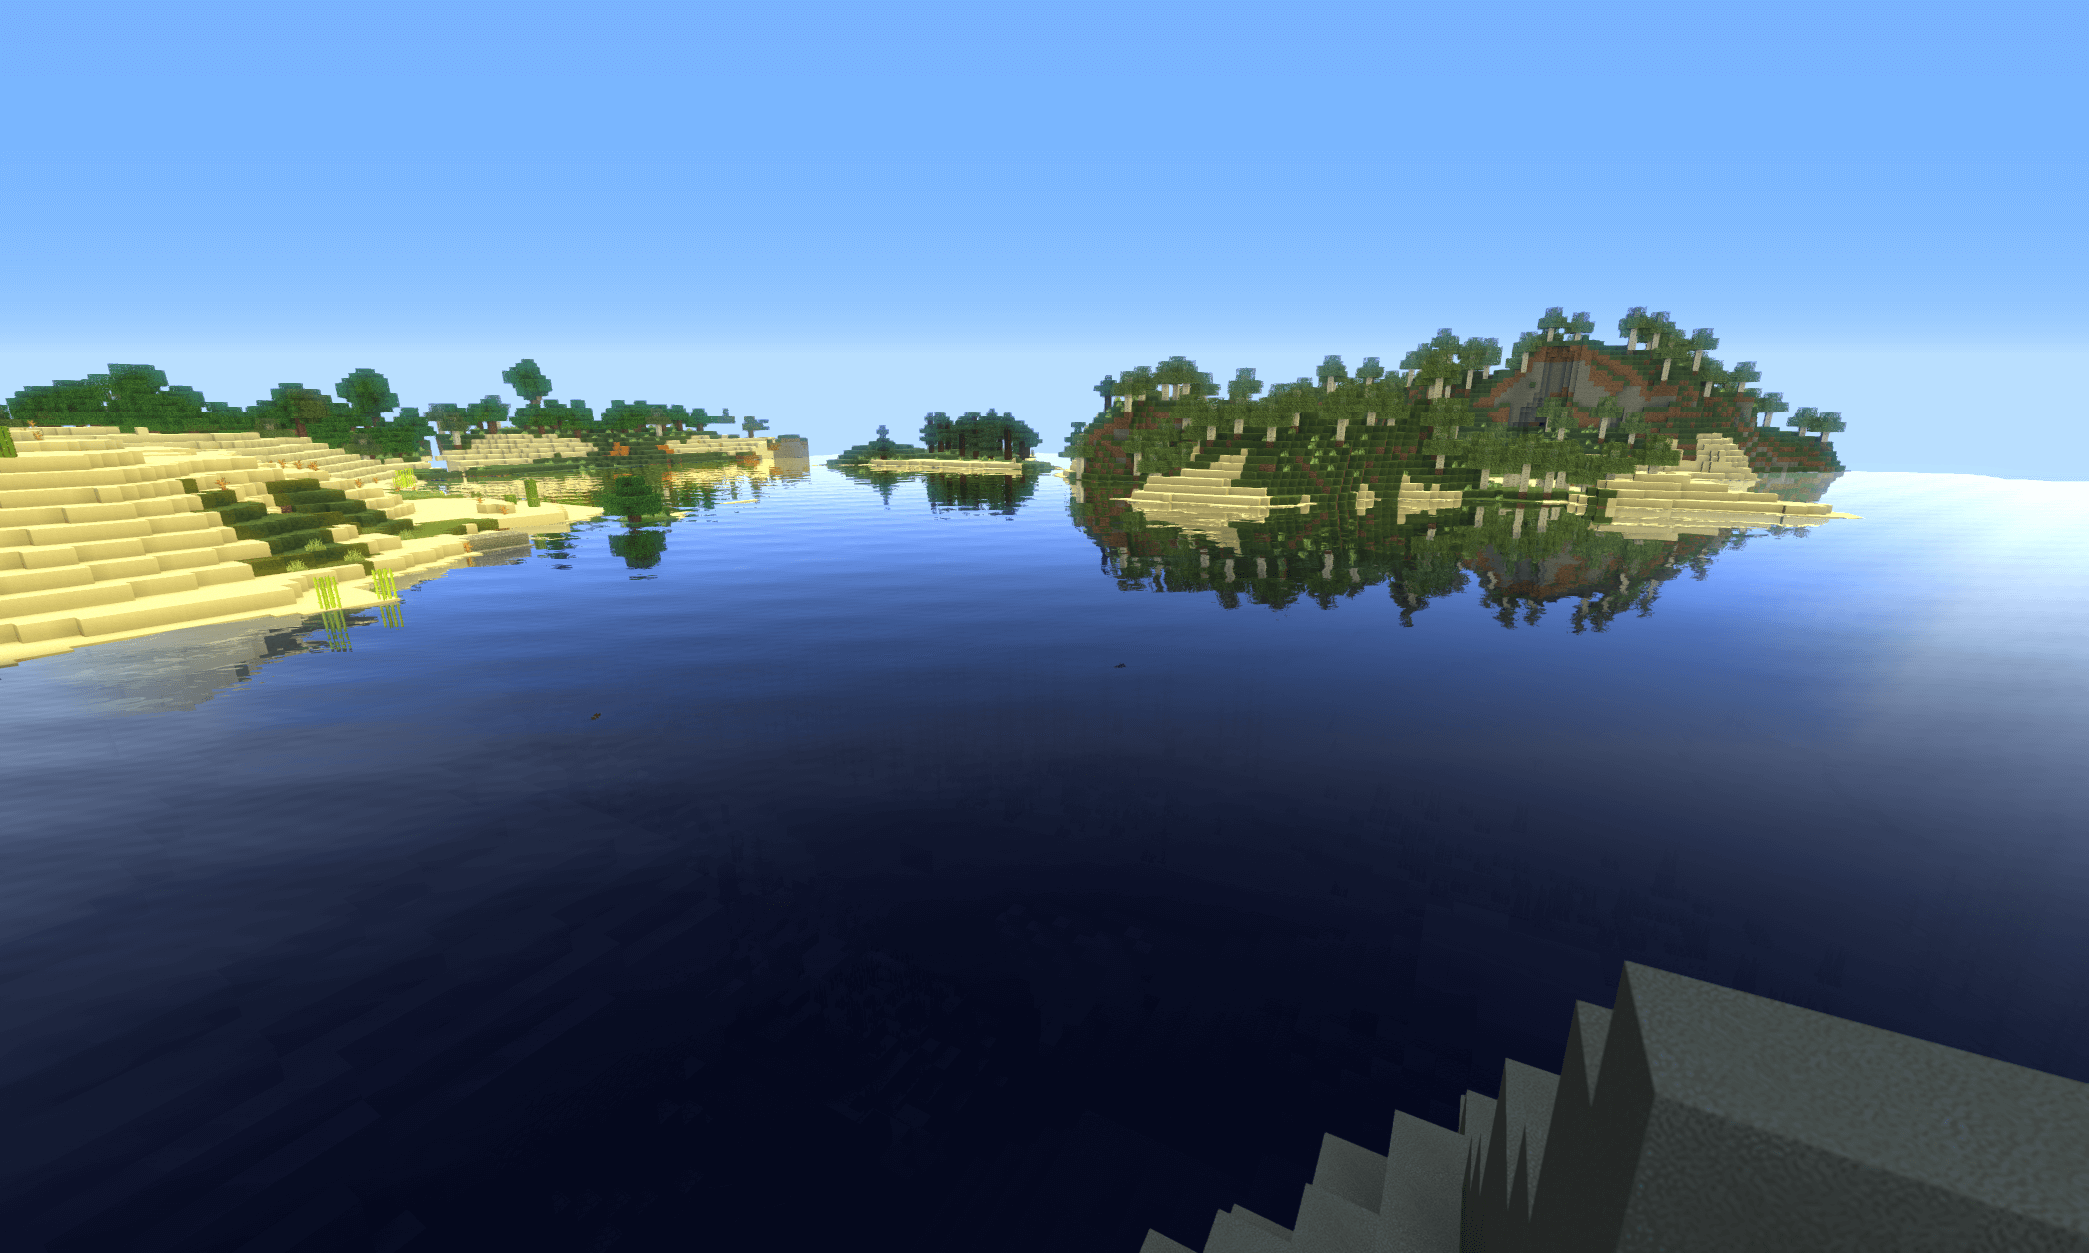
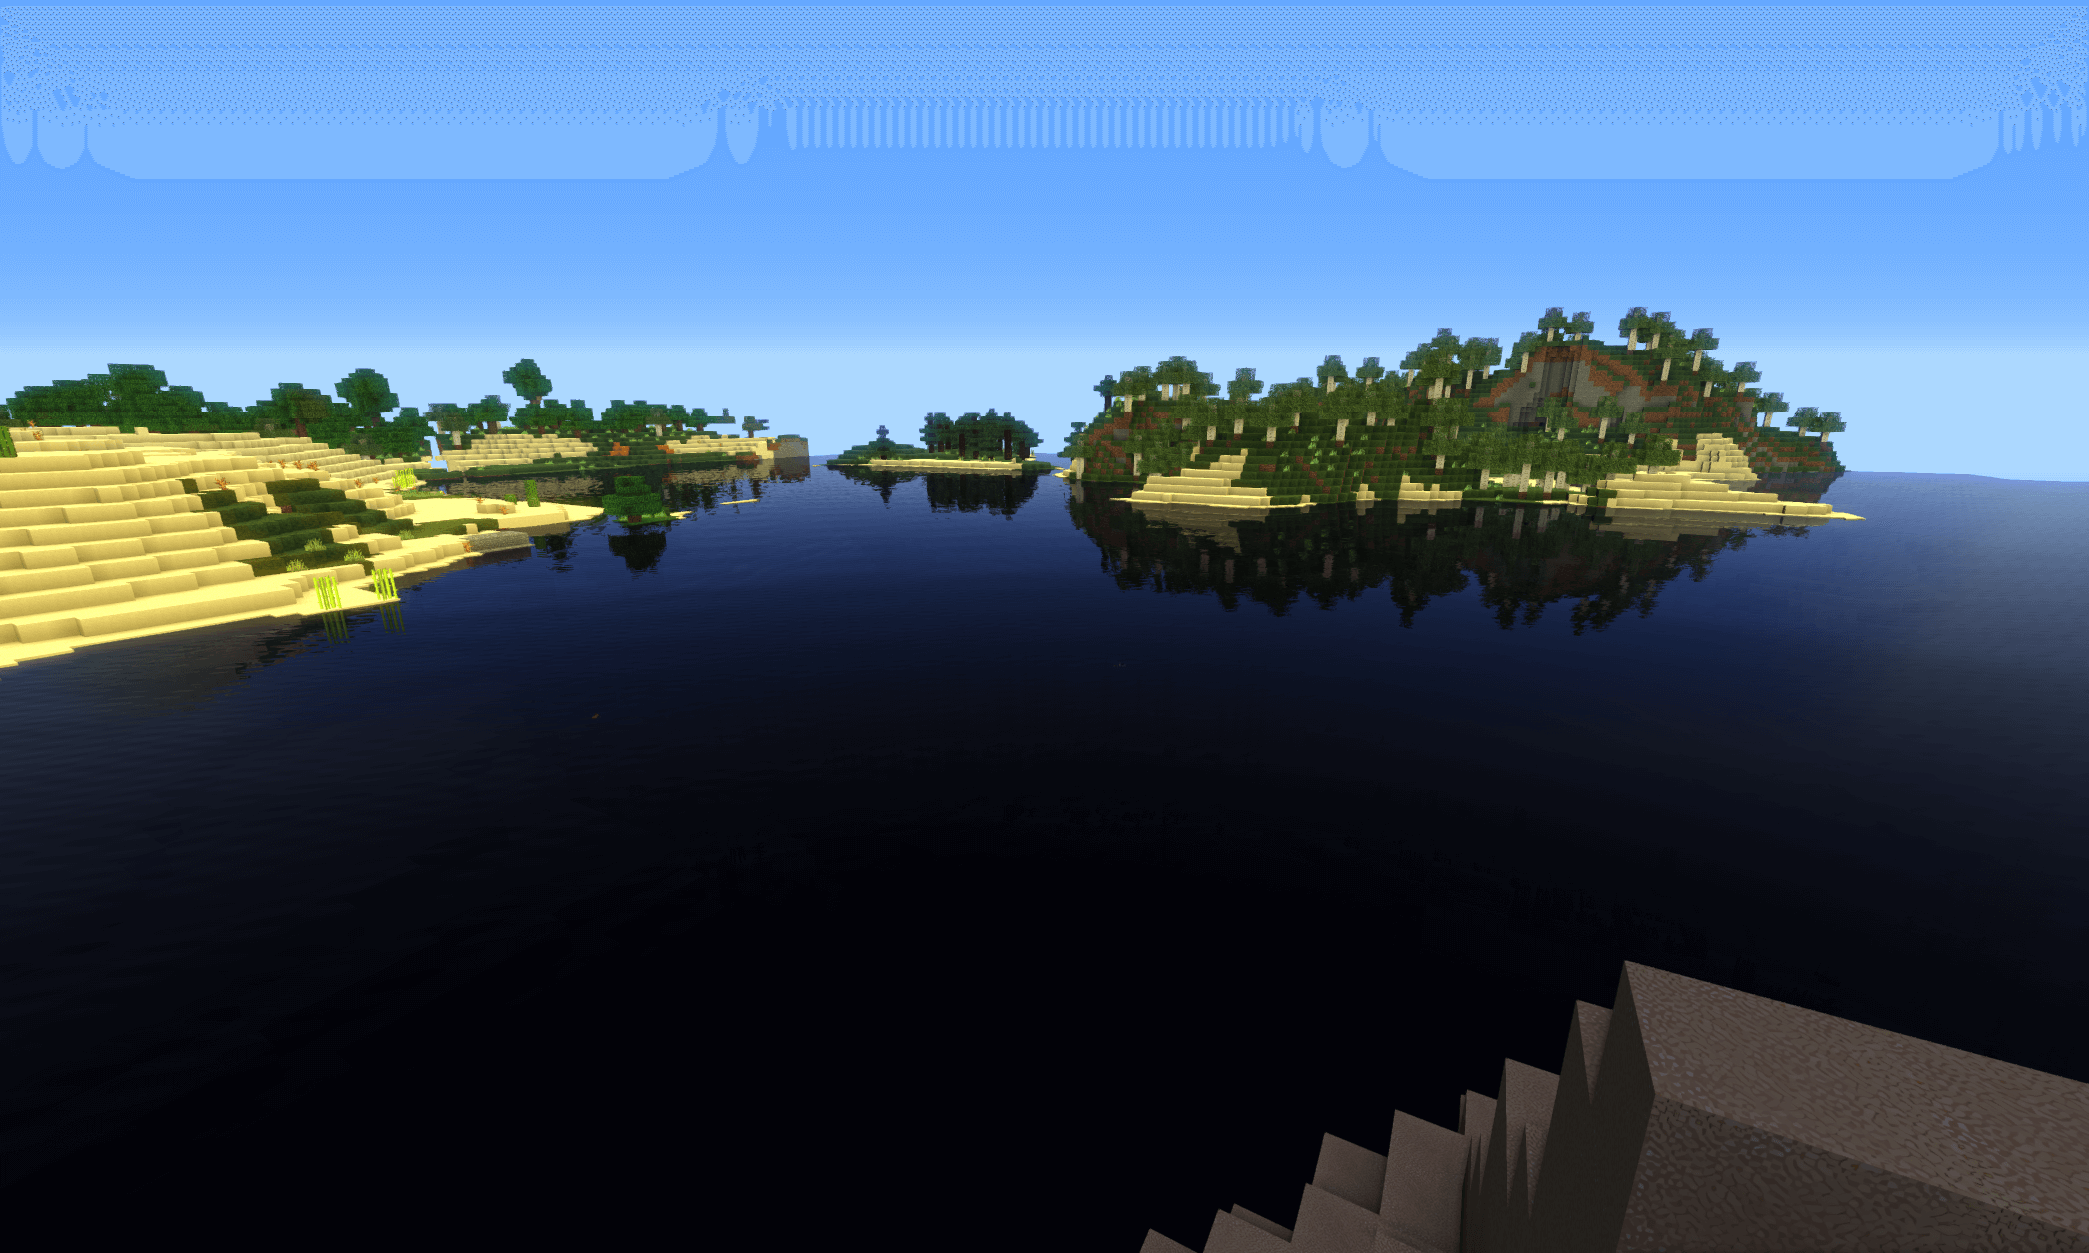
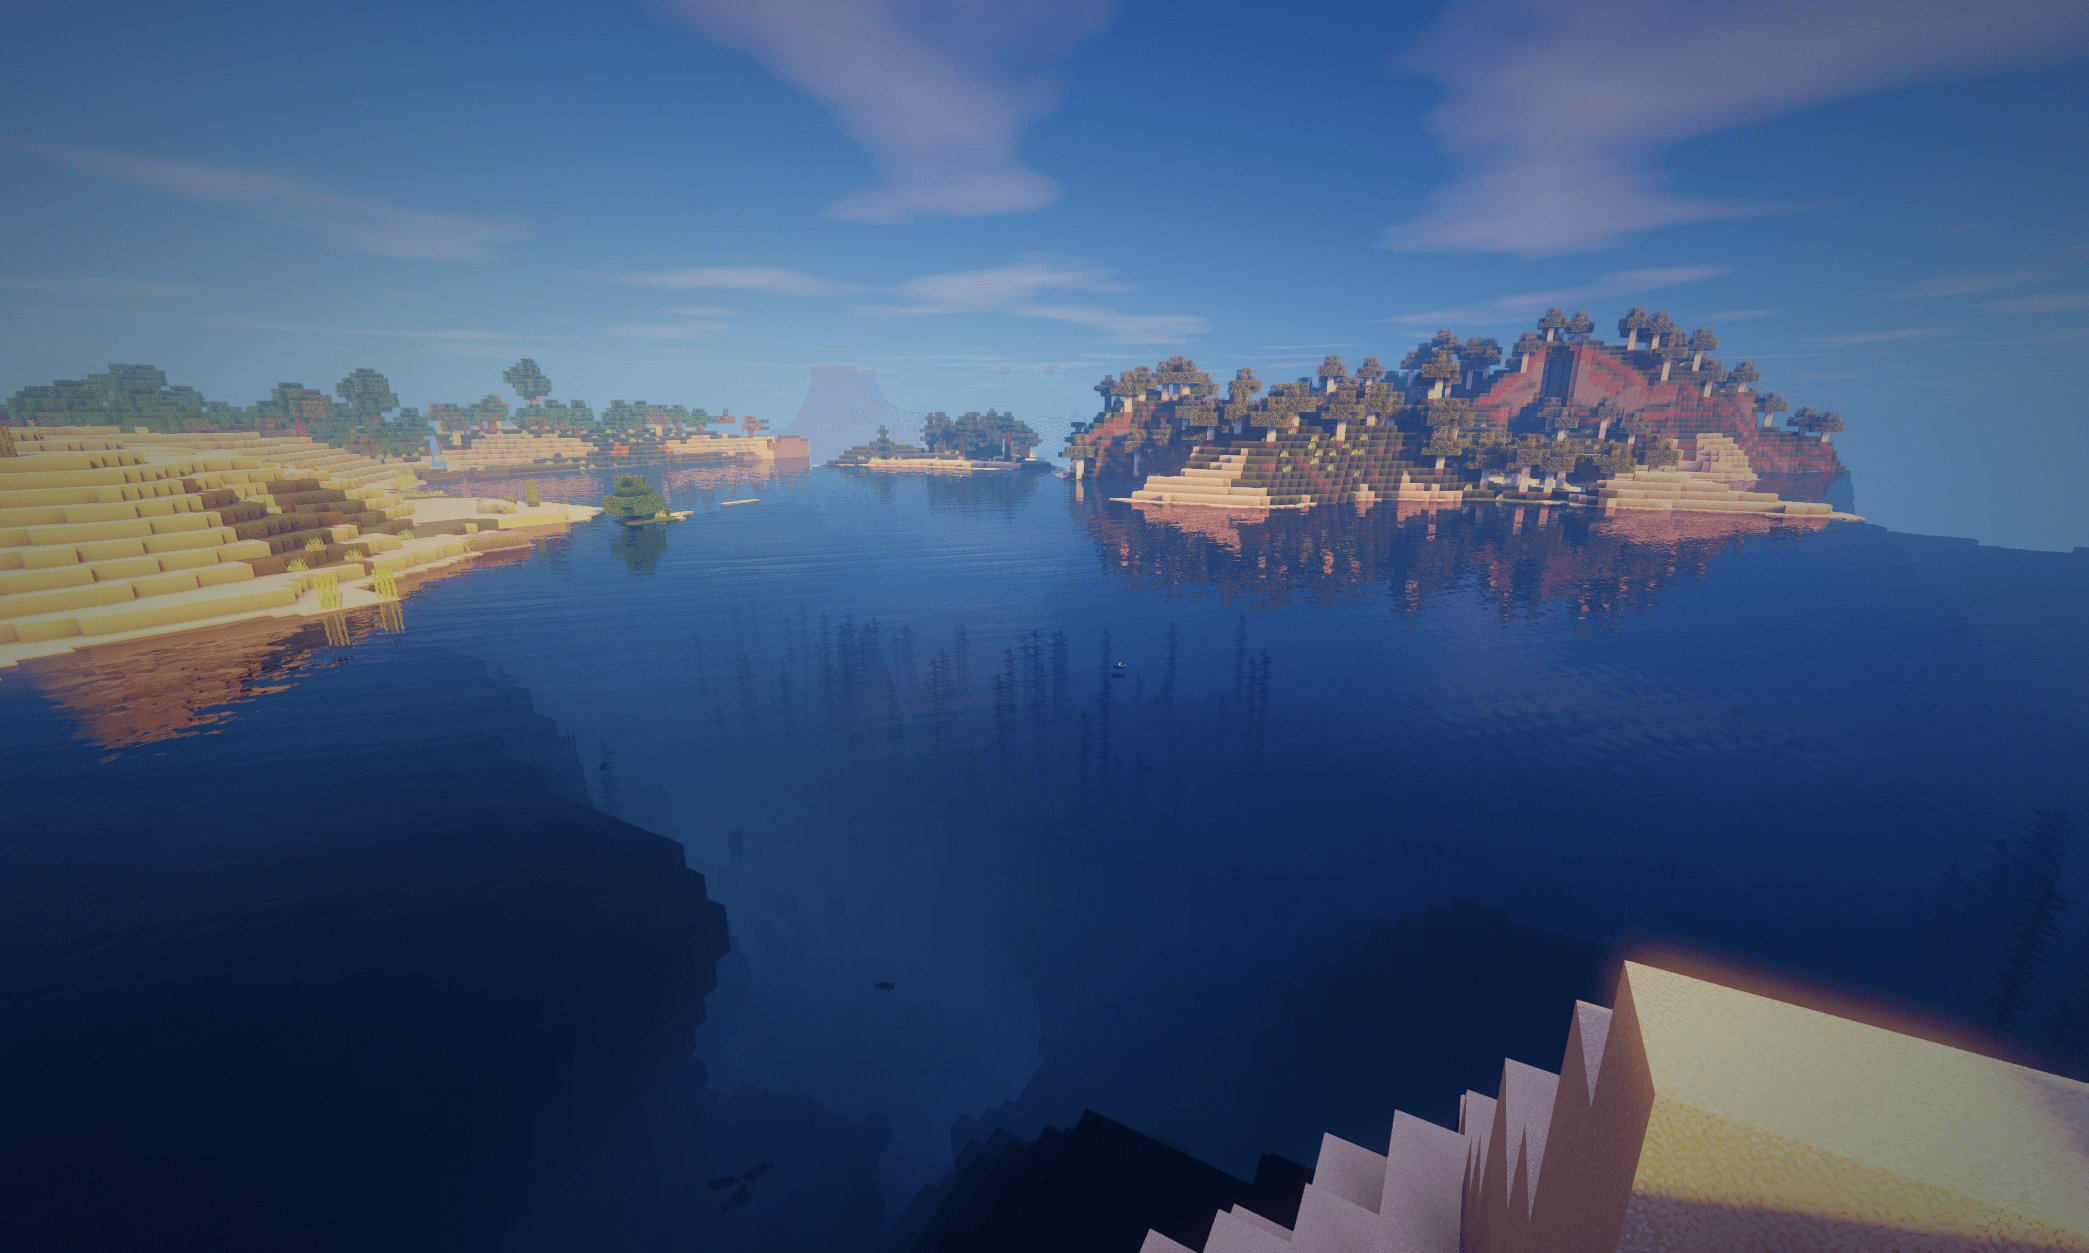
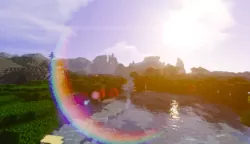
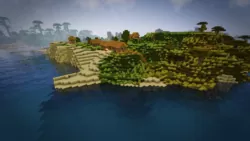
Ziipzaap’s Shaders makes many little changes to Minecraft, which has a substantial effect on the game’s visuals. By making torch light darker, modifying lens effects, totally removing god rays during rainstorms, and adding waving effects not just to the grass and trees but also to the flowers (including the new flowers from 1.8), this shader pack does a thorough job of changing up the look and feel of Minecraft. Whether that’s enough to make it worth downloading and installing is totally up to you, the player. But if you’re using an older version of Minecraft, you could do a lot worse than this shader.
- 1.20
- 1.19.4
- 1.19.3
- 1.19.2
- 1.19.1
- 1.19
- 1.18.2
- 1.18.1
- 1.18
- 1.17.1
- 1.17
- 1.16.5
- 1.16.4
- 1.16.3
- 1.16.2
- 1.16.1
- 1.16
- 1.15.2
- 1.15.1
- 1.15
- 1.14.4
- 1.14.3
- 1.14.2
- 1.14.1
- 1.14
- 1.13.2
- 1.13.1
- 1.13
- 1.12.2
- 1.12.1
- 1.12
- 1.11.2
- 1.11.1
- 1.11
- 1.10.2
- 1.10.1
- 1.10
- 1.9.4
- 1.9.3
- 1.9.2
- 1.9.1
- 1.9
- 1.8.9
- 1.8.8
- 1.8.7
- 1.8.6
- 1.8.5
- 1.8.4
- 1.8.3
- 1.8.2
- 1.8.1
- 1.8
- 1.7.10
- 1.7.9
- 1.7.8
- 1.7.7
- 1.7.6
- 1.7.5
- 1.7.4
- 1.7.2
- 1.7
- 1.6.4
- 1.6.2
Ziipzaap’s Shaders — Versions

Features
Over 32 new features are available in Ziipzaap’s Shaders to enhance your gaming experience.
📊 Performance Impacts
Decrease in performance can vary from device to device, driver version, and many other factors, you should test yourself on your machine for the best result.
-
- None
- No performance decreases
-
- Small
- ~5%
-
- Medium
- ~10%
-
- High
- ~25%
-
- Extreme
- +50%
-
- Ambient OcclusionMedium
- Simulating how light interacts with objects and surfaces.
-
- Atmospheric SkySmall
- Simulates realistic atmospheric scattering.
-
- BlurSmall
- Simulate how fast-moving objects appear to blur in a photograph or video.
-
- Cel ShadingSmall
- Technique used to give the game a more stylized, cartoon-like appearance.
-
- CustomizationNone
- Customize various aspects of the game's visual effects.
-
- Depth of FieldMedium
- Making objects closer to the camera appear sharp and in focus, while objects farther away appear out of focus and blurry.
-
- Dirty LensSmall
- Simulates the effect of a dirty or scratched camera lens.
-
- Lens FlareSmall
- Simulating the way light scatters and reflects inside a camera lens.
-
- LightMedium
- Enhance the game's overall visual quality.
-
- Motion BlurHigh
- Simulates the way that fast-moving objects appear to blur in the real world.
-
- Moving CloudsMedium
- Simulates the movement of clouds across the sky and can be used to create the appearance of a dynamic and ever-changing sky
-
- Parallax WaterMedium
- Enhances the realism of water by simulating the parallax effect.
-
- Photorealistic SkyboxesMedium
- Replacing the in-game sky with high-resolution, realistic images of the sky.
-
- Rain ReflectionsMedium
- Reflections during rainy weather by simulating the way light reflects off of wet surfaces.
-
- Realistic NightskyMedium
- More realistic and immersive night sky.
-
- Realistic RainMedium
- More natural and immersive rain experience.
-
- Realistic SkyMedium
- More realistic and immersive sky experience.
-
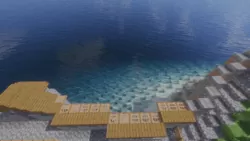
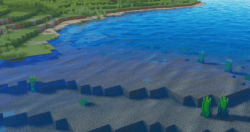
- Realistic WaterHigh
- More realistic and immersive water experience.
-
- ShadowsSmall
- Simulate how light is blocked and scattered by objects in the environment.
-
- Sun RaysMedium
- Simulate the appearance of sunlight streaming through trees leaves, objects, clouds, or other atmospheric conditions.
-
- SunriseSmall
- More realistic and immersive sunrise experience.
-
- SunsetSmall
- More realistic and immersive sunset experience.
-
- Tone MappingSmall
- Adjusting the brightness, contrast, and saturation levels.
-
- VignetteNone
- Darkening effect around the edges of the screen
-
- Volumetric LightHigh
- Simulating the scattering of light in the atmosphere and in the environment.
-
- Water ReflectionsMedium
- Simulating reflections on the surface of the water.
-
- Water WavesMedium
- Movement of waves on the surface of the water.
-
- Waving GrassSmall
- Simulating the way it moves and sways in the wind.
-
- Waving LavaSmall
-
- Waving PlantsSmall
- Simulating the way they move and sway in the wind.
-
- Waving TreesSmall
- Adds movement to the leaves and branches of trees, making them look more alive and realistic.
-
- Wet EffectSmall
Ziipzaap’s Shaders allow you to change more than 24 settings to suit your needs.
| Settings |
Description |
Options |
|---|---|---|
| CELSHADING | Cartoon-like effect |
|
| CF1 |
| |
| DISTANT_BLUR | Constant distance blur |
|
| DOF | Enable depth of field (blur on non-focused objects), not compatible with motion blur! |
|
| DYNAMIC_HANDLIGHT | Emitting light around player when holding light-emitting item |
|
| GODRAYS | Enable godrays effect |
|
| HEXAGONAL_BOKEH | Disabled : circular blur shape. Enabled : hexagonal blur shape |
|
| HQ_SHADOW_FILTER |
| |
| LENS_EFFECTS | Enable lens flare effects |
|
| LENS_FLARE |
| |
| RAIN_DROPS | Create rain drops on screen |
|
| HQ_SHADOW_FILTER |
| |
| SSS |
| |
| VIGNETTE | Enable vignette effect |
|
| WATER_REFLECTIONS |
| |
| WAVING_FIRE |
| |
| WAVING_FLOWERS |
| |
| WAVING_GRASS |
| |
| WAVING_LAVA |
| |
| WAVING_LEAVES |
| |
| WAVING_LILYPAD |
| |
| WAVING_VINES |
| |
| WAVING_WATER |
| |
| WAVING_WHEAT |
|
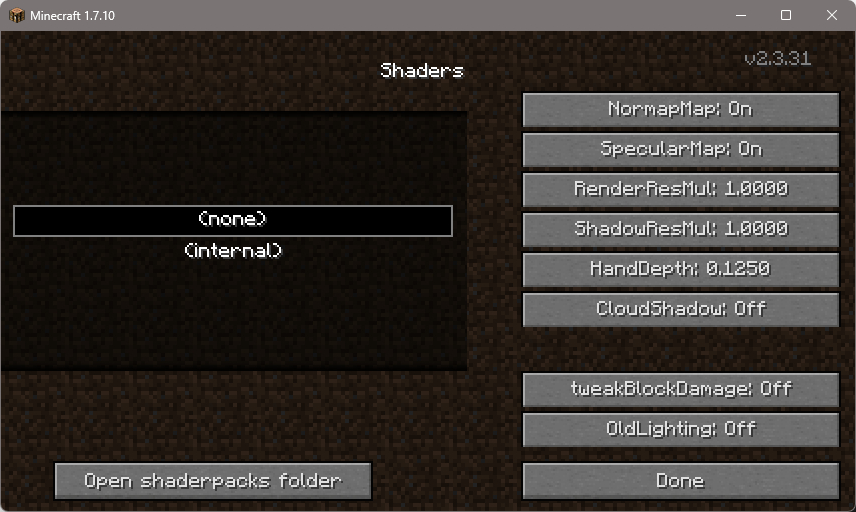
How To Install Ziipzaap’s Shaders
- Support Forge / Vanilla
- Extra features
- Good performance
- Support Fabric / Quilt
- Better performance, depend on your hardware
- No modding required Support Forge
- No modding required Older versions of Minecraft are supported
Optifine Installation Guide
Note
Your device must have Java installed to run the Forge and Optifine installers.
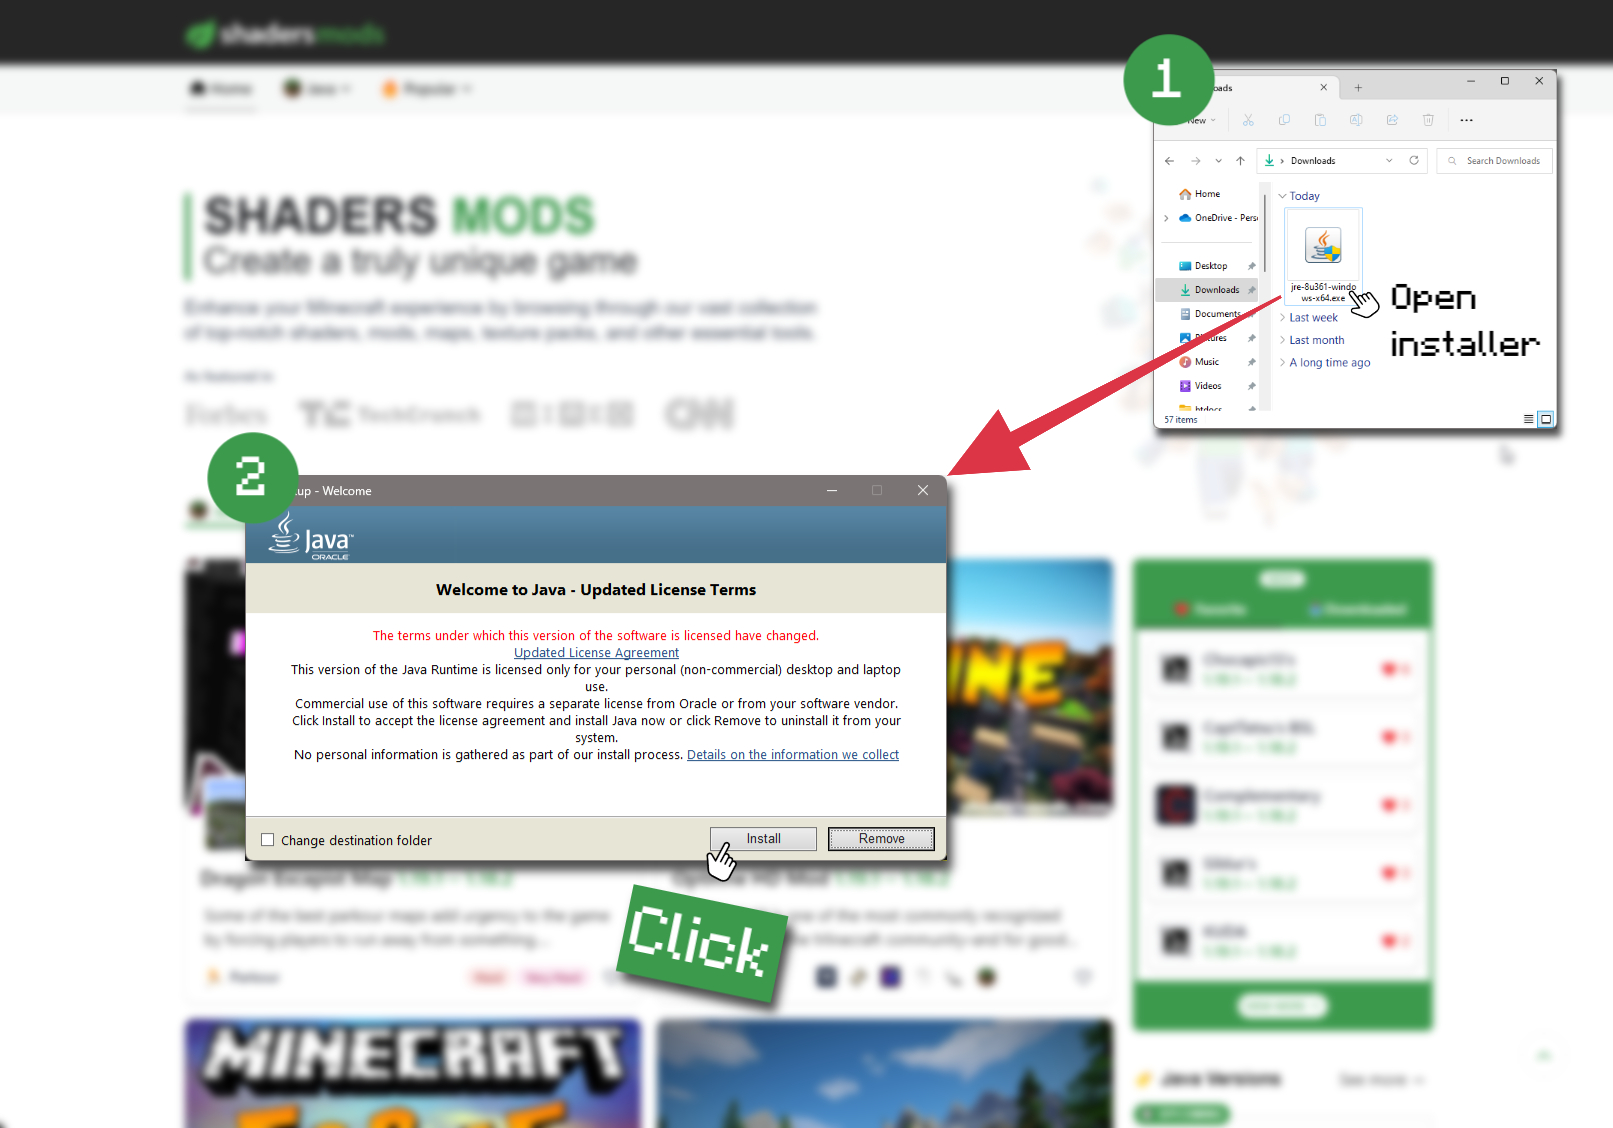
Quick Java Installation Guide
-
Download Java
Download the Java installer from the official website here.
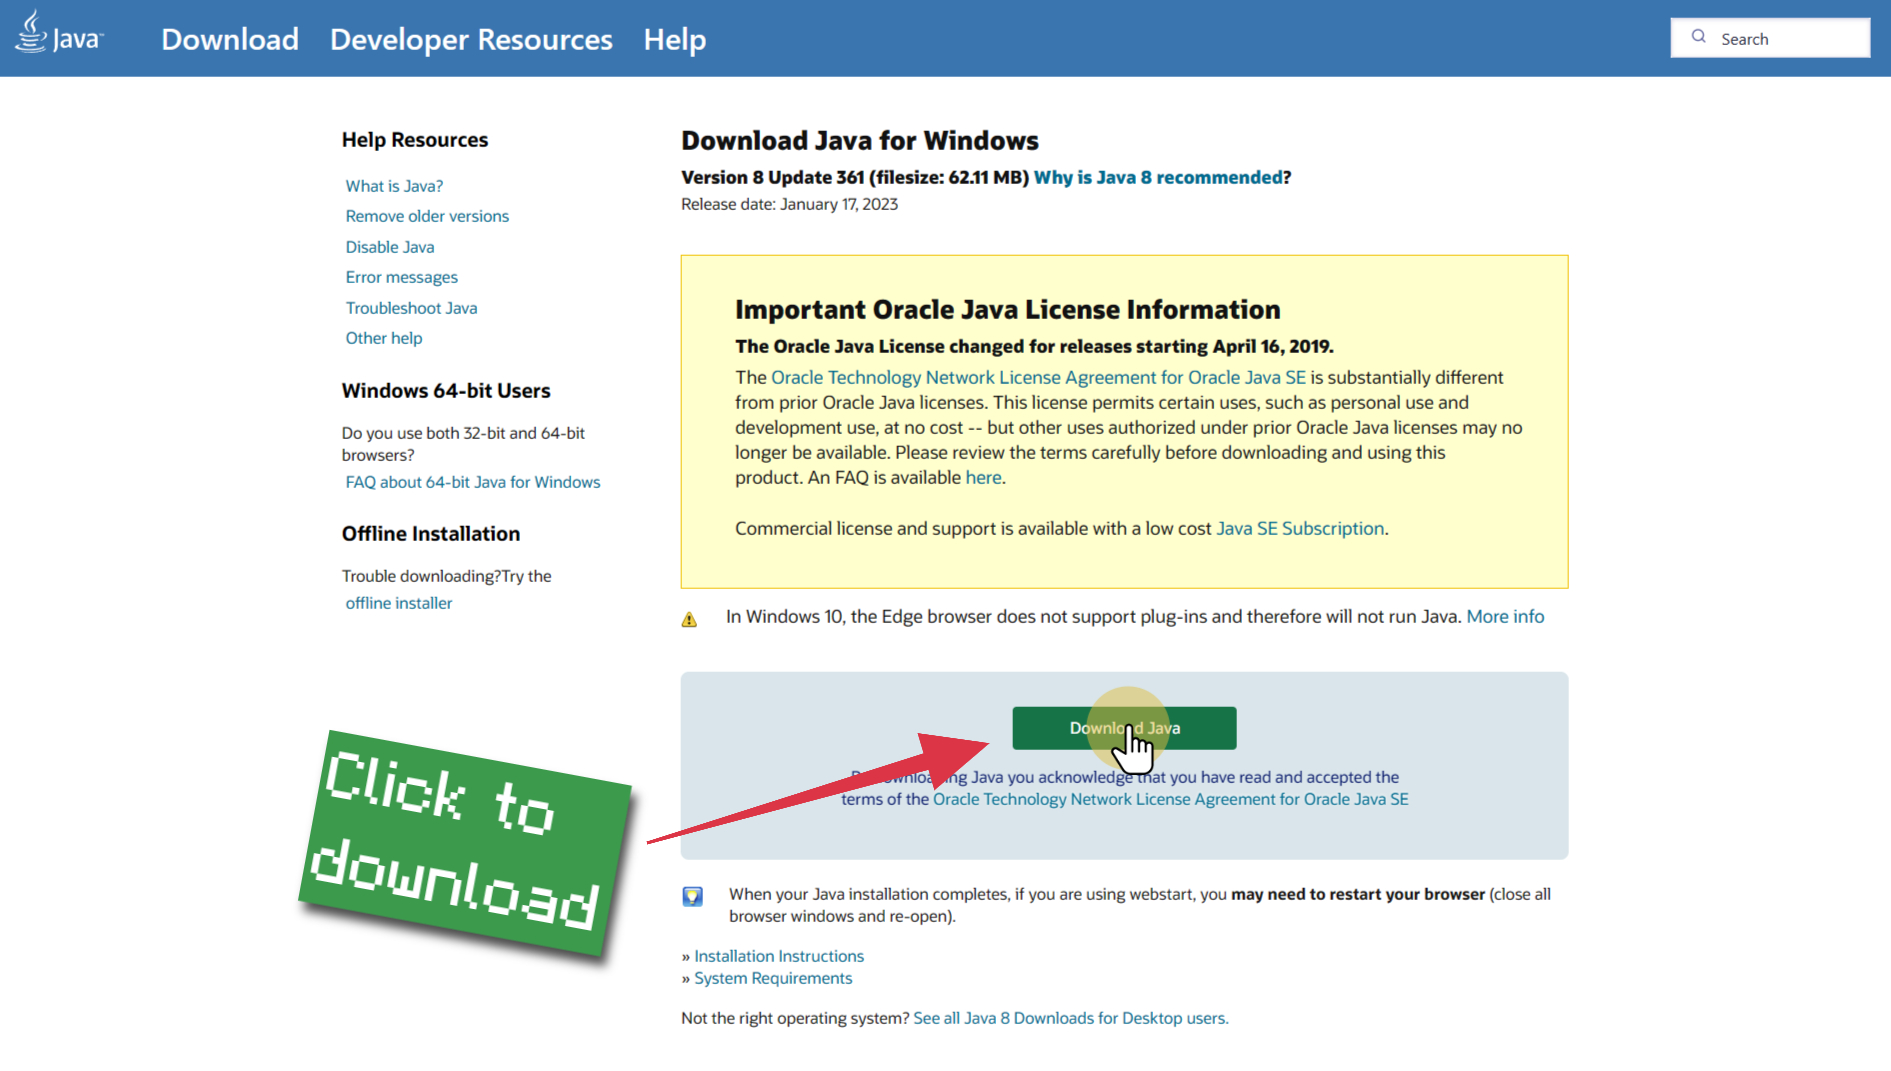
-
Open Installer
Once you have downloaded the file, run it and click the Install button.
How to install Ziipzaap’s Shaders with Optifine?
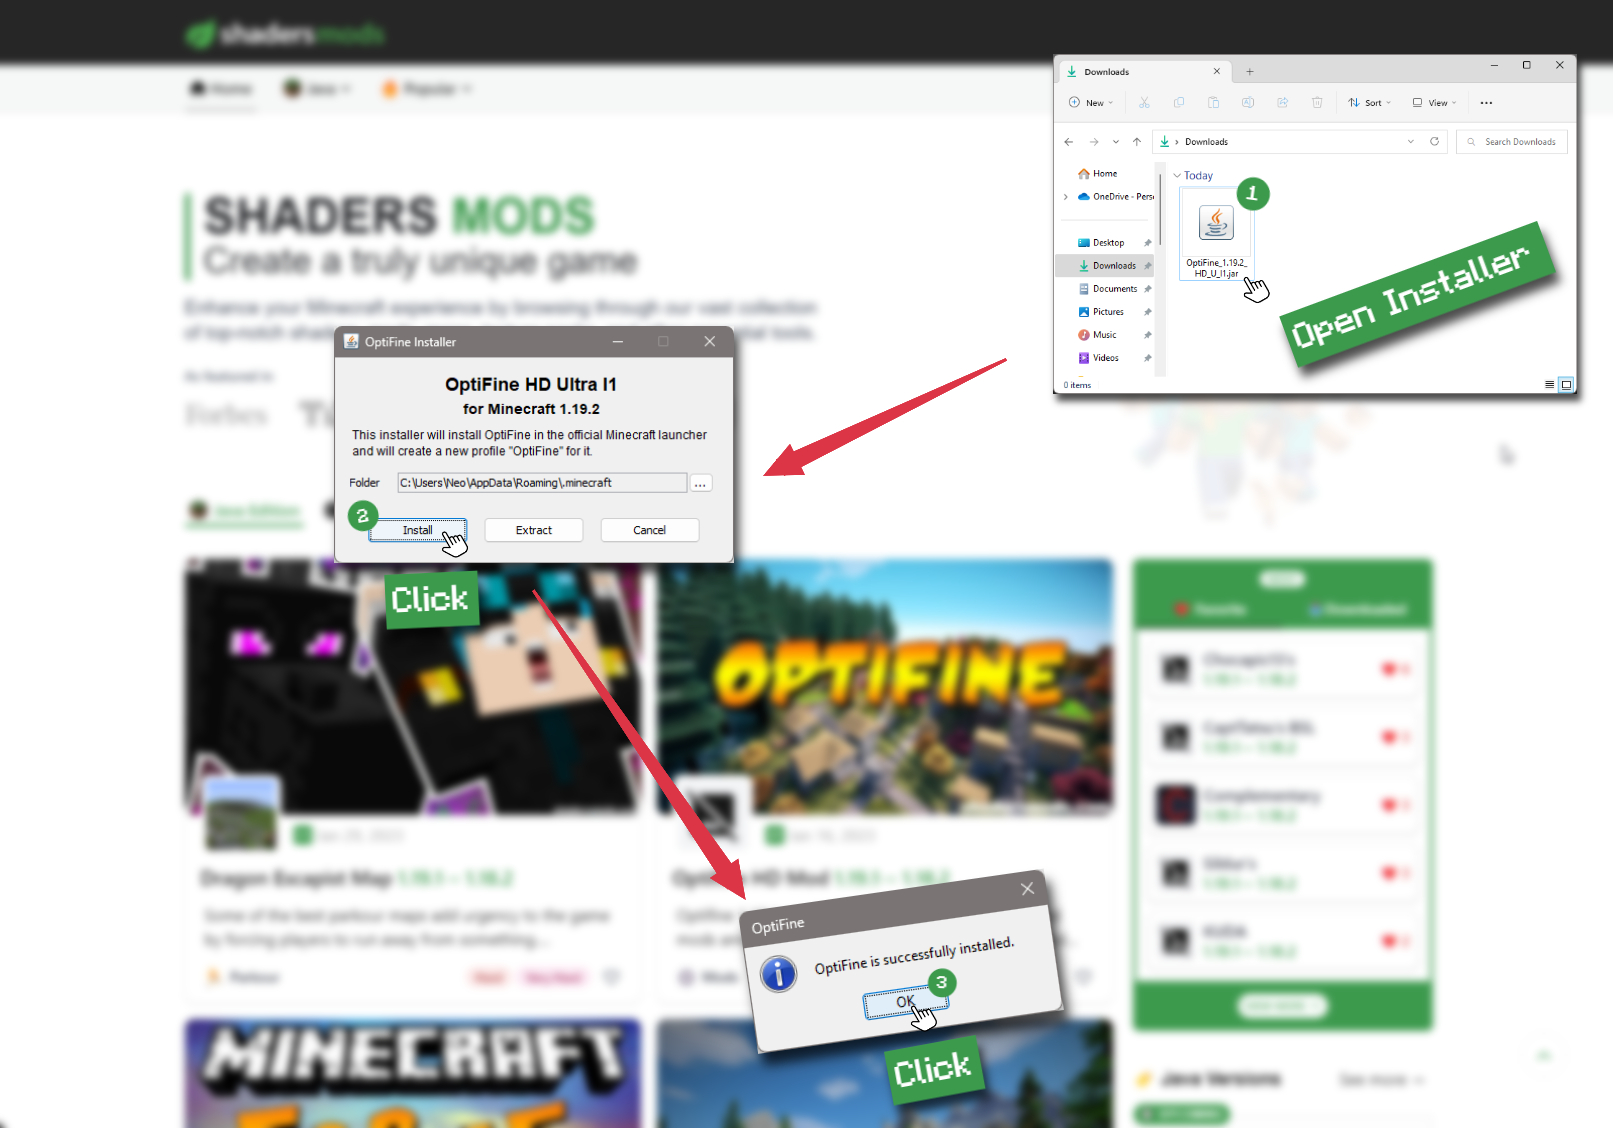
-
Download Optifine
Get the latest version of Optifine for your Minecraft version.
Download Optifine -
Install Optifine
Run the Optifine installer and follow the on-screen instructions to complete the installation.
-
Download Ziipzaap’s Shaders
Go to the download section and get shaders zip file. Unzip the file if necessary, as some shader developers may bundle multiple shader versions in one zip file.
-
Launch Minecraft
Start the Minecraft launcher and make sure you have the Optifine profile selected.

-
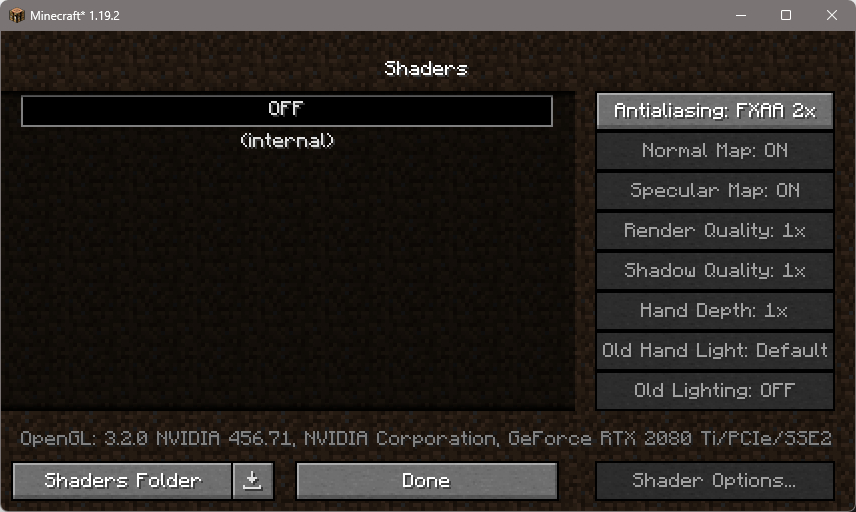
In-game Shaders menu
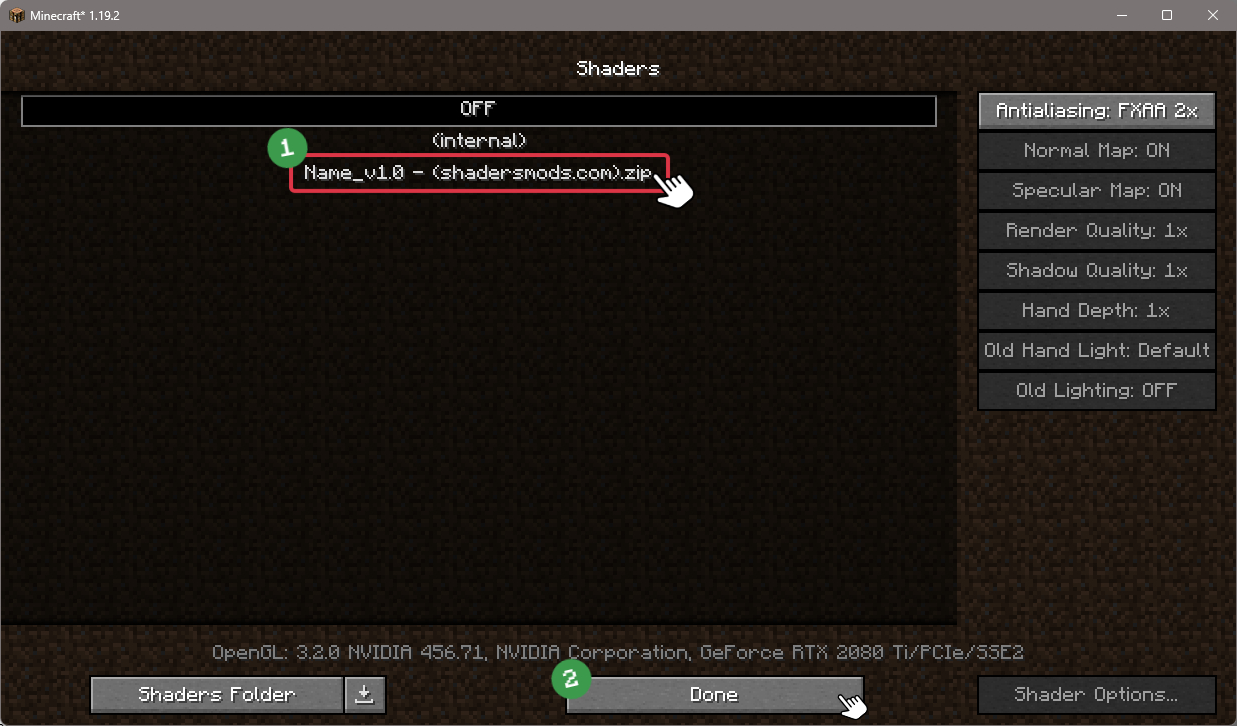
Go to Options > Video Settings > Shaders to access the shaders menu.
-
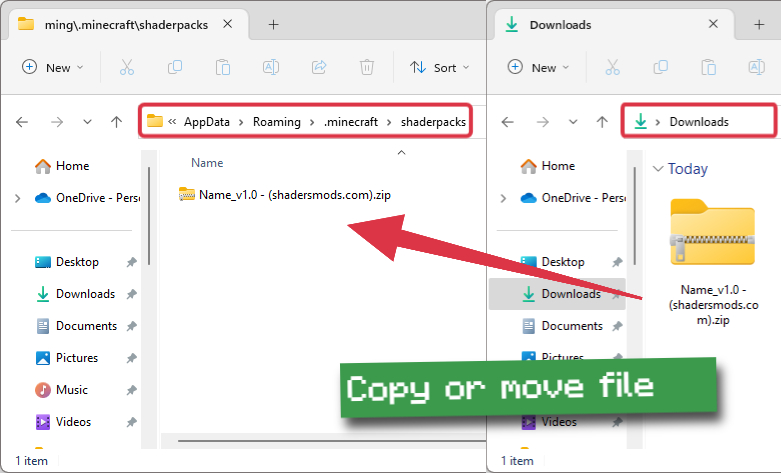
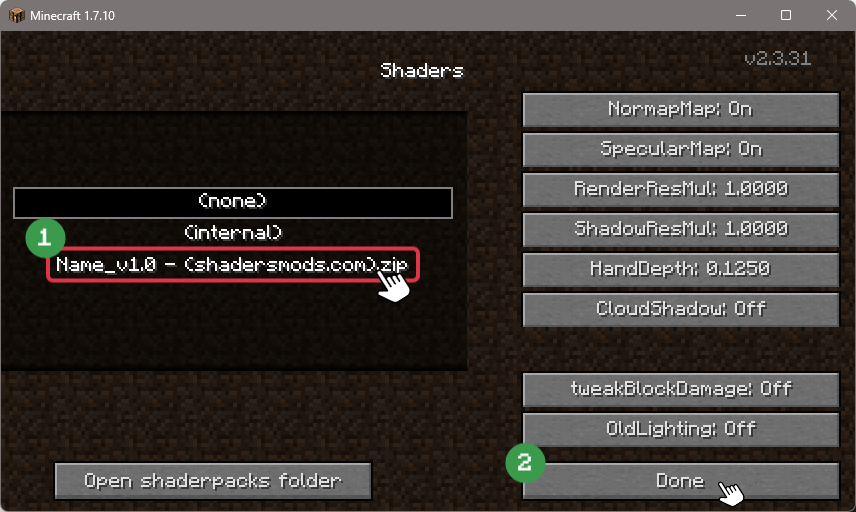
Open shaderpacks folder
Click on the "Shaders Folder" button to open the folder where shaders are stored, so you can add or remove shaders as desired.

-
Install Ziipzaap’s Shaders
Copy or move the downloaded Ziipzaap’s shaders zip file into the shaderpacks folder.

-
Select Ziipzaap’s Shaders
Choose Ziipzaap’s shader pack from the list of available shaders in the options menu.
How to install Ziipzaap’s Shaders with Forge and Optifine?
Quick Installation Guide
-
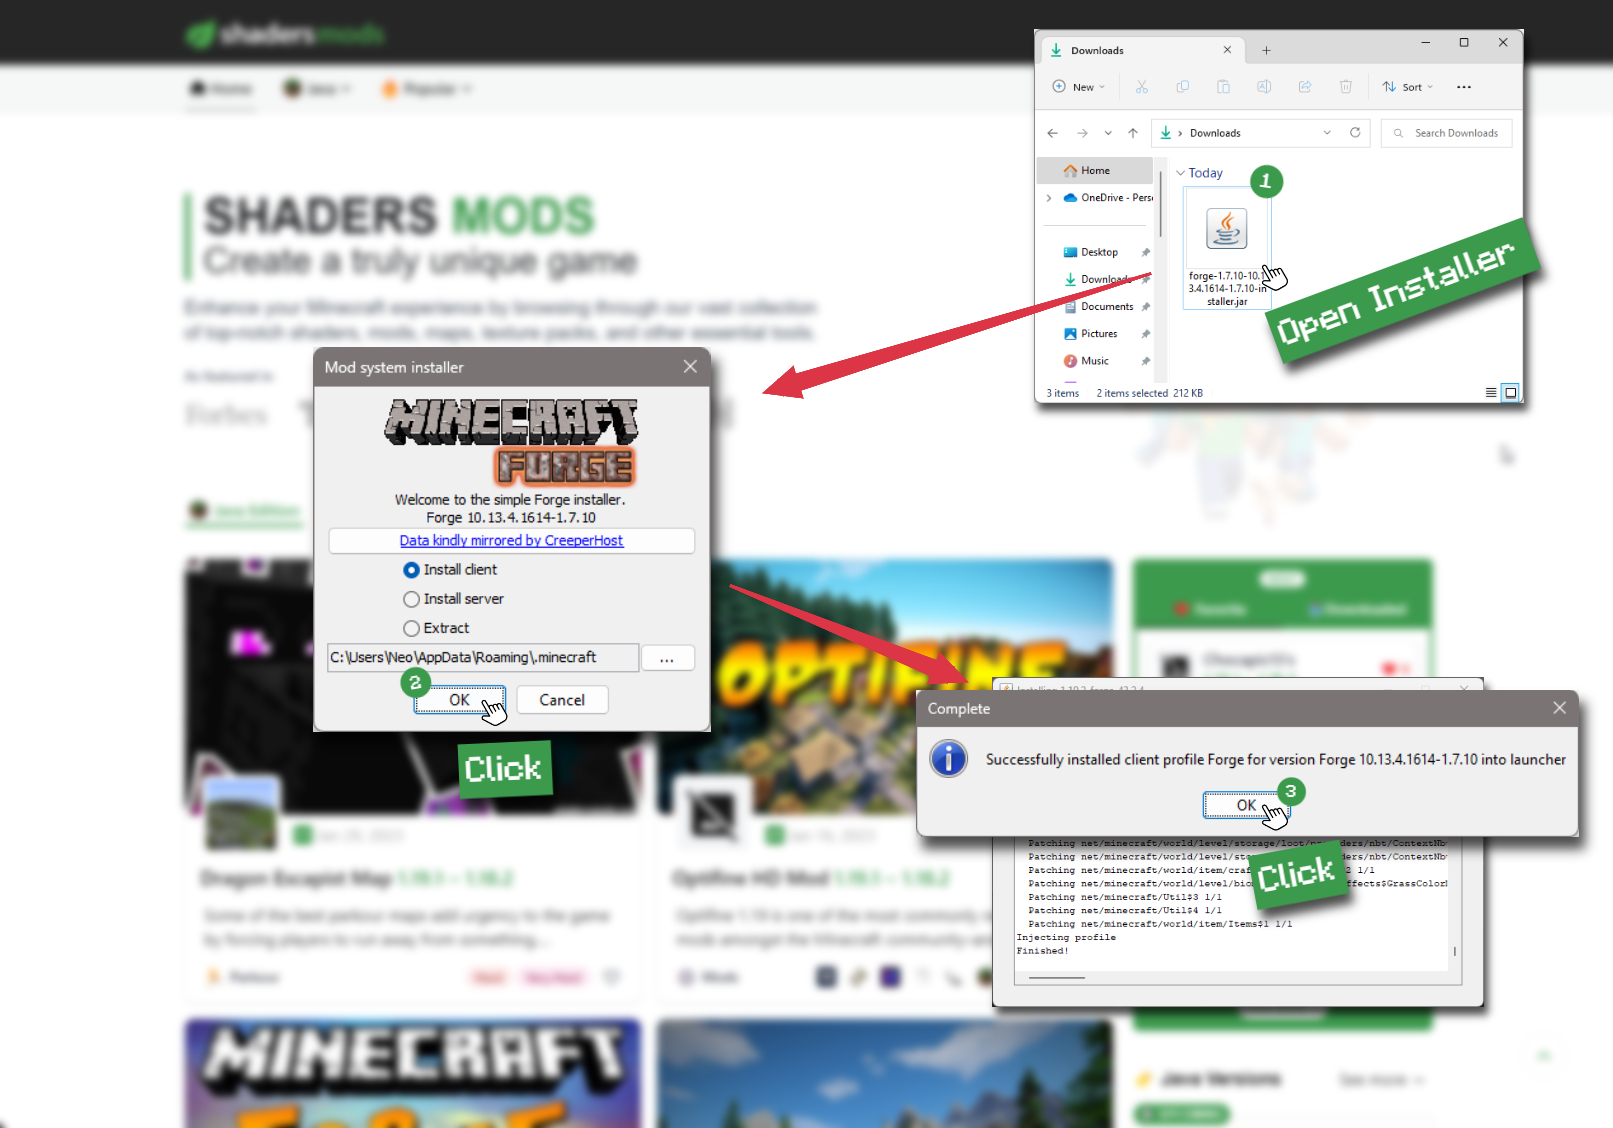
Install Forge
Obtain the latest version of Forge that is compatible with your Minecraft version.
Download Minecraft Forge -
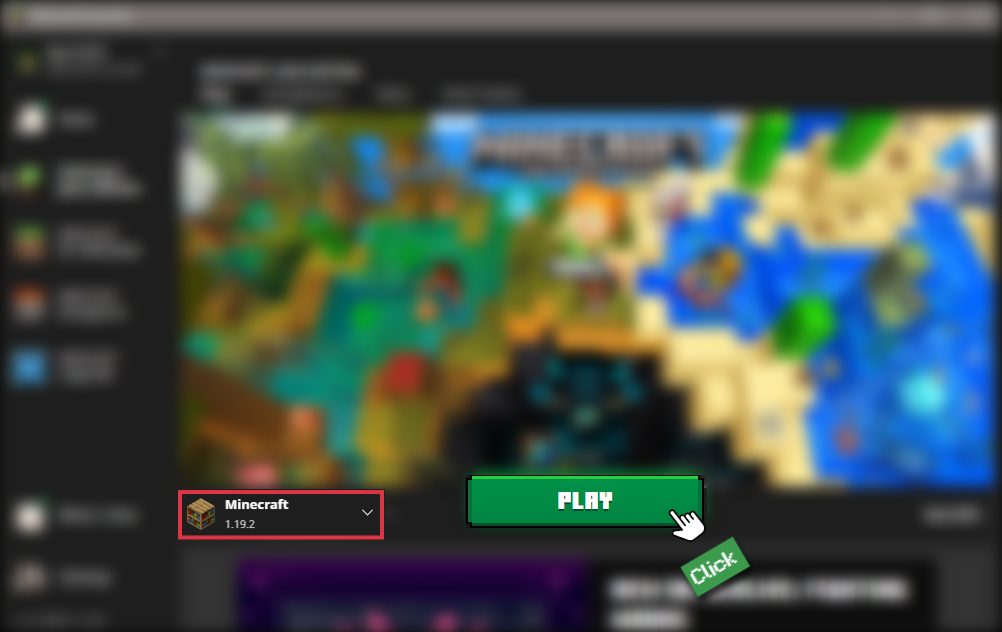
Launch Minecraft
Start the Minecraft launcher and select the version of Minecraft you want to install Forge on. Run the game once by clicking on the "Play" button to create necessary files for Forge.
-
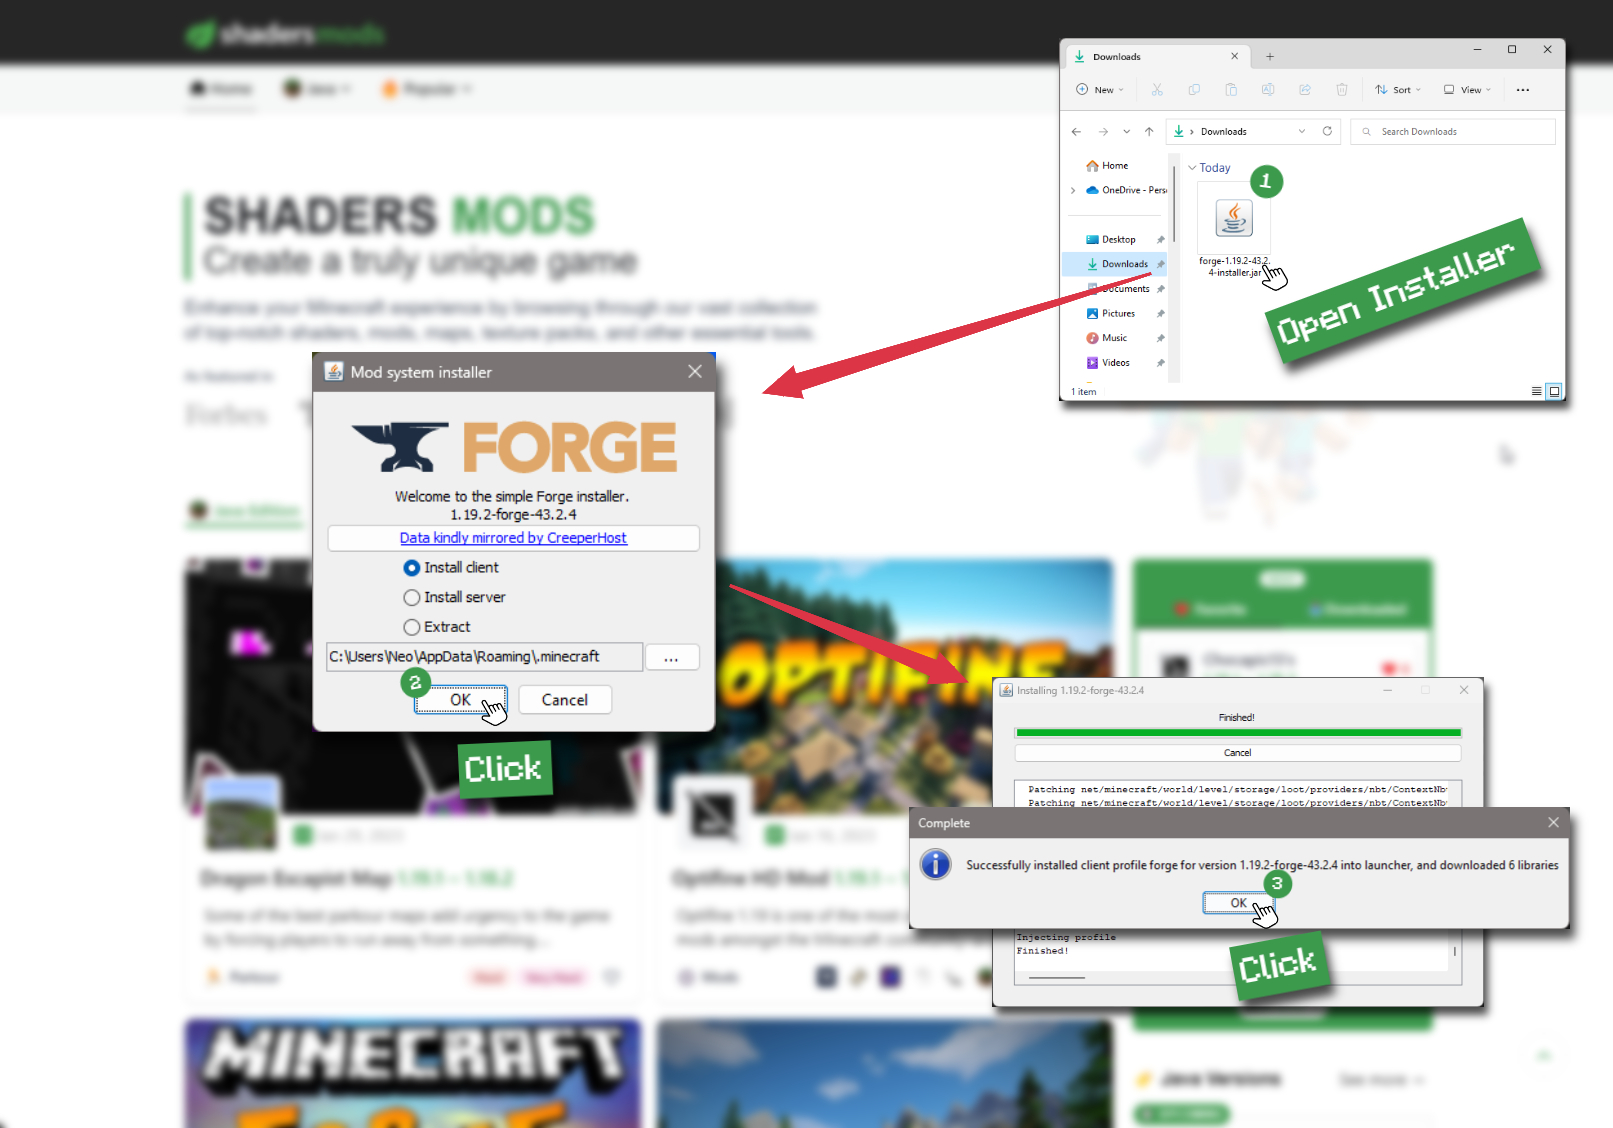
Install Forge Client
Double-click on the Forge installer jar file and choose "Install Client" in the window that appears.
-
Install Optifine
Download the Optifine jar file after Forge is installed. Move the Optifine jar file to the mods folder in the .minecraft directory.
Download Optifine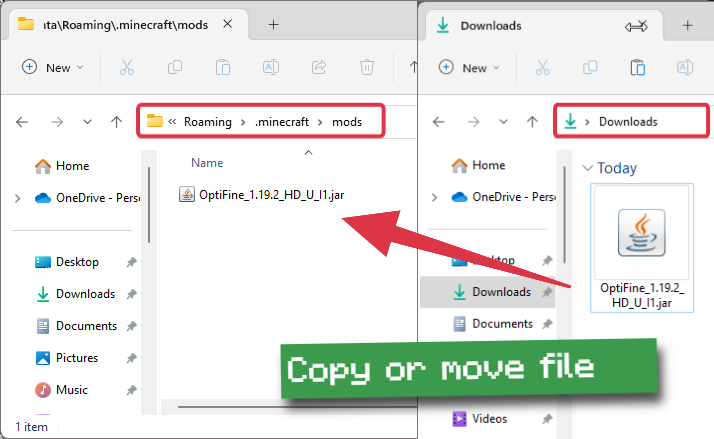
-
Launch Forge Profile
Launch Minecraft using the "Forge" profile, Optifine will be automatically loaded along with Forge.

-
Install Chocapic13's Shaders
Now the installation is the same as from the above Optifine instructions, just follow the steps starting from step 5.
Iris Installation Guide
Note
Your device must have Java installed to run the Iris installer.
Quick Java Installation Guide
-
Download Java
Download the Java installer from the official website here.
-
Open Installer
Once you have downloaded the file, run it and click the Install button.
How to install Ziipzaap’s Shaders with Iris?
-
Download Iris Shaders
Find the latest version of the Iris Shaders installer and download it.
Download Iris Installer -
Install Iris Shaders
Open the downloaded jar file, and choose the preferred game version and installation type.
⯈ Iris Install:
If you don't plan on using any other mods with Iris, choose this option.⯈ Fabric Install:
Choose this option if you want to use Iris with Fabric and other mods. The Iris jar files will be copied to the mods folder within the .minecraft directory.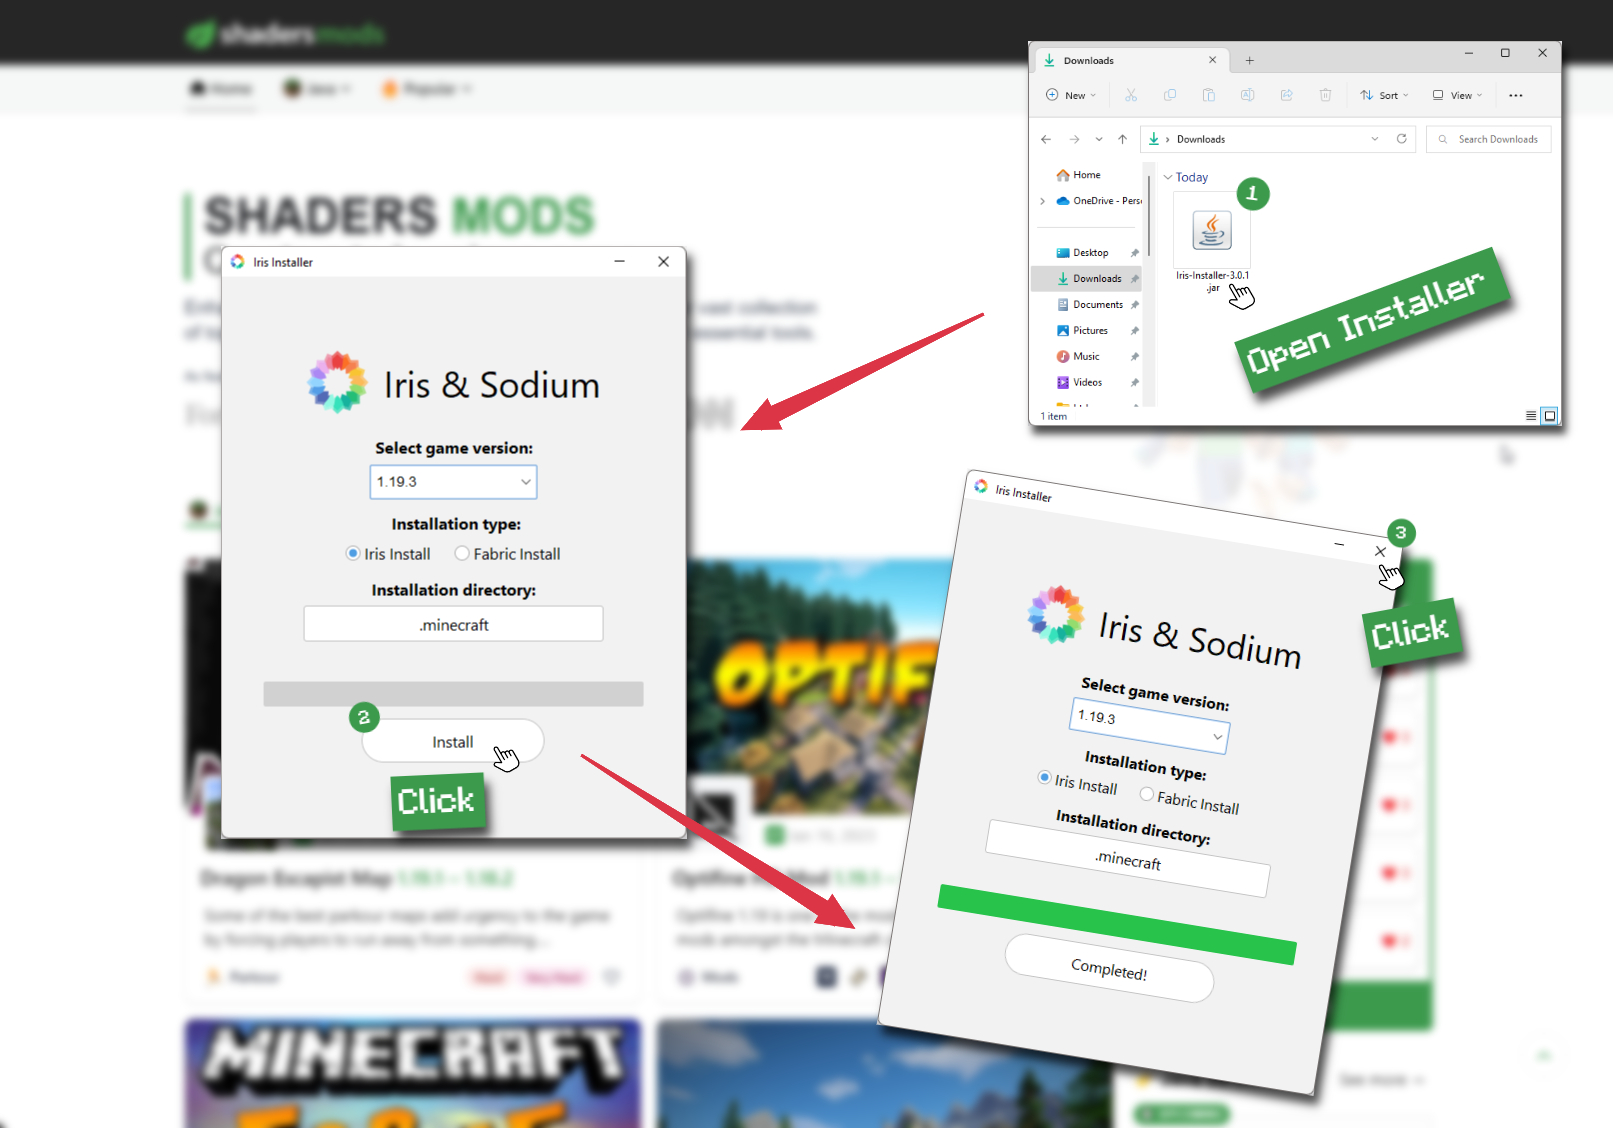
-
Start Installation
After selecting the game version and installation type, click the "Install" button to start the installation process.
-
Launch Minecraft
Start the Minecraft launcher and make sure you have the Iris profile selected.
Note
Select the Fabric profile if you opt for the Fabric installation type.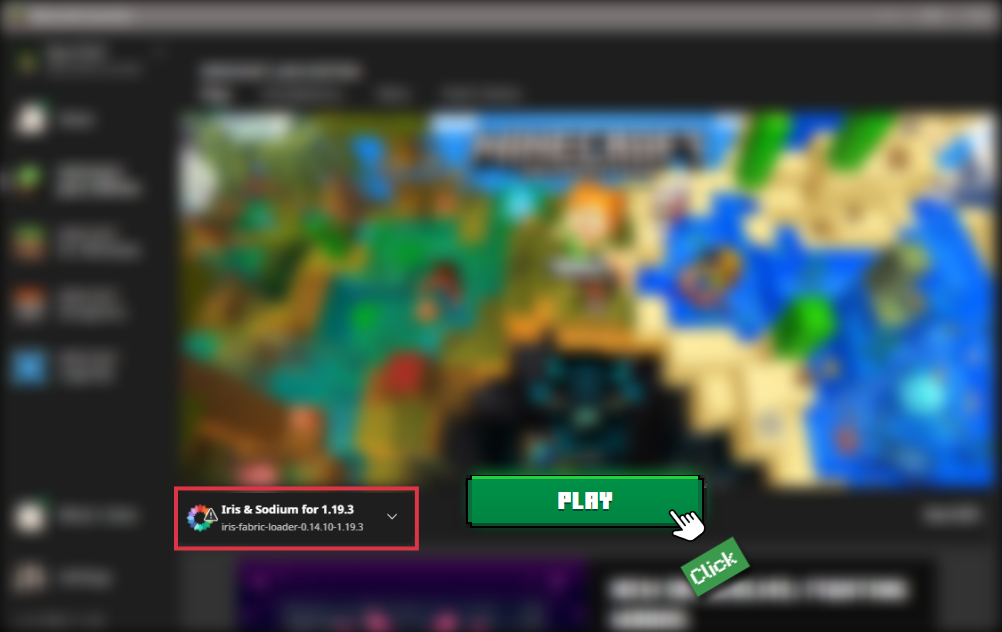
-
In-game Shader Menu
Open the Minecraft game and go to Options > Video Settings > Shader Packs to access the shaders menu.
Tip
To simplify the process, simply drag and drop the shader ZIP file directly into the Minecraft window, bypassing the next two steps.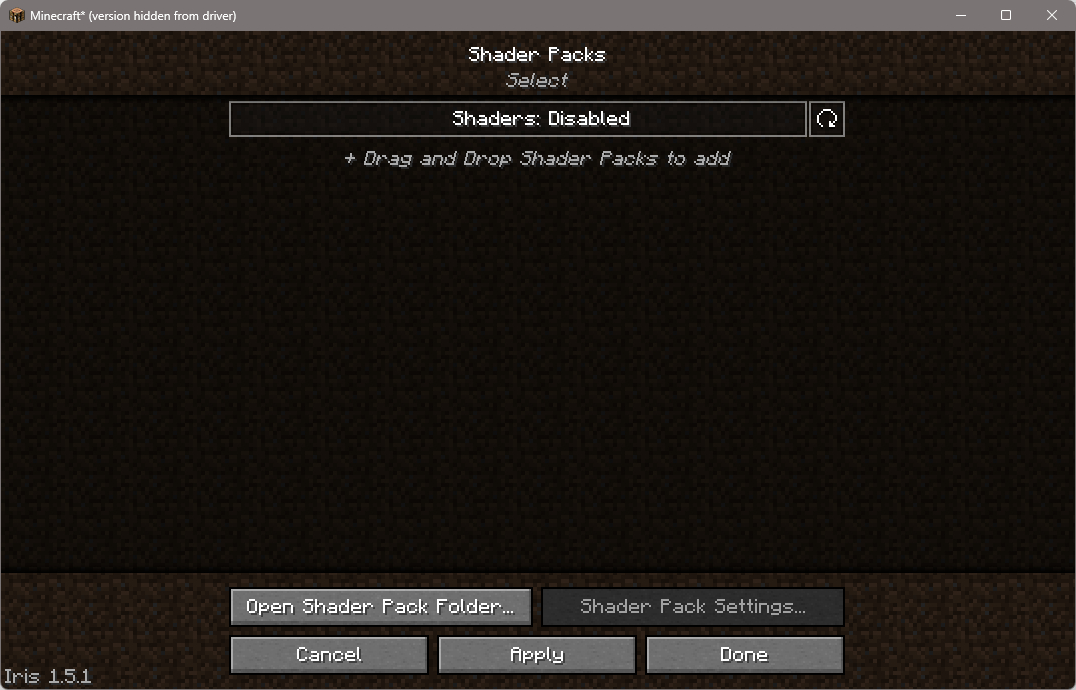
-
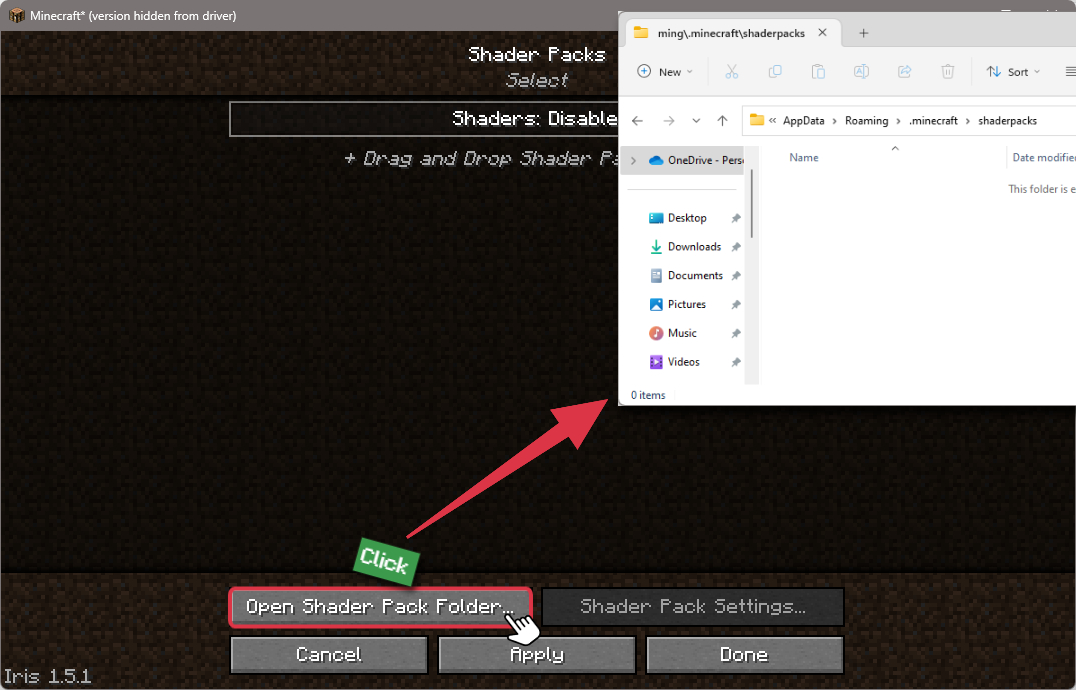
Open shaderpacks folder
Click on the "Open Shader Pack Folder" button to access the folder where shaders are stored.
-
Install Ziipzaap’s Shaders
Copy or move the shaders zip file into the shaderpacks folder.
-
Select Ziipzaap’s Shaders
Choose installed shader pack from the list of available shaders in the options menu and click the "Apply" or "Done" button to select it.
Tip
When the shader pack is selected, its name will be changed to yellow.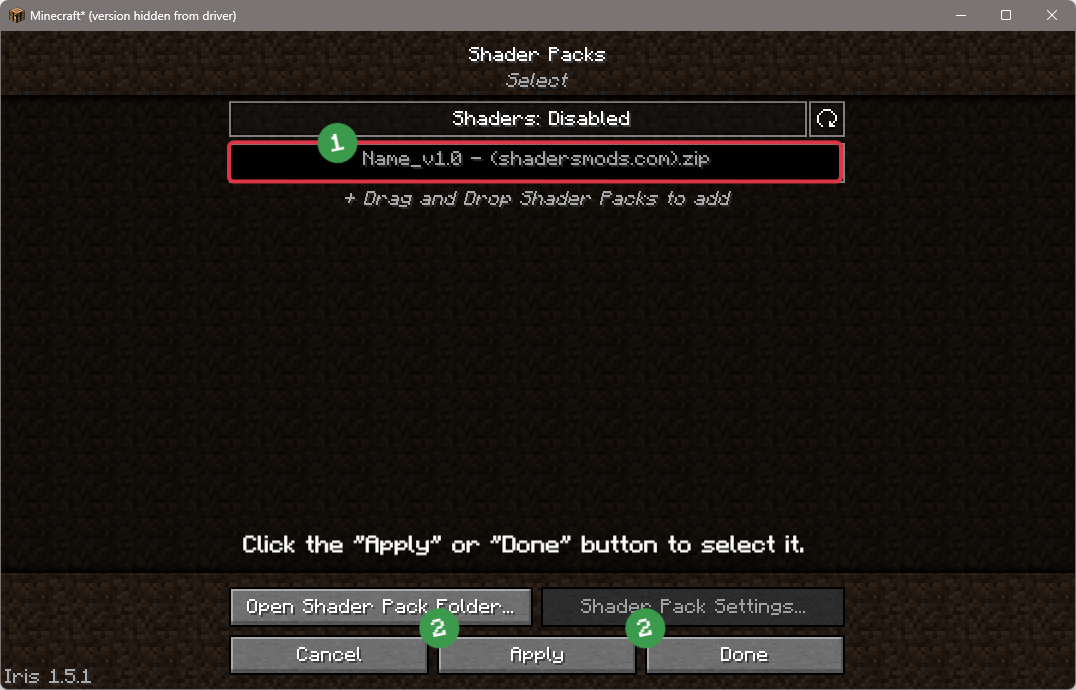
GLSL Installation Guide
Warning
How to install Ziipzaap’s Shaders with GLSL Shaders Mod?
-
Install Forge
Download the latest version of Forge that is compatible with your Minecraft version.
Download Minecraft Forge -
Launch Minecraft
Start the Minecraft launcher and select the version of Minecraft you want to install Forge on. Run the game once by clicking on the "Play" button to create the necessary files for Forge.

-
Install Forge Client
Double-click on the Forge installer jar file and choose "Install Client" in the window that appears.
-
Install GLSL Shaders Mod
Download the GLSL jar file after Forge is installed. Move the GLSL jar file to the mods folder in the .minecraft directory.
Download GLSL Shaders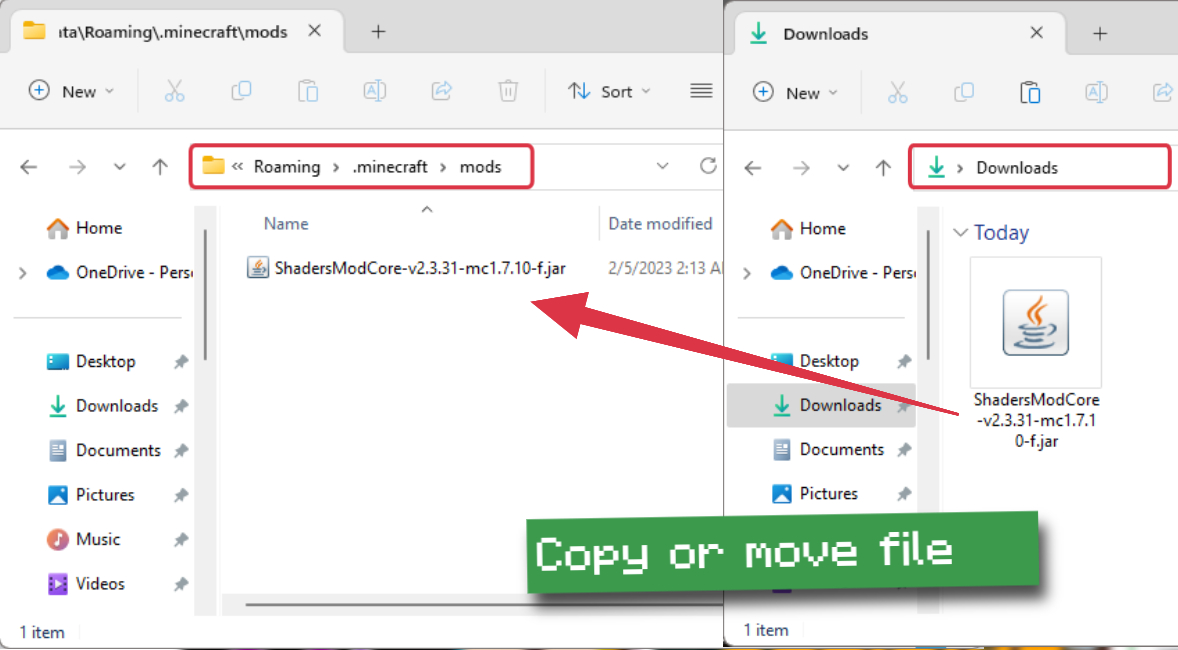
-
Launch Forge Profile
Launch Minecraft using the "Forge" profile, and GLSL Shaders will be automatically loaded along with Forge.

-
In-game Shaders menu
Go to Options > Shaders to access the shaders menu.
-
Open shaderpacks folder
Click on the "Open shaderpacks folder" button to open the folder where shaders are stored.

-
Install Ziipzaap’s Shaders
Copy or move the downloaded shaders zip file into the shaderpacks folder.

-
Select Ziipzaap’s Shaders
Choose Ziipzaap’s shader pack from the list of available shaders in the options menu.
📥 Ziipzaap’s Shaders — Download
Something You Should Know
- Our links are only from the official developer, so you can be sure they are secure.
- No modifications or edits are made to the files.
Ziipzaap's Shaders V1.2:
There are four levels of intensity: Lite, Medium, High, and Ultra
Ziipzaap's Shaders V1.1:
There are four levels of intensity: Lite, Medium, High, and Ultra
Ziipzaap's Shaders V1:
There are four levels of intensity: Lite, Medium, High, and Ultra
🔄 Update Logs
v2.0
- It is based on a new version from Chocapic13
- Water gets more violent while raining (Plants too)
- New colors, changed overall look
- Night is brighter
- Changed the torch color (less orange)
- “Smoother” clouds
- Changed sun
v1.2
- Raindrops are bluer and in different sizes.
- Fixed mistake with sun reflection
- Improved those small dots when looking at the sun
- Added some options in the files
- Added waving nether warts & acacia leaves
- Static DoF
- POM looks better
- Vignette-effect
- Changed water
- Sun looks different
- Changed overall look
- It looks more realistic when raining
- Moon looks different
v1.1
- No god rays when raining
- Lens flare is not visible anymore when raining
- SSAO in Ultra
- Changed water shader
- Adjusted lens effects
- Better sunrise/sunset
- Darker night
- Adjusted moon rays
- Flare at night less intensive
- More saturated image
- Dynamic hand light (torches only)
- New plants are waving now
- The grass is waving more
- Changed POM a little bit
- Bloom in High
- Better bloom in Ultra
- Torchlight more orange
- No DoF (All versions)
Comments (6)
It is a good shaderpacks
What nether ?
I would like if the water didn’t look so dark it literally looks like ink
I agree but it’s kinda funny
I was honestly wondering how to turn off the immense amount of torche and furnace bloom/brightness. its annoying for a base thats underground or in a mountain
The good news is it works just fine with the latest drivers from Nvidia, a series of graphics cards which are known to have issues with some Minecraft shader mods.