
Stazza’s Super Shaders 1.20, 1.19.4 → 1.18.2
Chocapic13's Edit
| Developer | 👤 Stazza85 |
|---|---|
| Style | 🌅Realistic |
| Support GPUs | |
| Loaders | |
| Performance Impact | Low |
| Settings | 66 |
| Presets | 🛠️ Low+3 |
| Features | Tone Mapping+43 |
| Created | Feb 28, 2014 |
| Updated | May 12, 2016 |
| Stats |
|
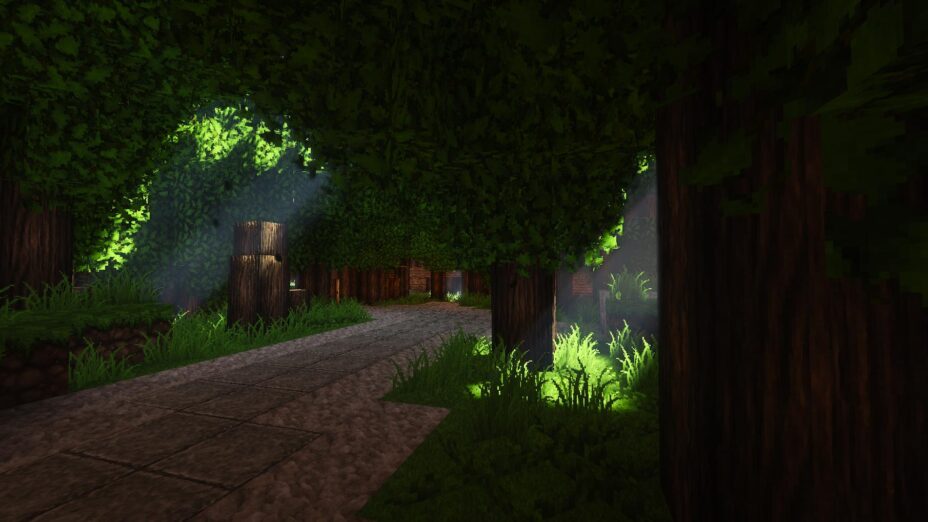
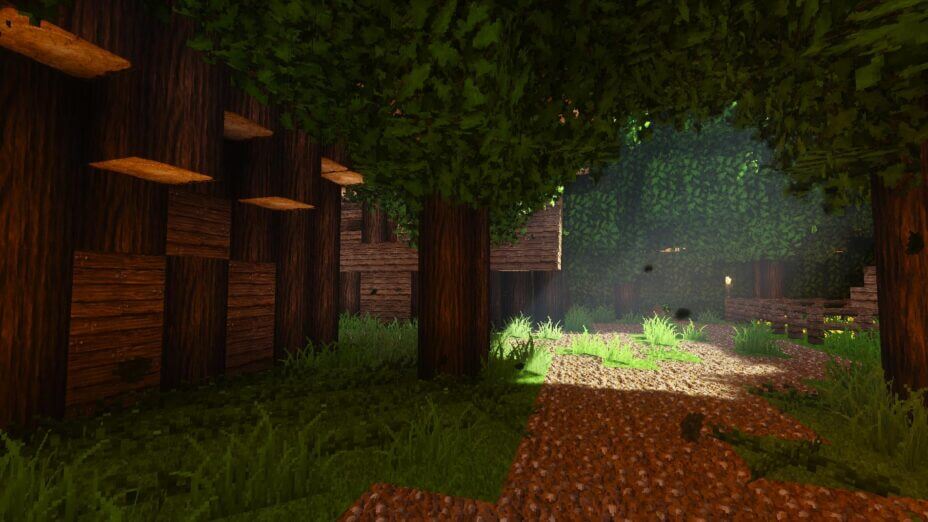
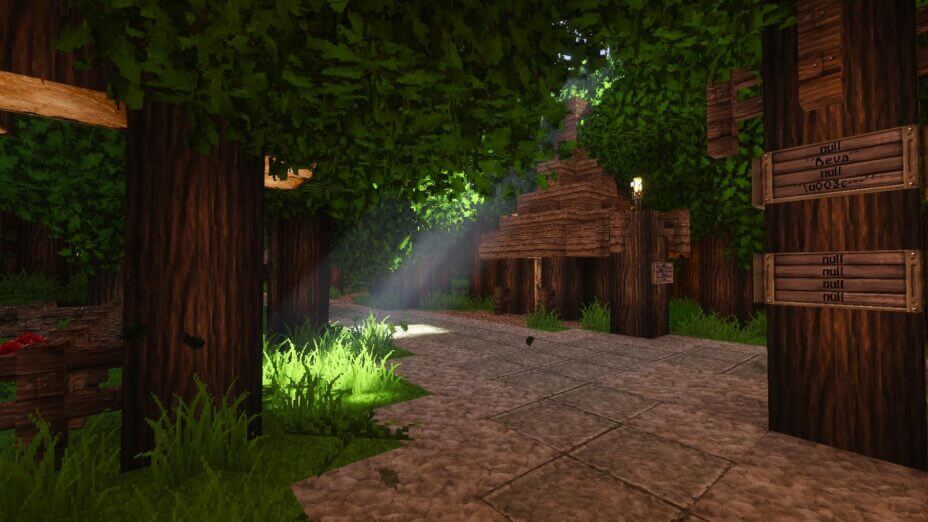
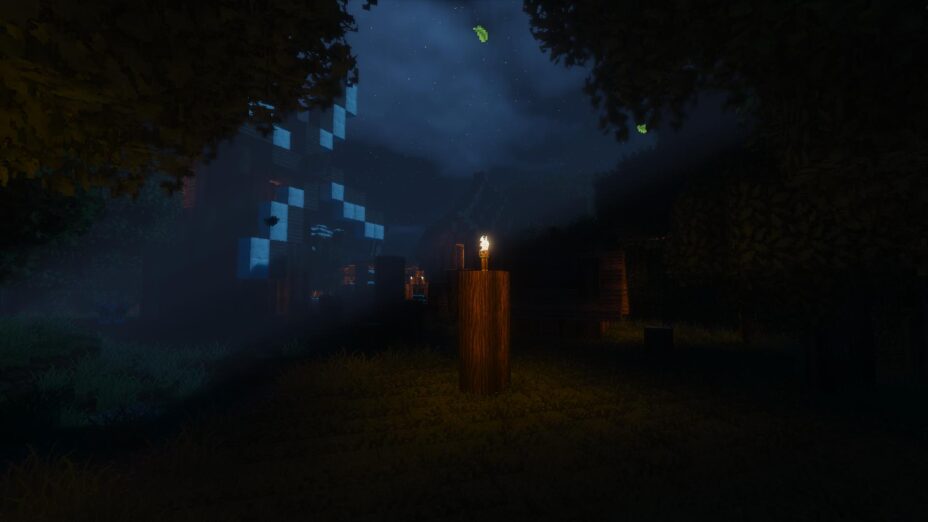
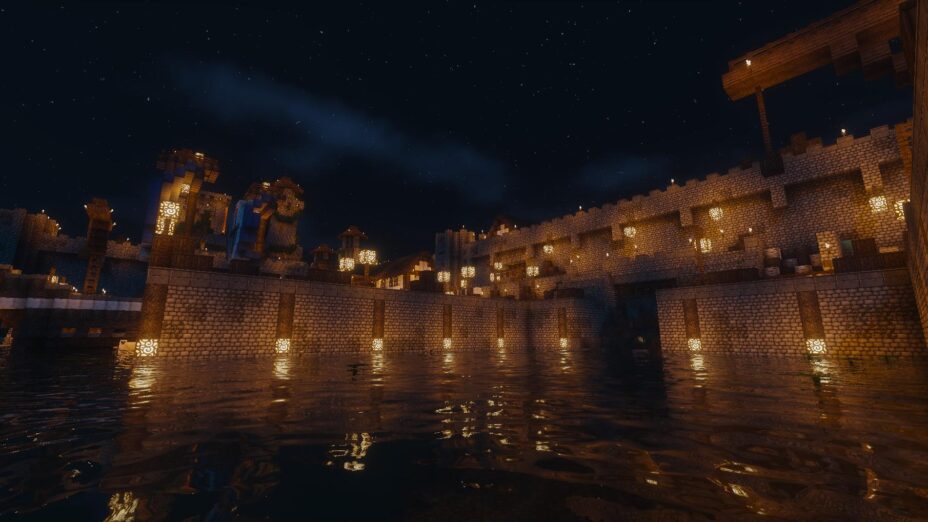
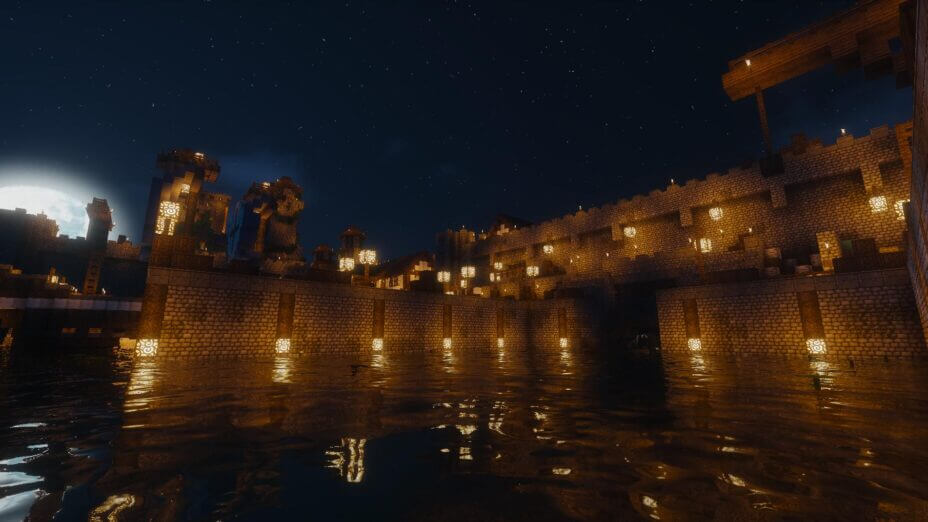
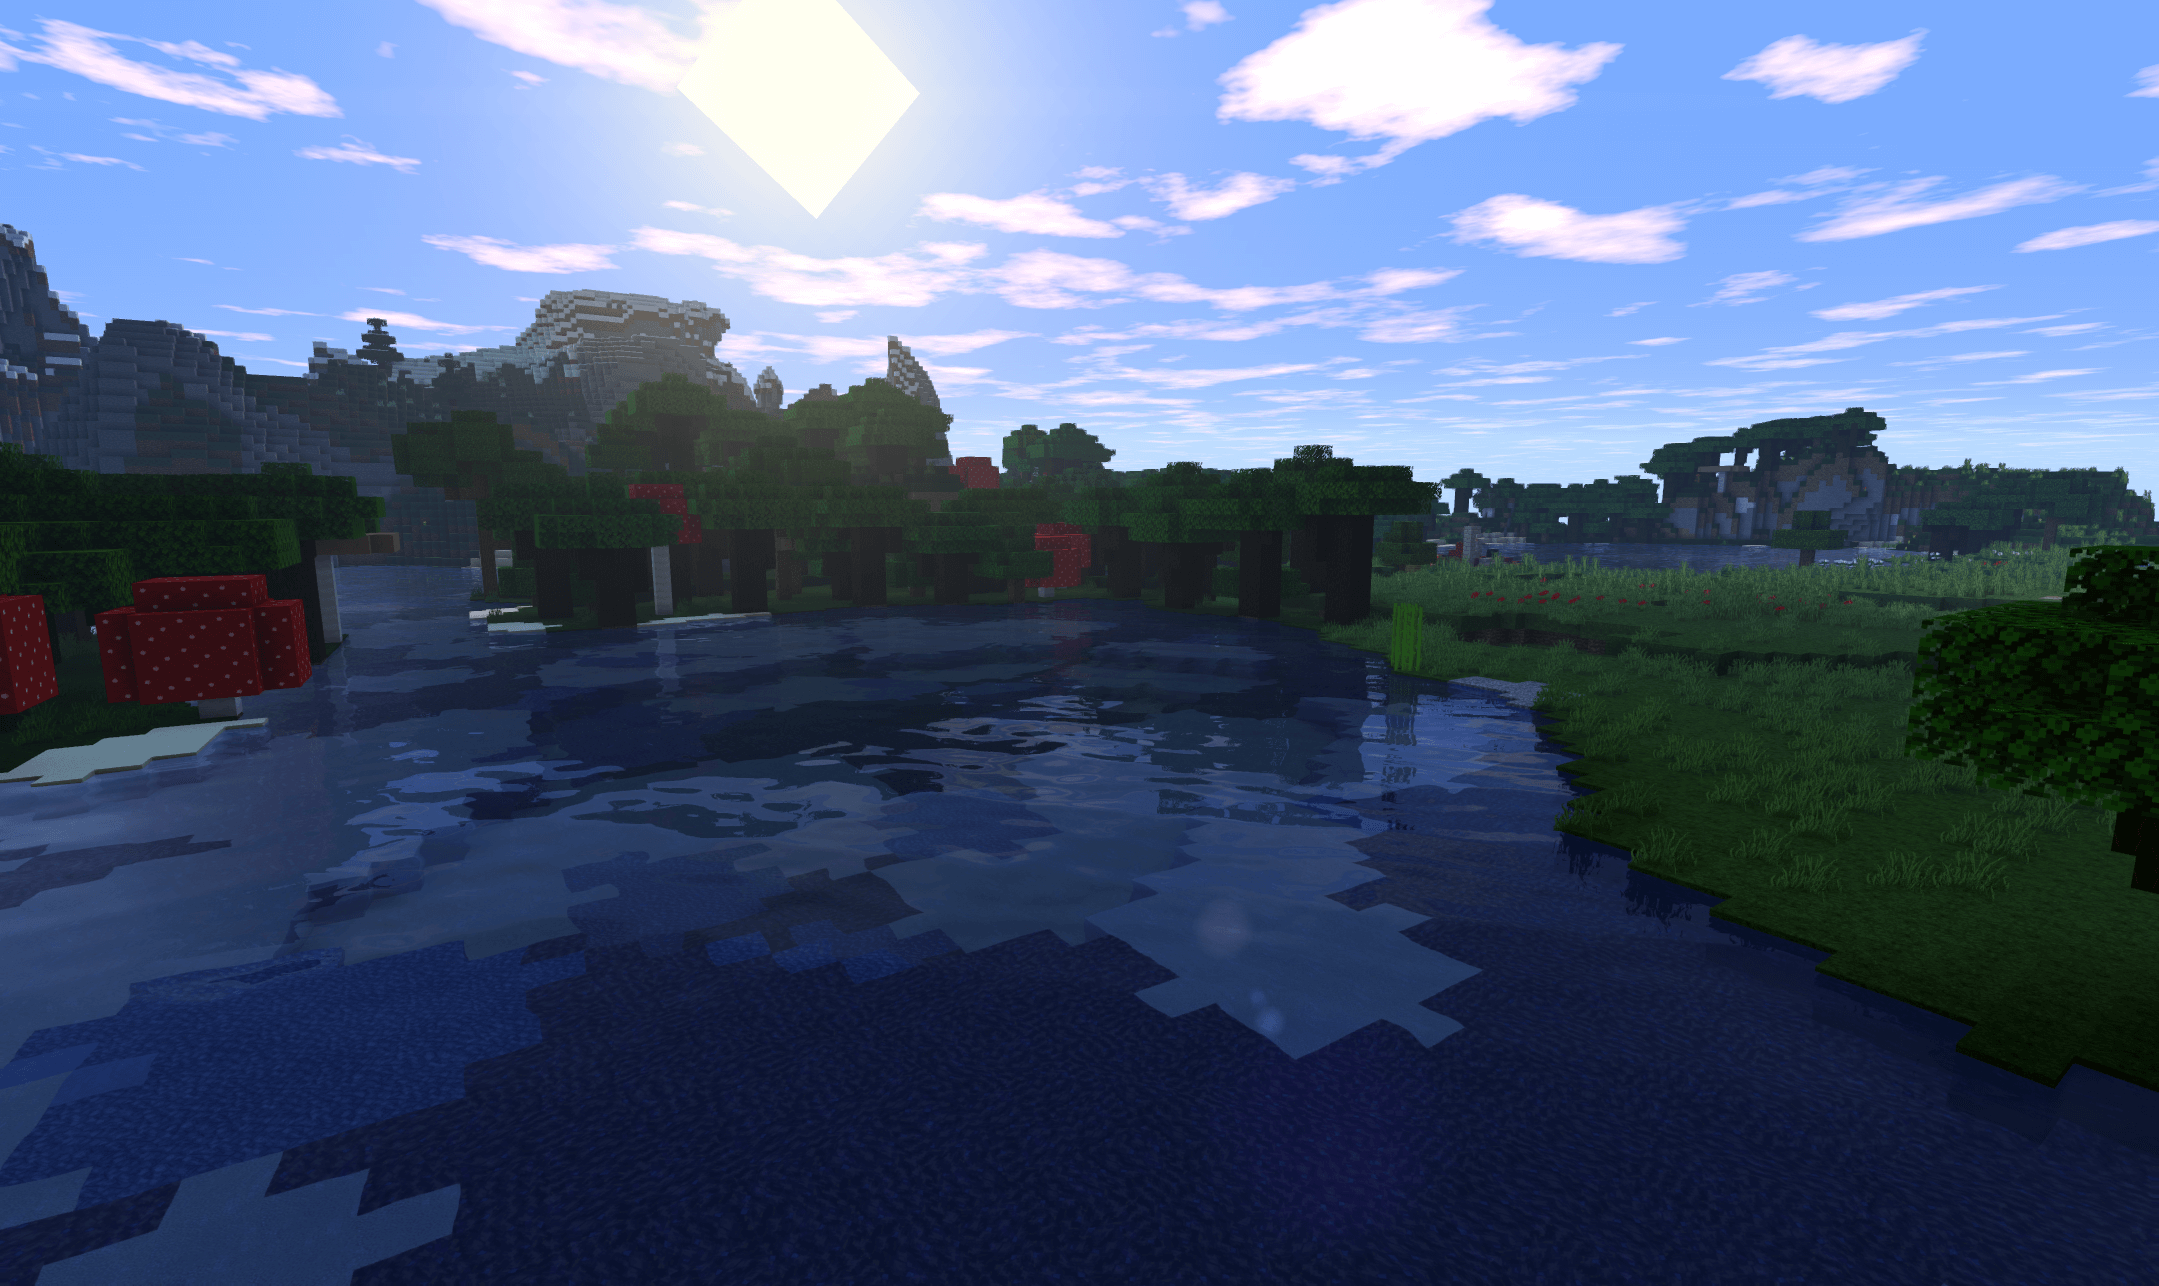
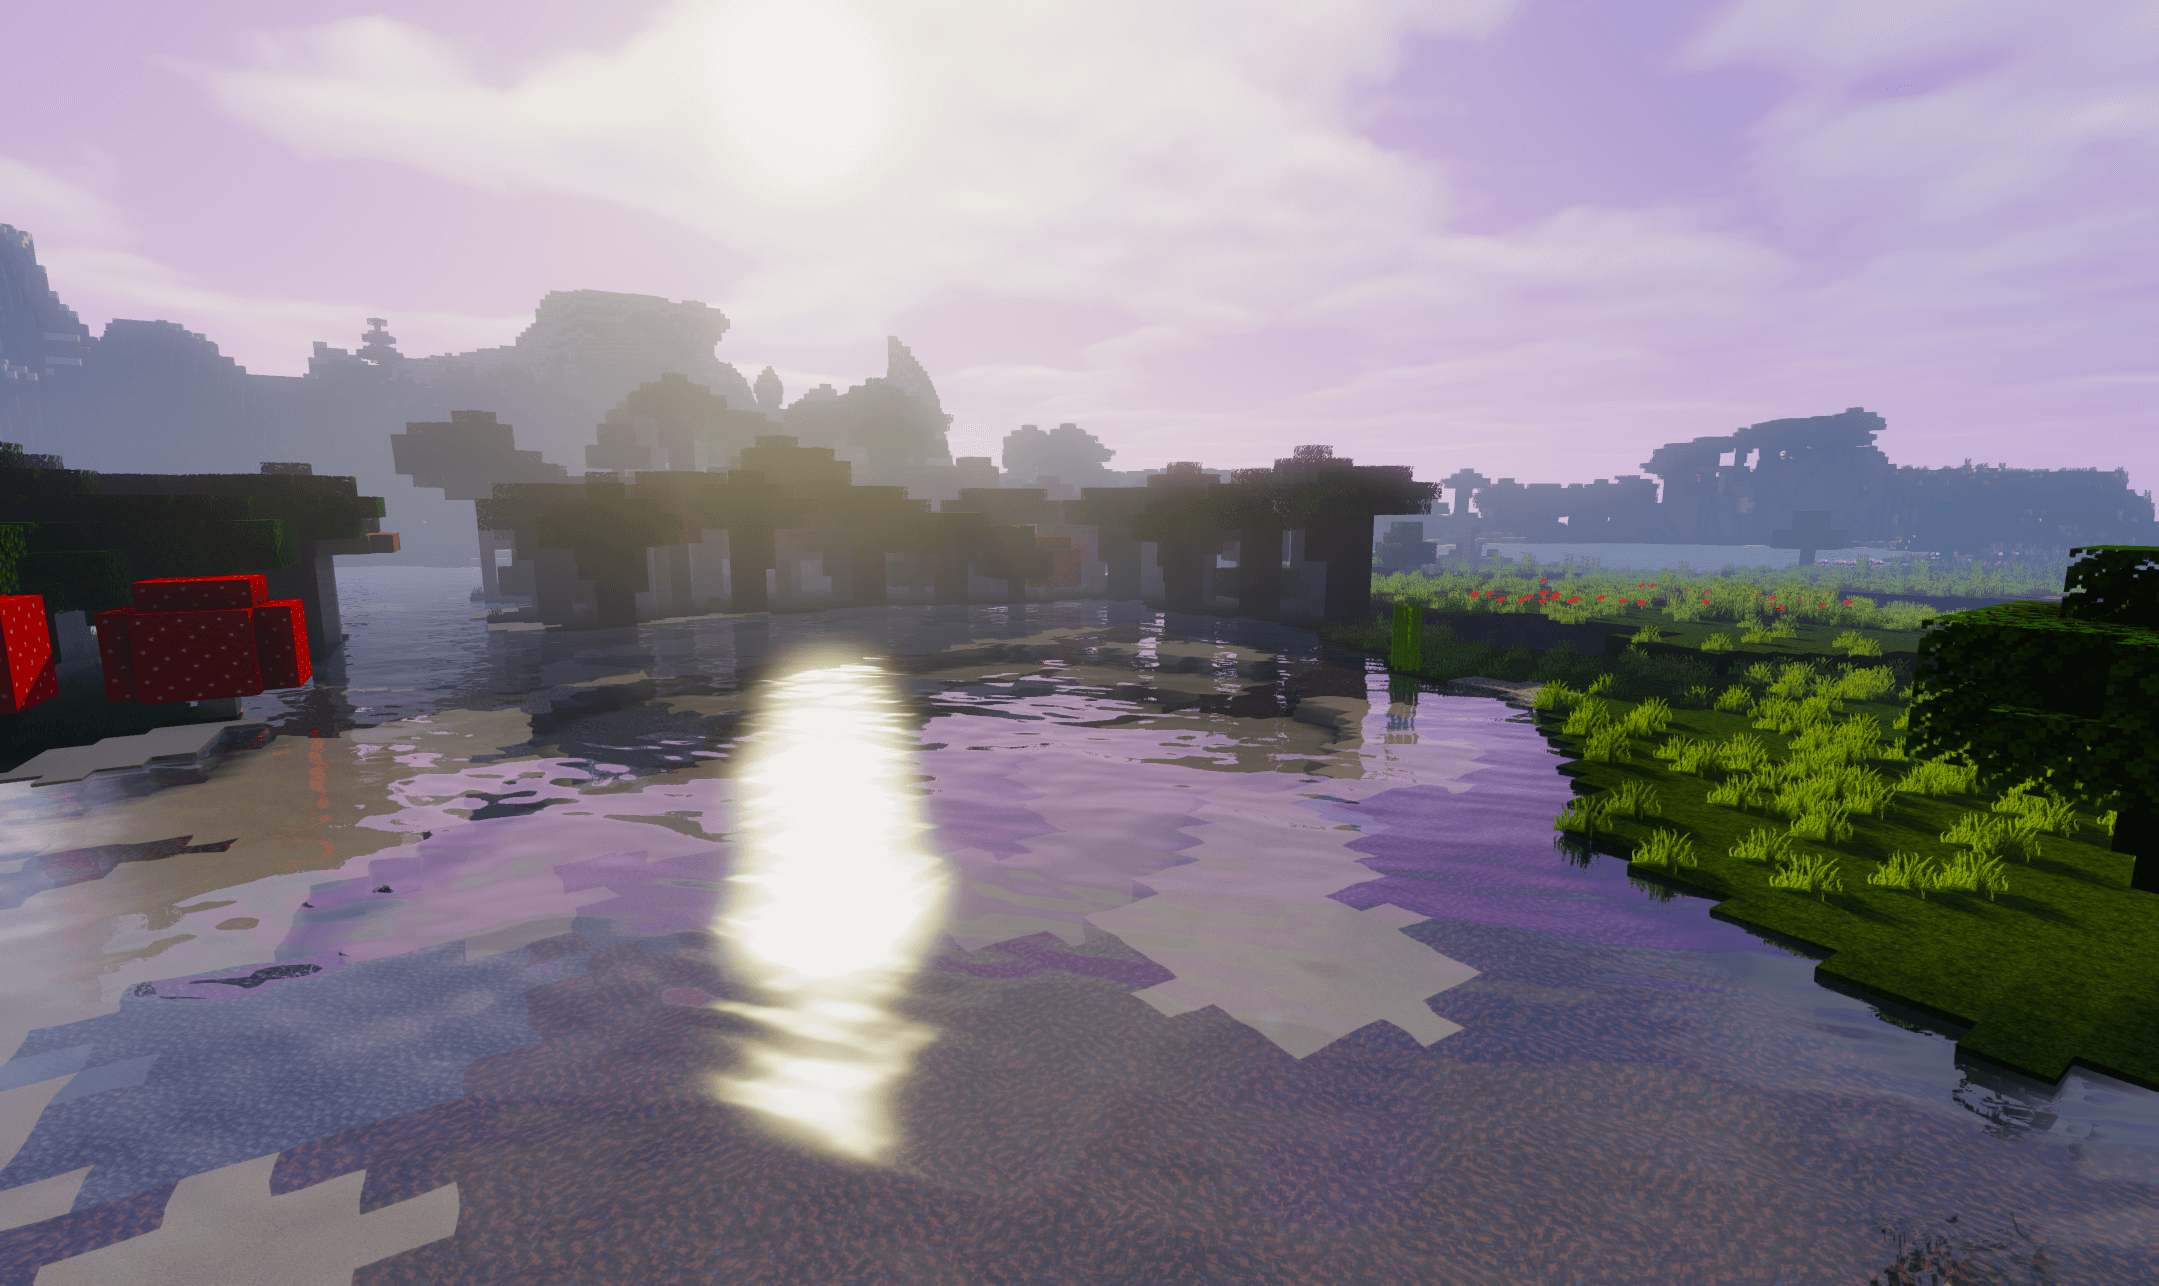
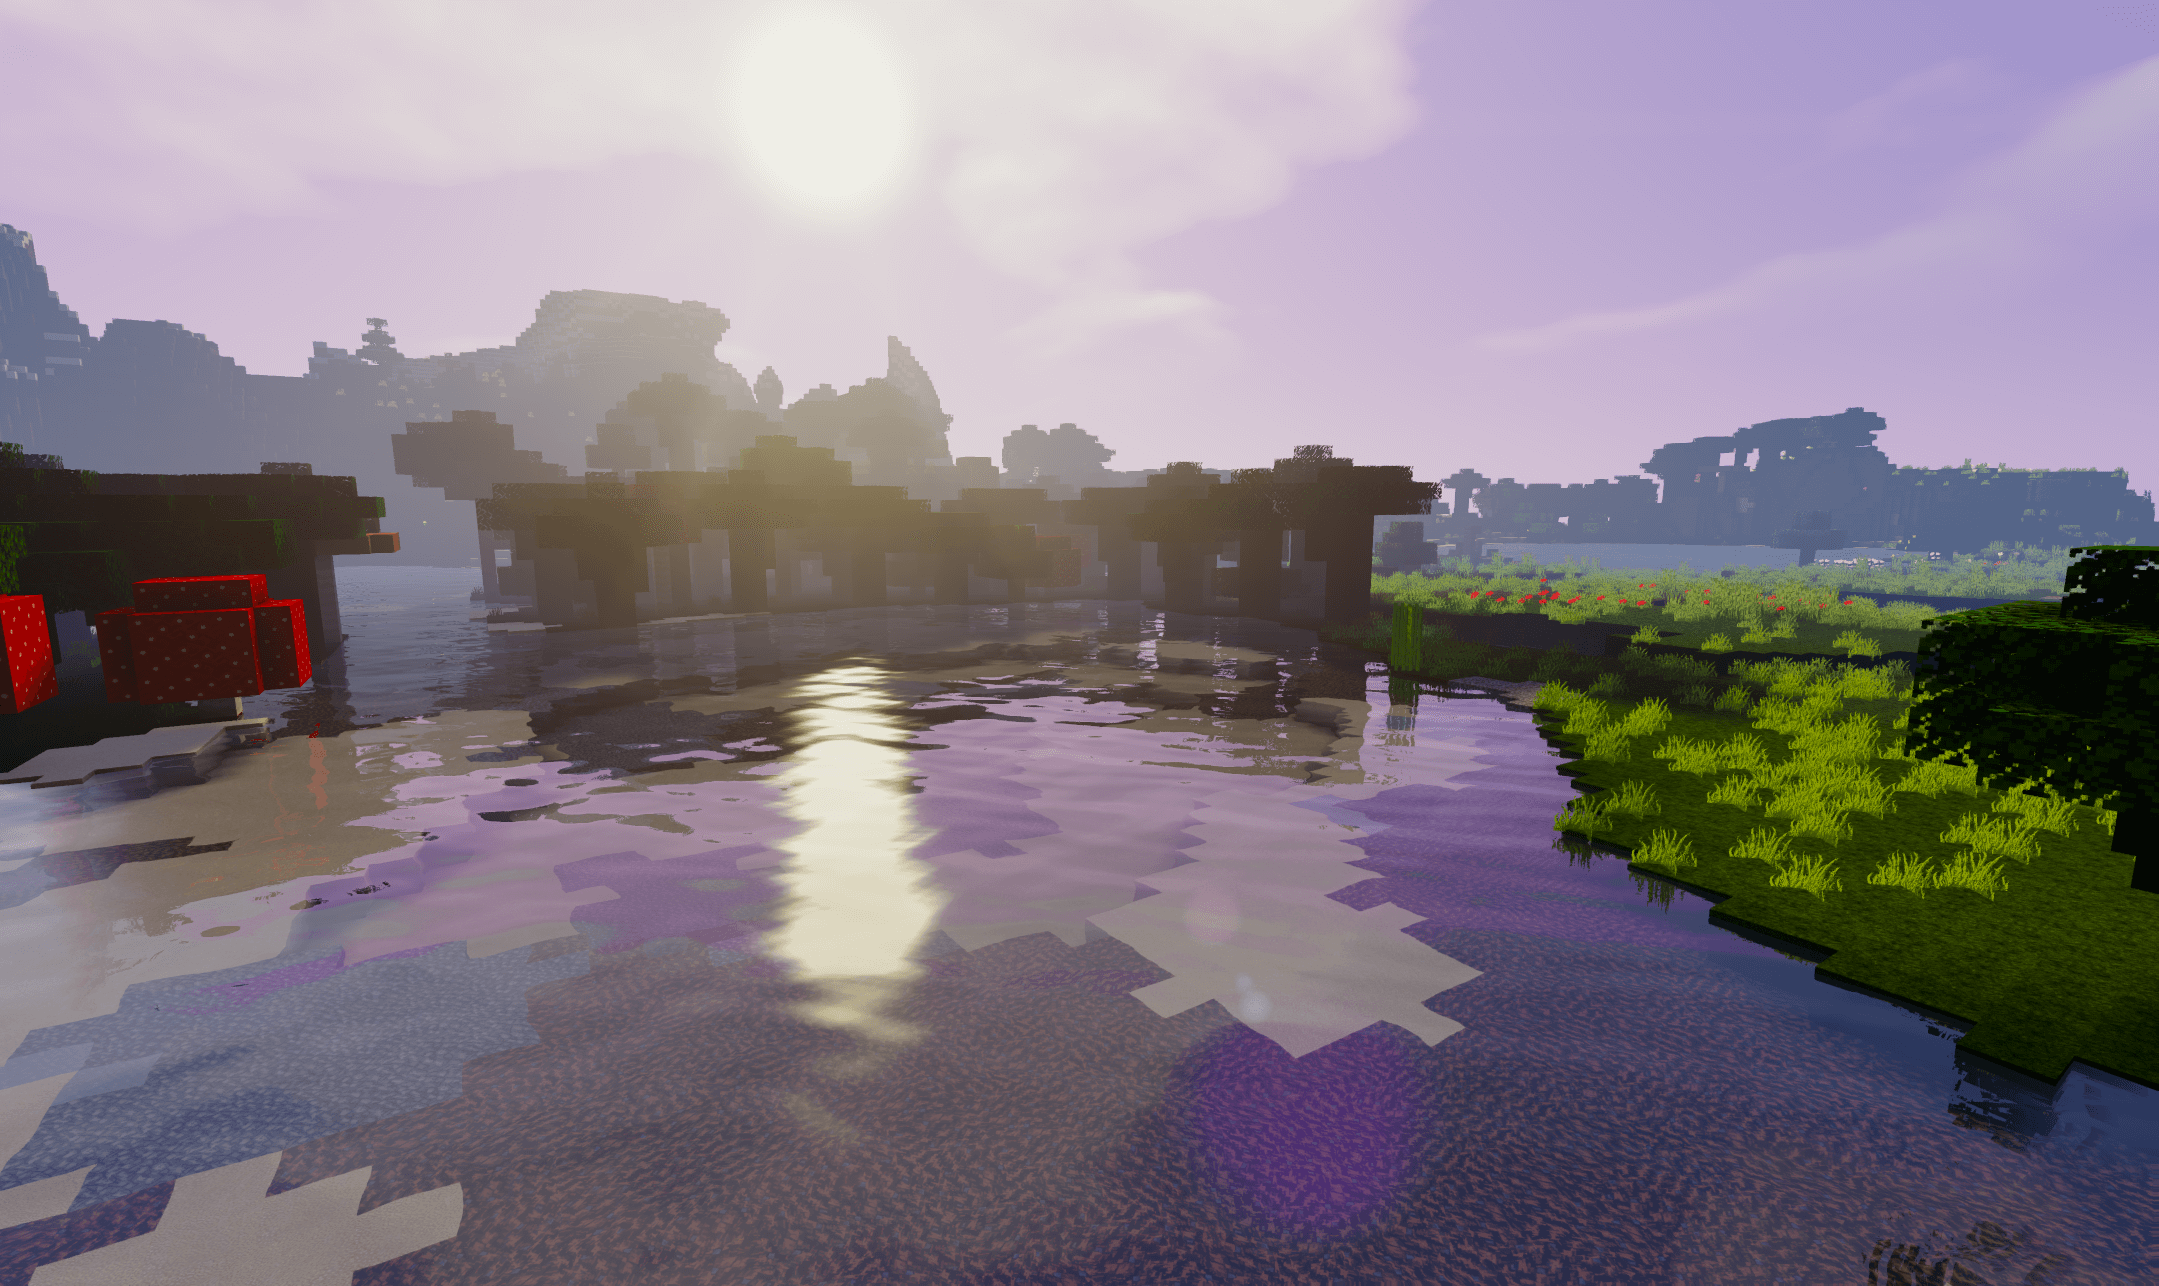
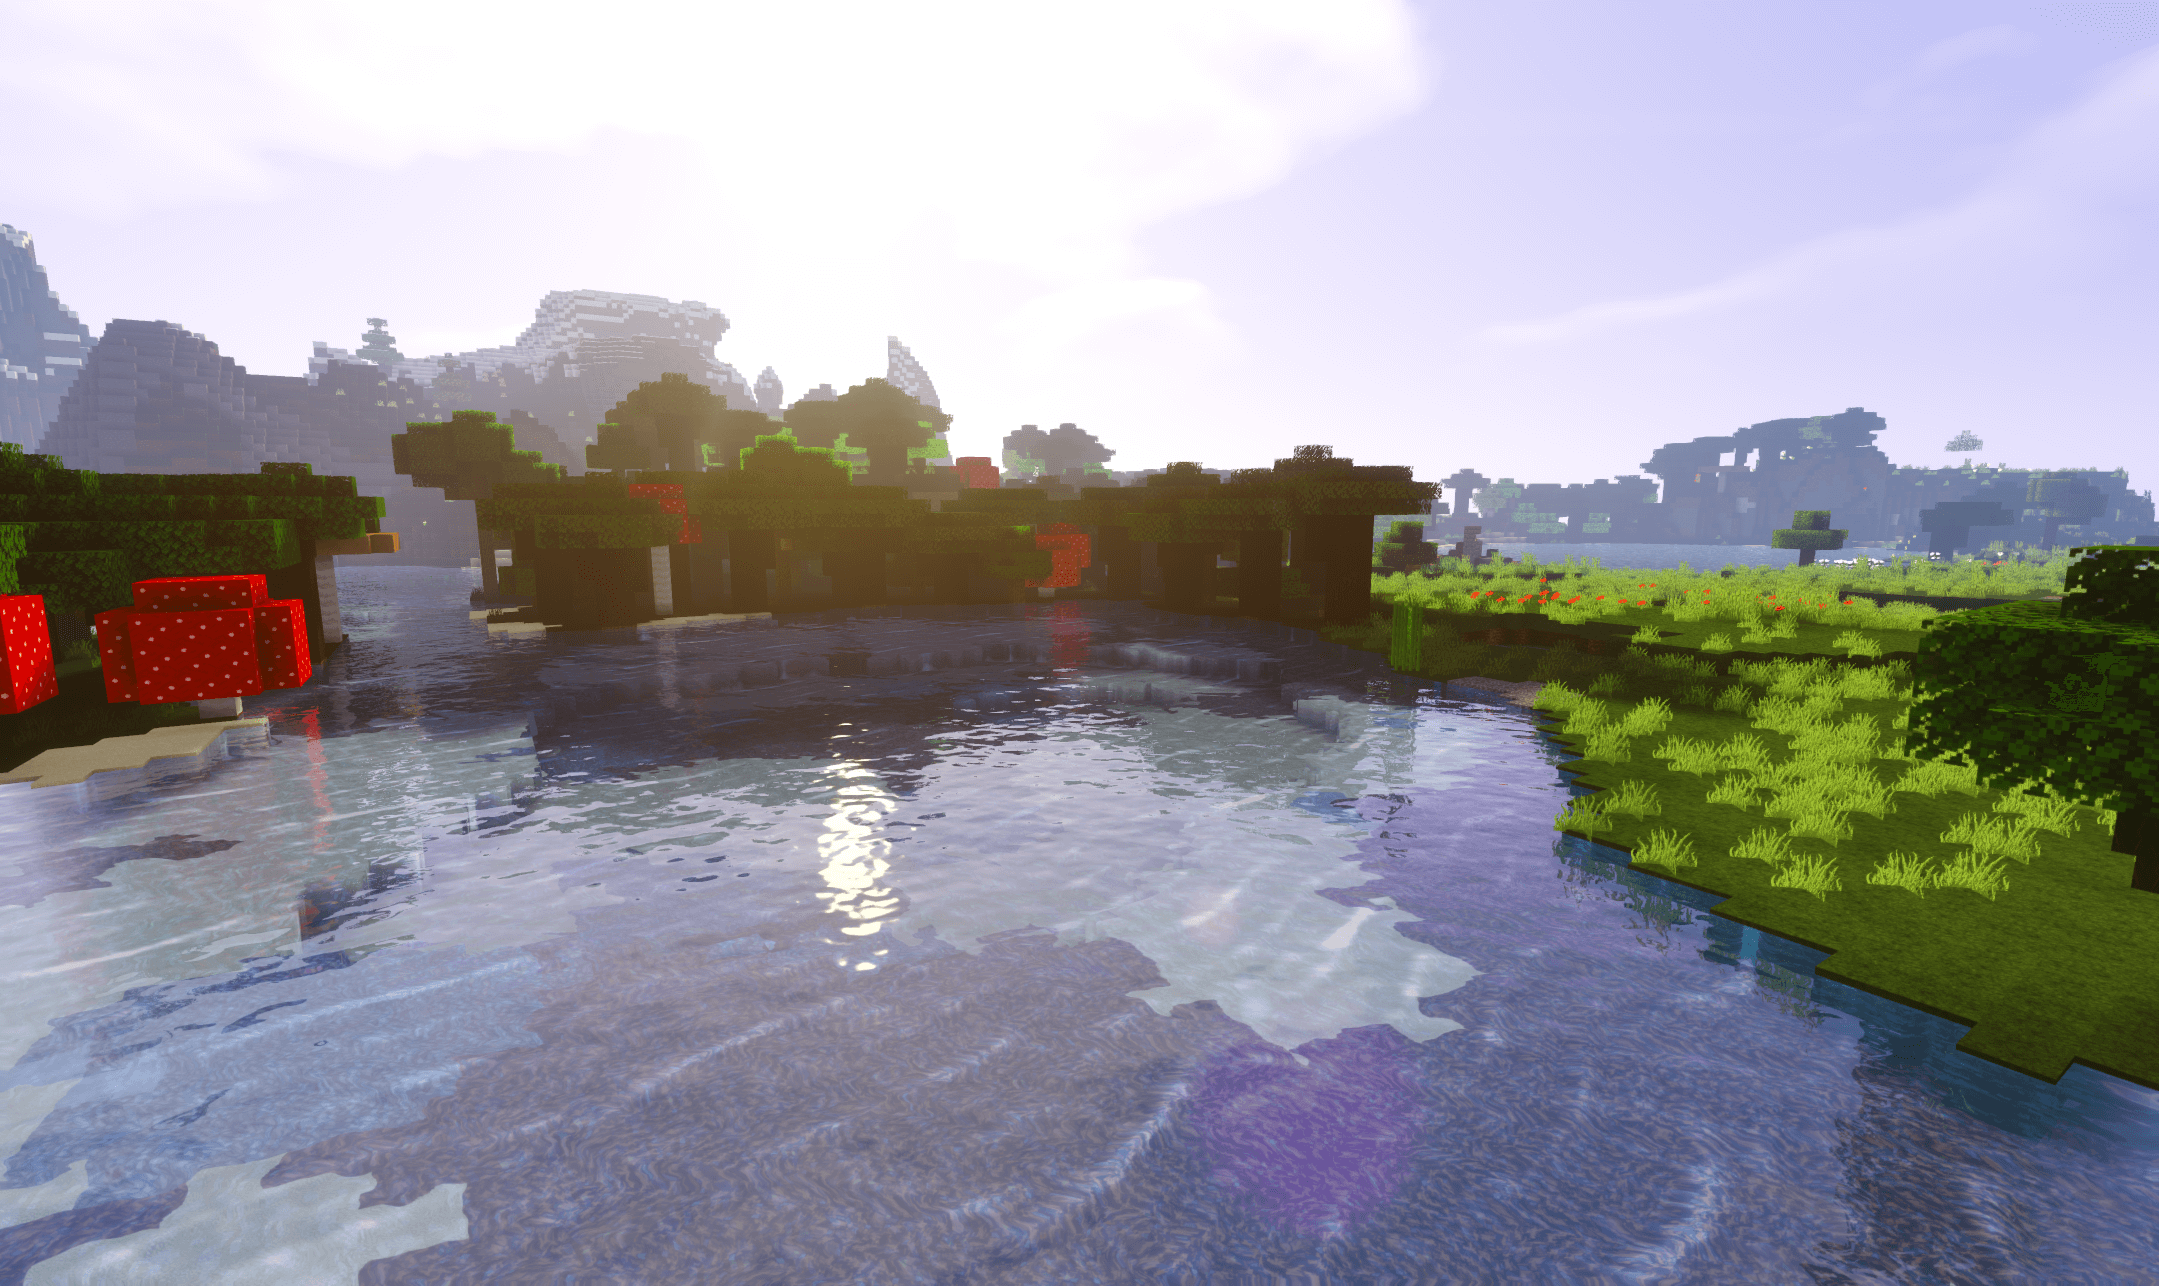
Stazza’s Super Shaders is a trendy shader pack for the original Shaders Mod by Karyonix or Optifine, and there’s a good reason for this – it just works. While many shaders seem to be plagued by bugs and loaded with crappy content, confusing colors, and objects that won’t stop moving, as if there’s a constant tornado making the world whirl around, you don’t get those things from Stazza’s Super Shaders. This fits the bill for a simple shader pack that focuses on lighting and shading elements rather than altering the world in weird ways. If you’re looking for something like that, you found it.
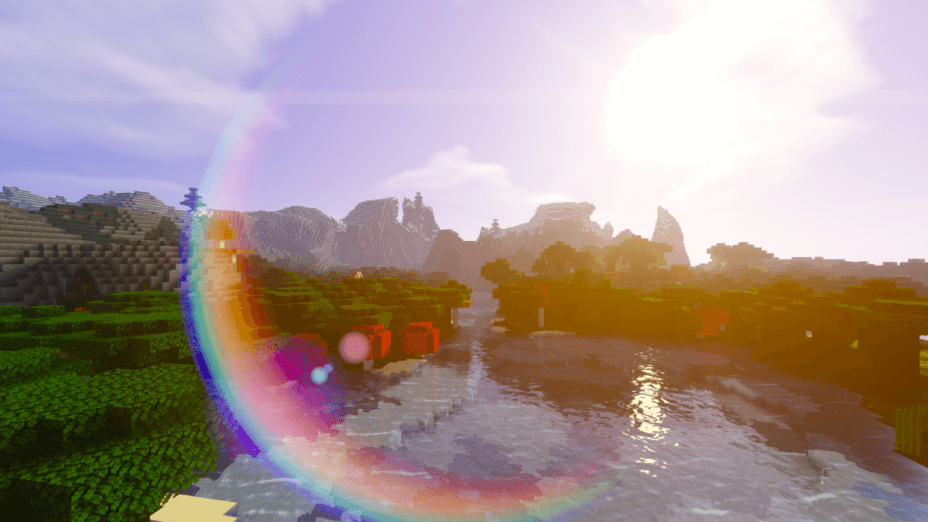
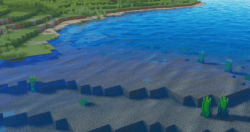
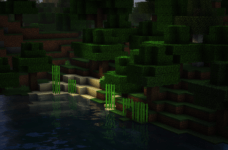
Like many other shader packs, Stazza’s Super Shaders takes little bits and pieces from Chocapic13’s Shaders, which is one of the most popular and well-known shader packs for Minecraft to date. Some features from the KUDA Shaders pack have also made their way into here, including the dirty lens effect when standing in or around the fire and improved lens flare visuals. The end product is something that’s bold, bright, and beautiful but not plagued by unnecessary colors and strange gradients of gray. More than anything, the lights, shadows, and textures look natural, which makes this a realistic shader pack.
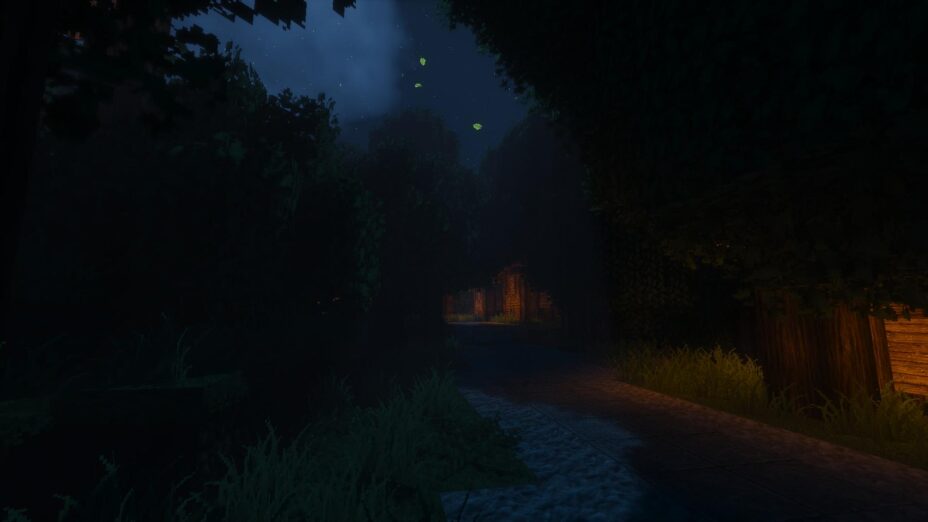
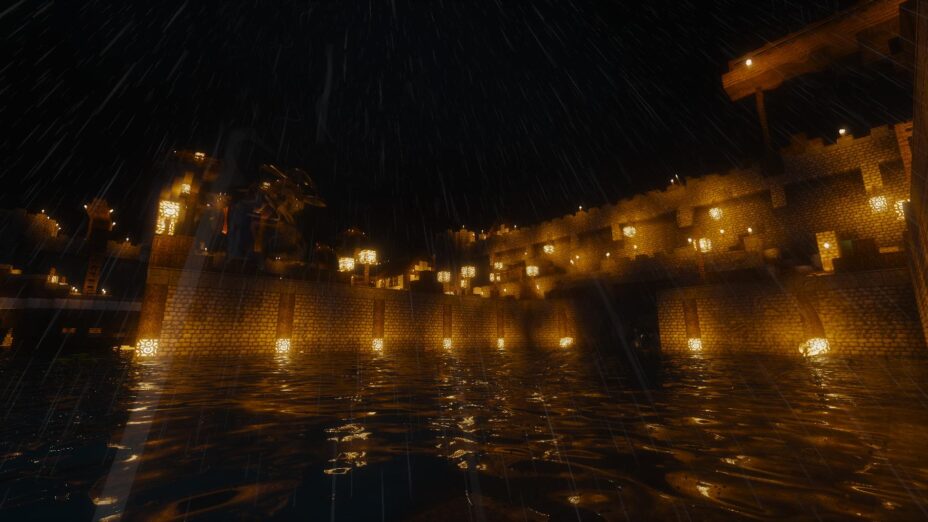
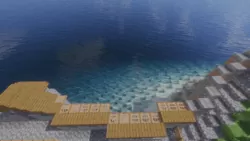
Requirements for Stazza’s Super Shaders pack are relatively high and even higher when talking about the Ultra version of the mod, which is one of the most demanding shader packs ever. There’s no way you’ll be able to use Stazza’s Super Shaders while relying on integrated Intel graphics, so you’re going to need a good GPU, and you’re going to need to make sure it’s compatible too. With additions like variable penumbra shadows, enhanced bloom effects, and specular lighting during rainy weather, this shader pack makes it easier to see many things in Minecraft when you normally wouldn’t be able to.
Surely, some players will consider this cheating, but how many times have you been out in a rainstorm and become totally blind to what was around you? The rain would have to be coming down pretty hard for that to happen, but that’s precisely what happens whenever it rains at all in Minecraft, and Stazza’s Super Shaders make the bold move of fixing that issue. With no significant bugs, glitches, or errors to worry about and regular updates still coming along every few months, this is definitely one of the better shader packs out there, and it comes highly recommended.
- 1.20
- 1.19.4
- 1.19.3
- 1.19.2
- 1.19.1
- 1.19
- 1.18.2
- 1.18.1
- 1.18
- 1.17.1
- 1.17
- 1.16.5
- 1.16.4
- 1.16.3
- 1.16.2
- 1.16.1
- 1.16
- 1.15.2
- 1.15.1
- 1.15
- 1.14.4
- 1.14.3
- 1.14.2
- 1.14.1
- 1.14
- 1.13.2
- 1.13.1
- 1.13
- 1.12.2
- 1.12.1
- 1.12
- 1.11.2
- 1.11.1
- 1.11
- 1.10.2
- 1.10.1
- 1.10
- 1.9.4
- 1.9.3
- 1.9.2
- 1.9.1
- 1.9
- 1.8.9
- 1.8.8
- 1.8.7
- 1.8.6
- 1.8.5
- 1.8.4
- 1.8.3
- 1.8.2
- 1.8.1
- 1.8
- 1.7.10
- 1.7.9
- 1.7.8
- 1.7.7
- 1.7.6
- 1.7.5
- 1.7.4
- 1.7.2
- 1.7
- 1.6.4
- 1.6.2
Stazza’s Super — Versions
Features
Over 43 new features are available in Stazza’s Super Shaders to enhance your gaming experience.
📊 Performance Impacts
Decrease in performance can vary from device to device, driver version, and many other factors, you should test yourself on your machine for the best result.
- None
- No performance decreases
- Small
- ~5%
- Medium
- ~10%
- High
- ~25%
- Extreme
- +50%
-
- Ambient OcclusionMedium
- Simulating how light interacts with objects and surfaces.
-
- Atmospheric SkySmall
- Simulates realistic atmospheric scattering.
-
- BloomSmall
- Enhance the game's lighting and create a more realistic and immersive visual experience
-
- BlurSmall
- Simulate how fast-moving objects appear to blur in a photograph or video.
-
- CausticHigh
- Simulating the way light is refracted and reflected by the water's surface
-
- Cel ShadingSmall
- Technique used to give the game a more stylized, cartoon-like appearance.
-
- CustomizationNone
- Customize various aspects of the game's visual effects.
-
- Depth of FieldMedium
- Making objects closer to the camera appear sharp and in focus, while objects farther away appear out of focus and blurry.
-
- Dirty LensSmall
- Simulates the effect of a dirty or scratched camera lens.
-
- HDRMedium
- Enhance the lighting and color in the game.
-
- Lens FlareSmall
- Simulating the way light scatters and reflects inside a camera lens.
-
- LightMedium
- Enhance the game's overall visual quality.
-
- Motion BlurHigh
- Simulates the way that fast-moving objects appear to blur in the real world.
-
- Moving CloudsMedium
- Simulates the movement of clouds across the sky and can be used to create the appearance of a dynamic and ever-changing sky
-
- Normal MapSmall
- Add depth and detail to surfaces without increasing the number of polygons.
-
- Ocean WavesHigh
- Simulating the movement of waves on the surface of the ocean.
-
- Parallax WaterMedium
- Enhances the realism of water by simulating the parallax effect.
-
- Photorealistic SkyboxesMedium
- Replacing the in-game sky with high-resolution, realistic images of the sky.
-
- POMHigh
- Realism of textures by simulating the way light interacts with surfaces.
-
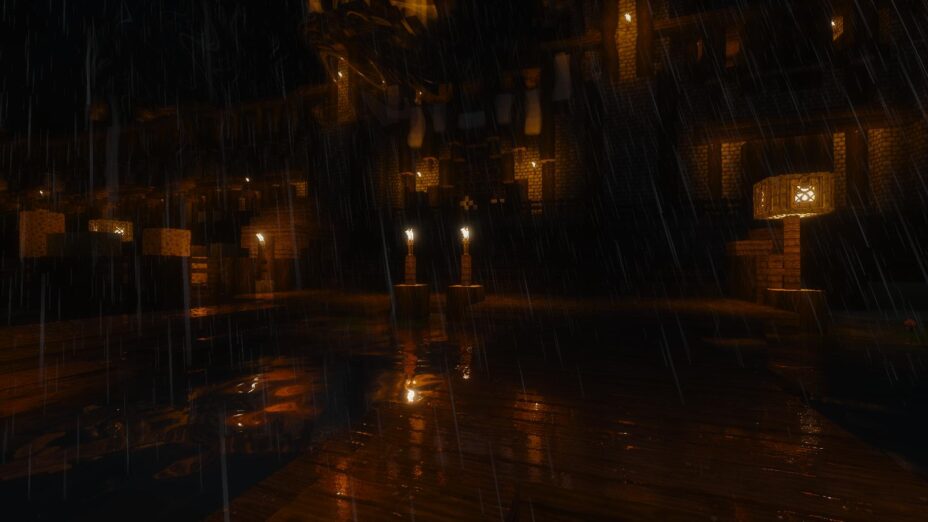
- Rain ReflectionsMedium
- Reflections during rainy weather by simulating the way light reflects off of wet surfaces.
-
- Realistic NightskyMedium
- More realistic and immersive night sky.
-
- Realistic RainMedium
- More natural and immersive rain experience.
-
- Realistic SkyMedium
- More realistic and immersive sky experience.
-
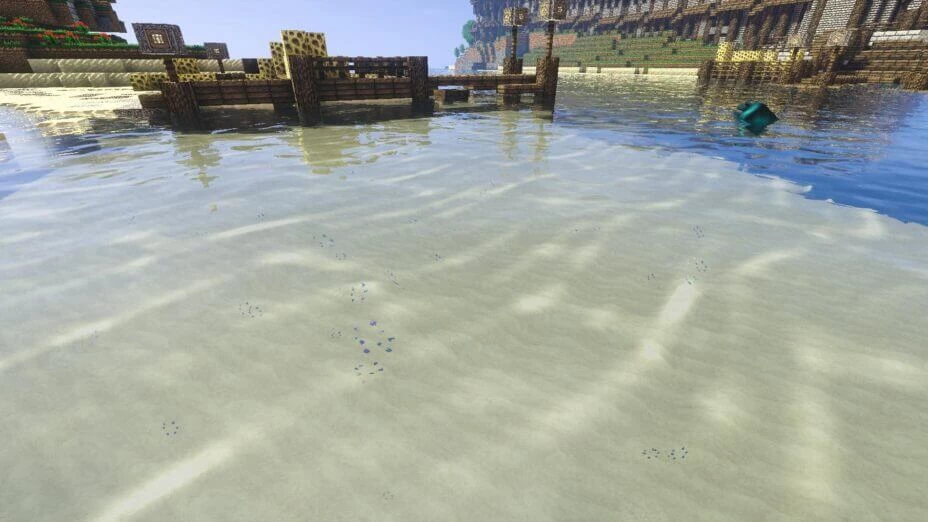
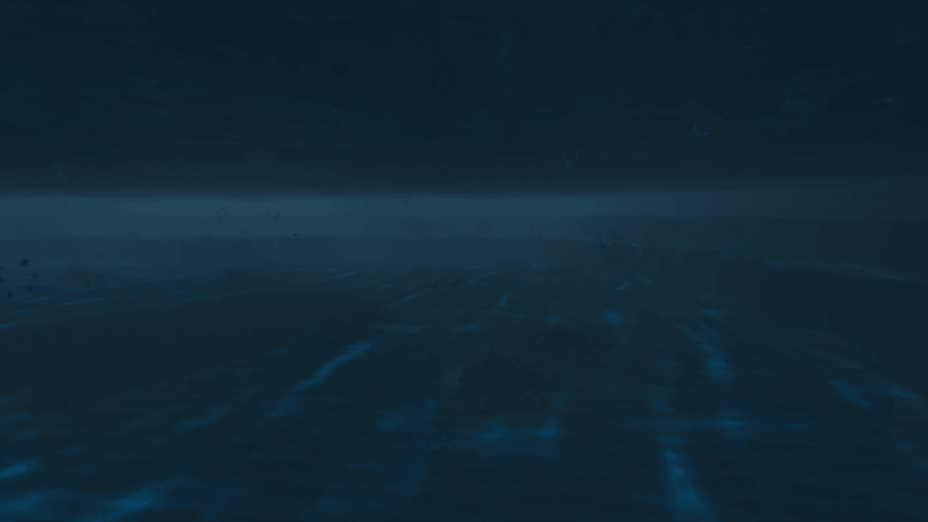
- Realistic WaterHigh
- More realistic and immersive water experience.
-
- ShadowsSmall
- Simulate how light is blocked and scattered by objects in the environment.
-
- Sun RaysMedium
- Simulate the appearance of sunlight streaming through trees leaves, objects, clouds, or other atmospheric conditions.
-
- SunriseSmall
- More realistic and immersive sunrise experience.
-
- SunsetSmall
- More realistic and immersive sunset experience.
-
- TAAMedium
- Smooth out jagged edges and reduce the "stair-stepping" effect that can occur when rendering graphics.
-
- Tone MappingSmall
- Adjusting the brightness, contrast, and saturation levels.
-
- Underwater ReflectionsMedium
- Simulate the appearance of light reflecting off of the water's surface.
-
- Volumetric CloudsHigh
- Simulate the way that clouds appear to have volume and depth in the real world rather than just flat textures.
-
- Volumetric FogHigh
- Create the appearance of fog that is lit from within, casting shadows and creating a sense of depth.
-
- Volumetric LightHigh
- Simulating the scattering of light in the atmosphere and in the environment.
-
- Volumetric NetherHigh
-
- Volumetric The EndHigh
-
- Water ReflectionsMedium
- Simulating reflections on the surface of the water.
-
- Water WavesMedium
- Movement of waves on the surface of the water.
-
- Waving GrassSmall
- Simulating the way it moves and sways in the wind.
-
- Waving LavaSmall
-
- Waving PlantsSmall
- Simulating the way they move and sway in the wind.
-
- Waving TreesSmall
- Adds movement to the leaves and branches of trees, making them look more alive and realistic.
-
- Wet EffectSmall
There are 4 profiles pre-built into Stazza’s Super Shaders to adjust the level of intensity of these effects.
| Profiles | Low | Standard | High | Ultra |
|---|---|---|---|---|
CLOUDS_HQ | ||||
CLOUDS_HQ_FPSBOOST | ||||
CLOUDS_LQ | ||||
DOF_LQ | ||||
DYNAMIC_HANDLIGHT | ||||
Godrays | ||||
HQ_DOF | ||||
HQ_SHADOW_FILTER | ||||
KUDA_LENS | ||||
Lens Flare | ||||
Motion blur | ||||
NIGHT_LIGHT_DESATURATION | ||||
POM | ||||
POST_BLOOM | ||||
PSEUDO_HDR | ||||
RAIN_DROPS | ||||
RAIN_LENS | ||||
RAIN_PUDDLES | ||||
SHADOWDISTANCE | ||||
SHADOWMAPRESOLUTION | ||||
SOFT_SHADOWS | ||||
SPECULAR_MAPPING | ||||
SSAO | ||||
STARS | ||||
STEPS_QUALITY | ||||
PCSS | ||||
VOLUMETRIC_LIGHT | ||||
WATER_CAUSTIC |
Stazza’s Super Shaders allow you to change more than 66 settings to suit your needs.
| Settings | Description | Options |
|---|---|---|
| Profile | ||
| Shadows | ||
| HQ_SHADOW_FILTER | Set SUNLIGHTAMOUNT to 5.0 when using |
|
| PCSS | Variable Penumbra Shadows. Makes the shadows get softer as they go down. |
|
| SOFT_SHADOWS | Smooth shadows |
|
| SSAO | Screen Space Ambient Occlusion, taxing on FPS |
|
| shadowMapResolution | Shadow Resolution. 512 - Lowest Quality. 4096 - Highest Quality |
|
| shadowDistance | shadowDistance. 60 - Lowest Quality. 200 - Highest Quality |
|
| PostProcess | ||
| CELSHADING |
| |
| Motion blur | Blurred vision when the camera moves fast, your eyes do this naturally so this is disabled. |
|
| Stars | Adds Stars at night |
|
| Post_Bloom | Adds Bloom to everything |
|
| CHOCS_LENS_FLARE | Lens Flare from Chocapics shaders |
|
| Lens Flare | Light entering a camera lens creates a similar effect. |
|
| KUDA_LENS | Sun star lens |
|
| HQ_DOF | High Quality DOF that uses centerDepthSmooth to have smooth focus transition. Cant use DISTANT_BLUR or DOF_LQ at the same time. |
|
| DOF_LQ | This is a Low Quality Depth Of Field version that doesnt use centerDepthSmooth to smooth focus transition. Cant use DISTANT_BLUR or HQ_DOF at the same time. |
|
| RAIN_LENS | Adds colour Blue to rain drops on screen |
|
| RAIN_DROPS | Rain Drops on the players lens |
|
| Rain_Fog | Adds fog when its raining |
|
| DISTANT_BLUR | Blurs objects in the distance. Cant use HQ_DOF or DOF_LQ at the same time. |
|
| Clouds Adjusting the many cloud layers in the sky | ||
| Clouds_HQ | Very FPS taxing |
|
| Clouds_LQ | Clouds From Robobo's shader, no FPS hit but dont look as nice as HQ Clouds |
|
| Clouds_HQ_fpsBoost | This is to boost the FPS of the HQ Clouds by sacrificing the Visual appearance of the clouds |
|
| Steps_Quality | This is for Clouds_LQ lower means less detail in the clouds, higher means more detail but could take some FPS. |
|
| Water Changing the many water effects | ||
| OLD_WATER_COLOR | Enable this to return the water Colour back to V4.1 |
|
| WATER_REFLECTIONS | Adds reflections to the water surface |
|
| UNDERWATER_FOG | Adds a Blue fog when underwater |
|
| Water Temp Fix | This is to shadow map getting messed up while underwater |
|
| WATER_CAUSTIC | Fake caustics, to simulate light rays reflected or refracted through water on the surface |
|
| WAVING_WATER |
| |
| Color_Red |
| |
| Color_Green |
| |
| Color_Blue |
| |
| Transparency |
| |
| GodRays Adjustments to the Godrays | ||
| Godrays | A second layer to godrays |
|
| VolumeLight | ||
| VOLUMETRIC_LIGHT | True Godrays, this is not Screen Space and is Based off Robobo's shader VL |
|
| SpecNPom | ||
| SPECULAR_MAPPING | Adds a "Shiny" look to blocks when raining |
|
| Rain_Puddles | To give the effect of Rain Puddles on the ground when raining, taxing to FPS |
|
| Rain_Puddles_Strength |
| |
| POM | Parallax Occlusion Mapping, needs Compatible Texture Pack to make textures look 3D |
|
| Waving Enabling and disabling waving grass, leaves, ect. | ||
| WAVING_LEAVES |
| |
| WAVING_VINES |
| |
| WAVING_GRASS |
| |
| WAVING_WHEAT |
| |
| WAVING_FLOWERS |
| |
| WAVING_FIRE |
| |
| WAVING_LAVA |
| |
| WAVING_LILYPAD |
| |
| Misc General little stuff that you most likely wont touch | ||
| CALCULATE_EXPOSURE |
| |
| LQ POM | Lower Quality POM, saves a few fps. |
|
| New Specular | New Specular which has much higher quality for supported texture packs. Chroma Hills is supported. |
|
| Lighting Fix | This is used to counteract the effects of old lighting being enabled, if it is not fully removed in the version of optifine. |
|
| POM | Parallax Occlusional Mapping, adds depth to blocks. |
|
| Pseudo_hdr | This is to simulate your eyes adapting to different light amounts |
|
| Rain Water Speed |
| |
| Smooth Water | Adds a little extra smoothness to the water waves, turn off to save a few fps |
|
| SPECULARITY |
| |
| TEXTURE_FIX | If you're using 1.7.2, it has a texture glitch where certain sides of blocks are mirrored. Enable the following to compensate and keep lighting correct |
|
| TRANSLUCENT_BLOCKS |
| |
| WAVING_LILIES |
| |
| Lighting | ||
| SUNLIGHTAMOUNT | Change sunlight strength |
|
| NIGHT_LIGHT_Desaturation | Used to desaturate color at night but affects torch color, still needs work |
|
| DYNAMIC_HANDLIGHT | This enables torches and glowstones in players had to cast light |
|
| desaturation | Color_desaturation. |
|
| Light_Jitter | This makes torch light flicker to simulate the inconsistent light that fire would produce |
|
| OldColor_Tonemap | Returns the Tonemap Colours Back to V4.1 |
|
How To Install Stazza’s Super Shaders
- Support Forge / Vanilla
- Extra features
- Good performance
- Support Fabric / Quilt
- Better performance, depend on your hardware
- No modding required Support Forge
- No modding required Older versions of Minecraft are supported
Optifine Installation Guide
Note
Your device must have Java installed to run the Forge and Optifine installers.
Quick Java Installation Guide
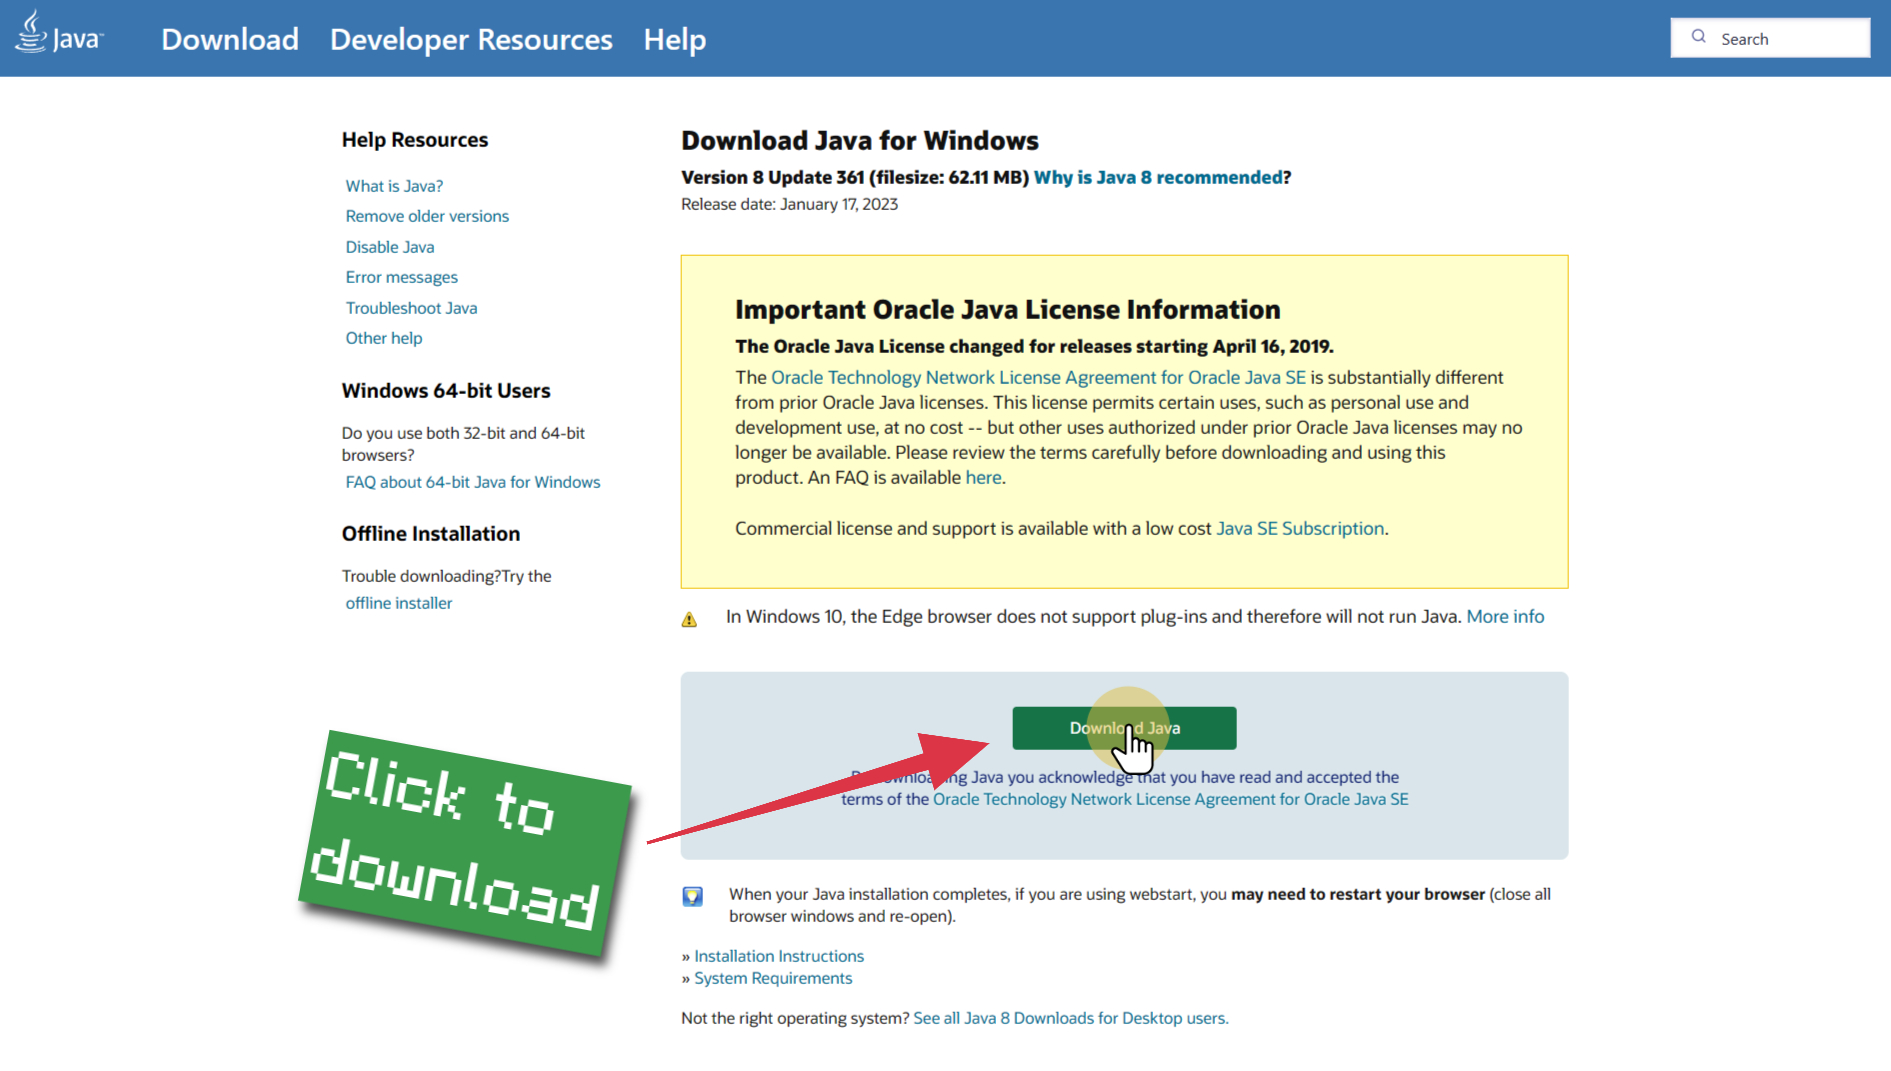
Download Java
Download the Java installer from the official website here.

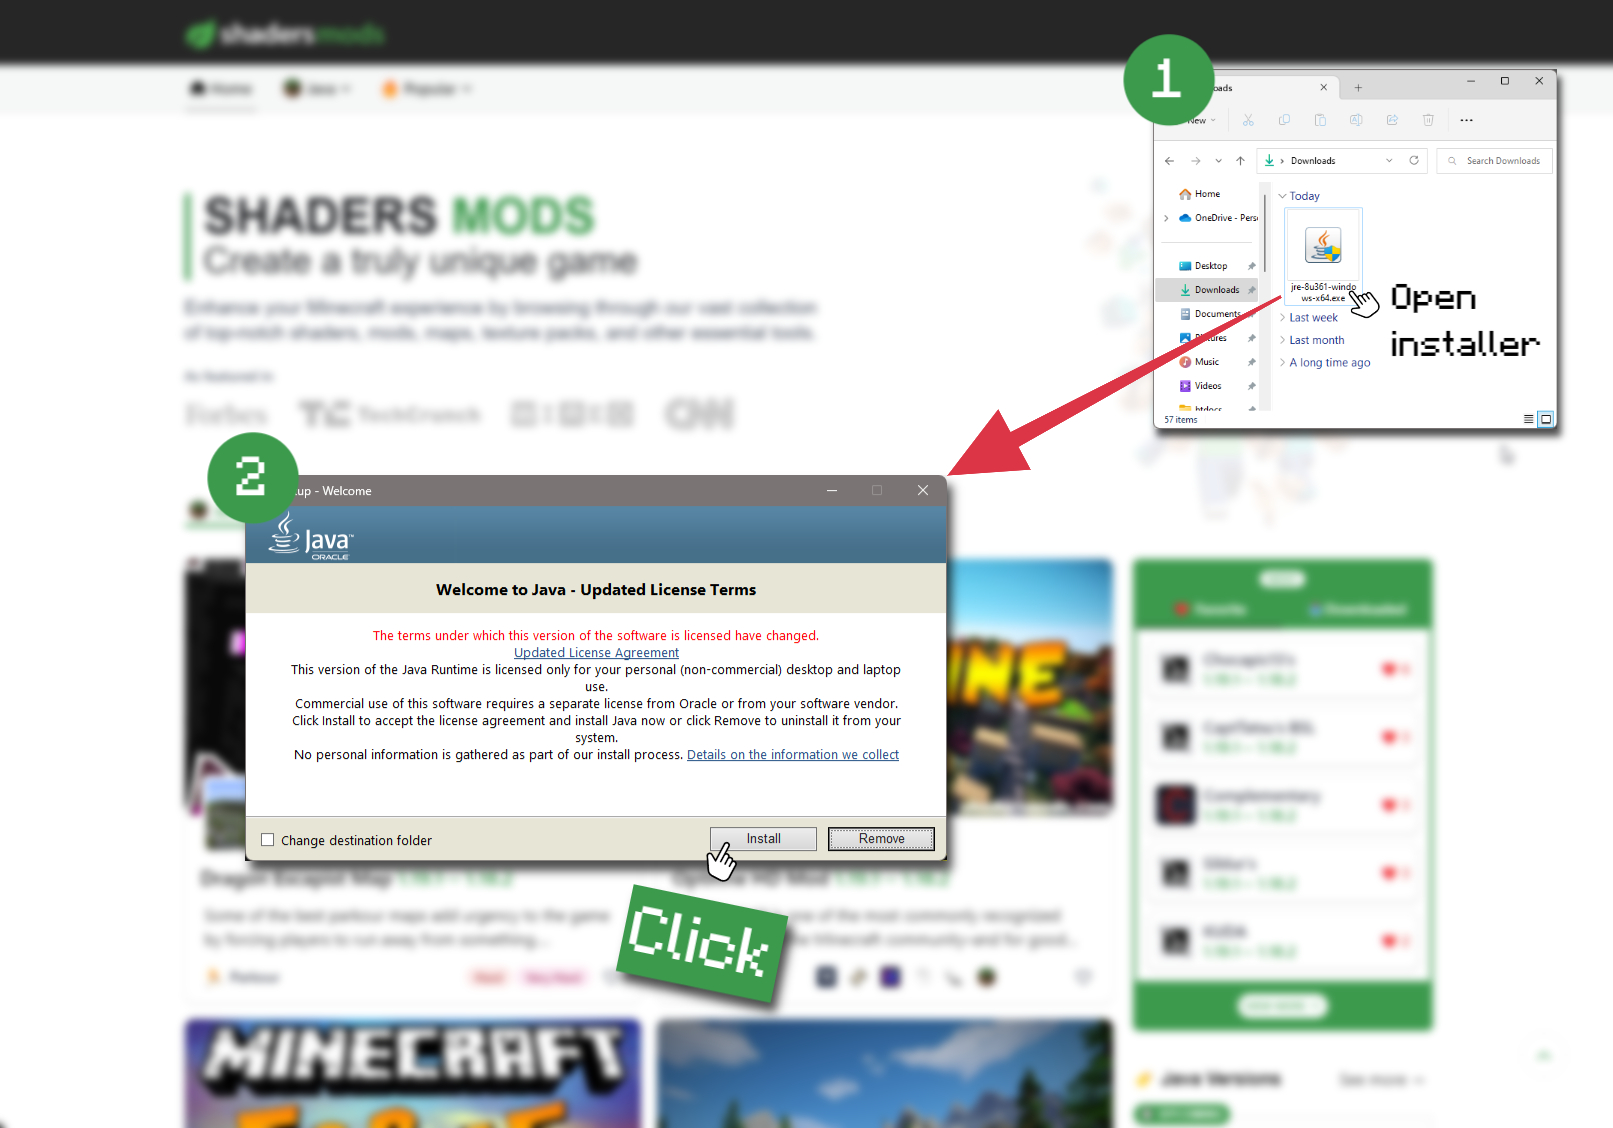
Open Installer
Once you have downloaded the file, run it and click the Install button.
How to install Stazza’s Super Shaders with Optifine?
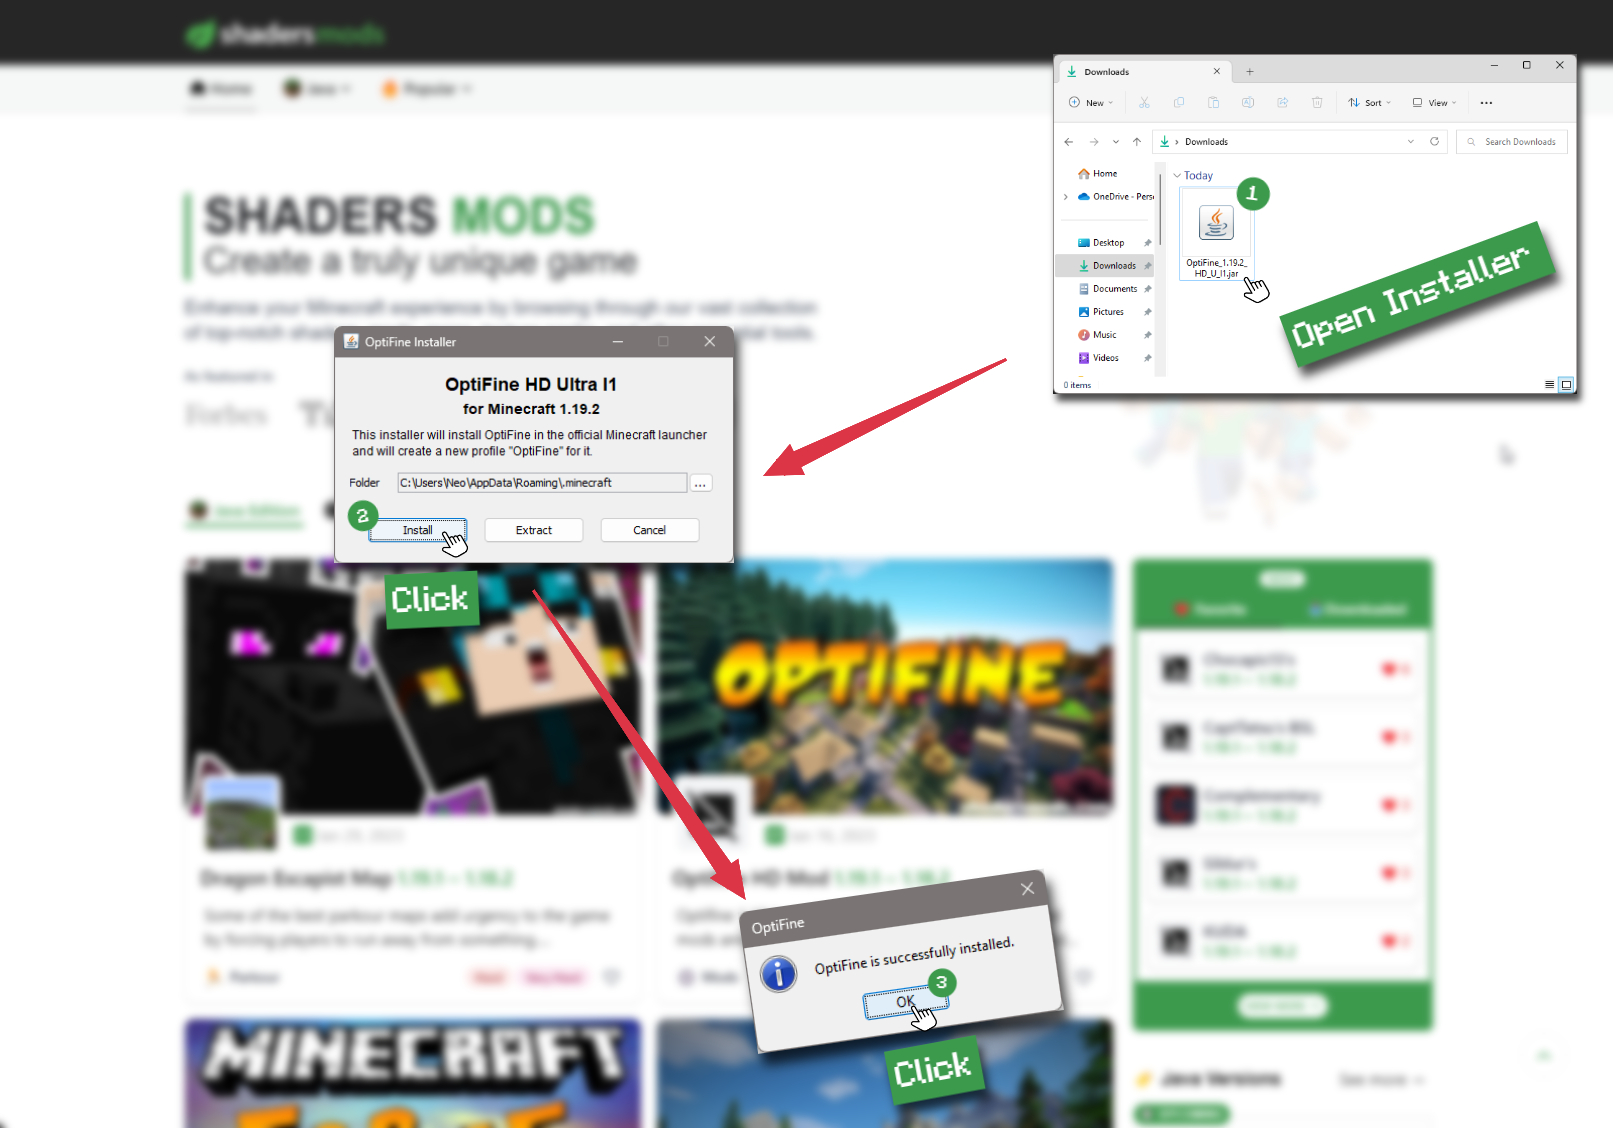
Download Optifine
Get the latest version of Optifine for your Minecraft version.
Download OptifineInstall Optifine
Run the Optifine installer and follow the on-screen instructions to complete the installation.
Download Stazza’s Super Shaders
Go to the download section and get shaders zip file. Unzip the file if necessary, as some shader developers may bundle multiple shader versions in one zip file.
Launch Minecraft
Start the Minecraft launcher and make sure you have the Optifine profile selected.
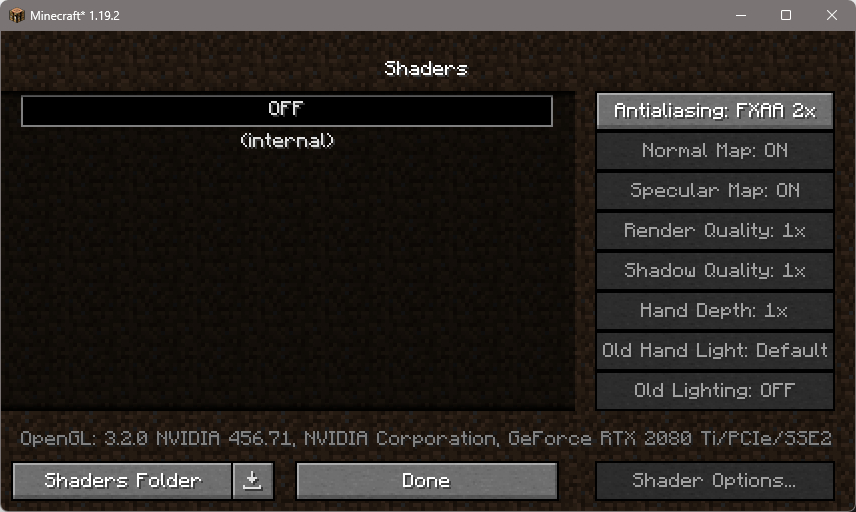
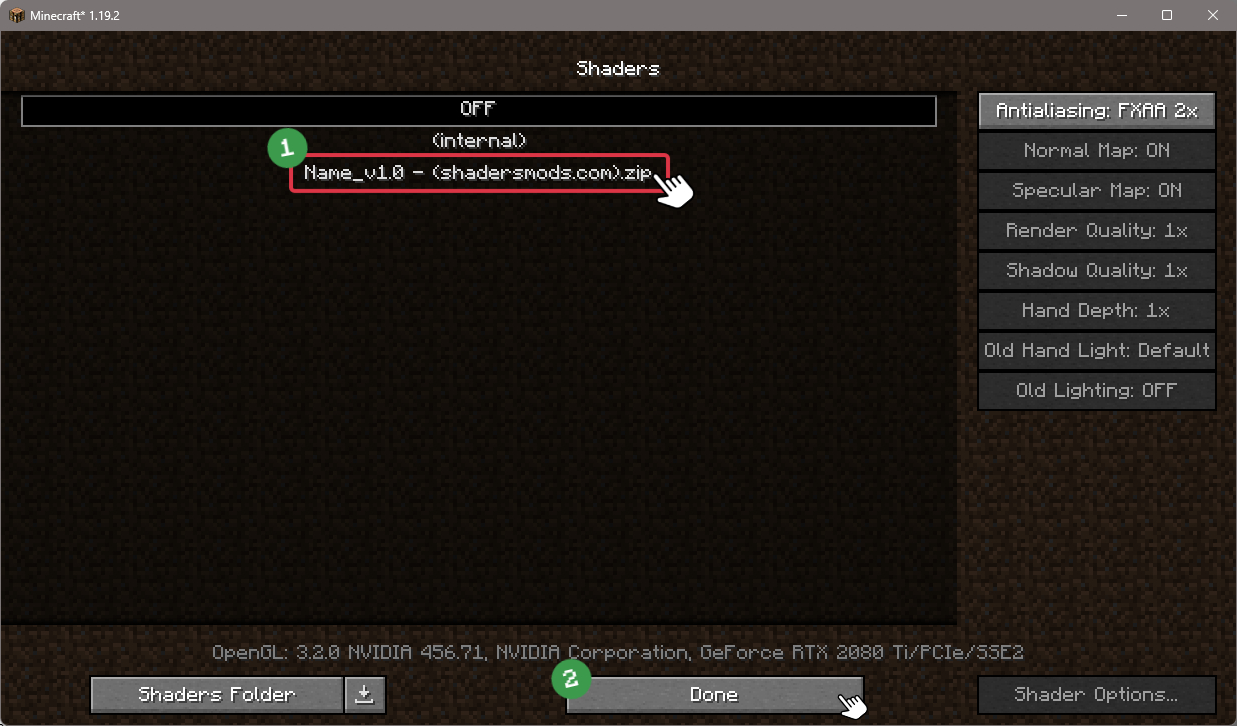
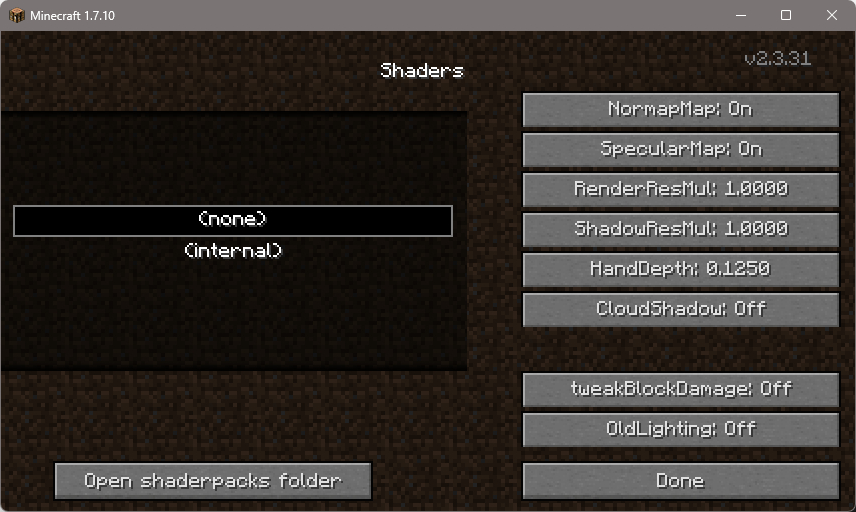
In-game Shaders menu
Go to Options > Video Settings > Shaders to access the shaders menu.
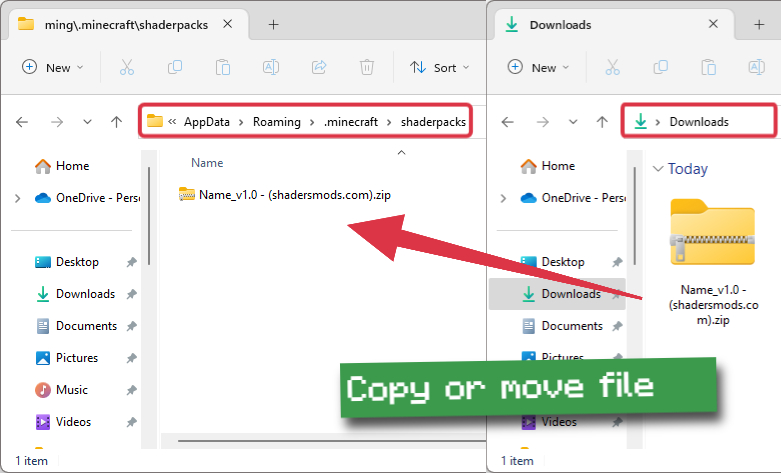
Open shaderpacks folder
Click on the "Shaders Folder" button to open the folder where shaders are stored, so you can add or remove shaders as desired.
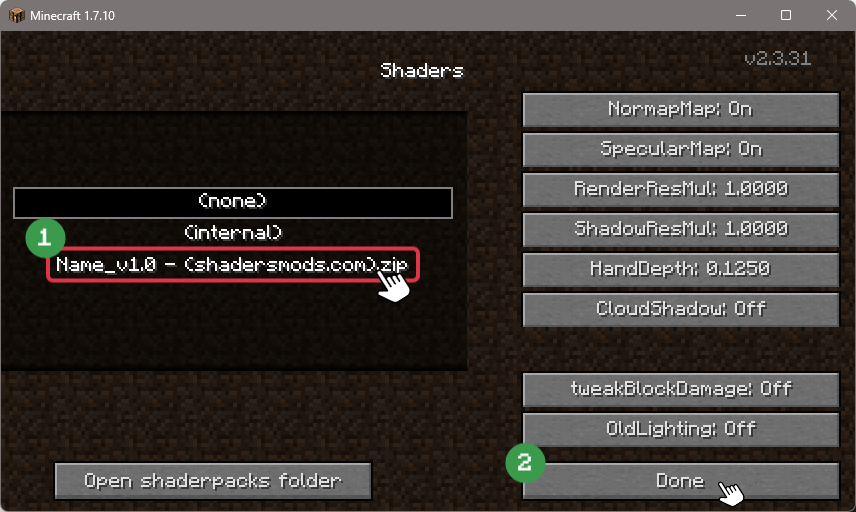
Install Stazza’s Super Shaders
Copy or move the downloaded Stazza’s Super shaders zip file into the shaderpacks folder.
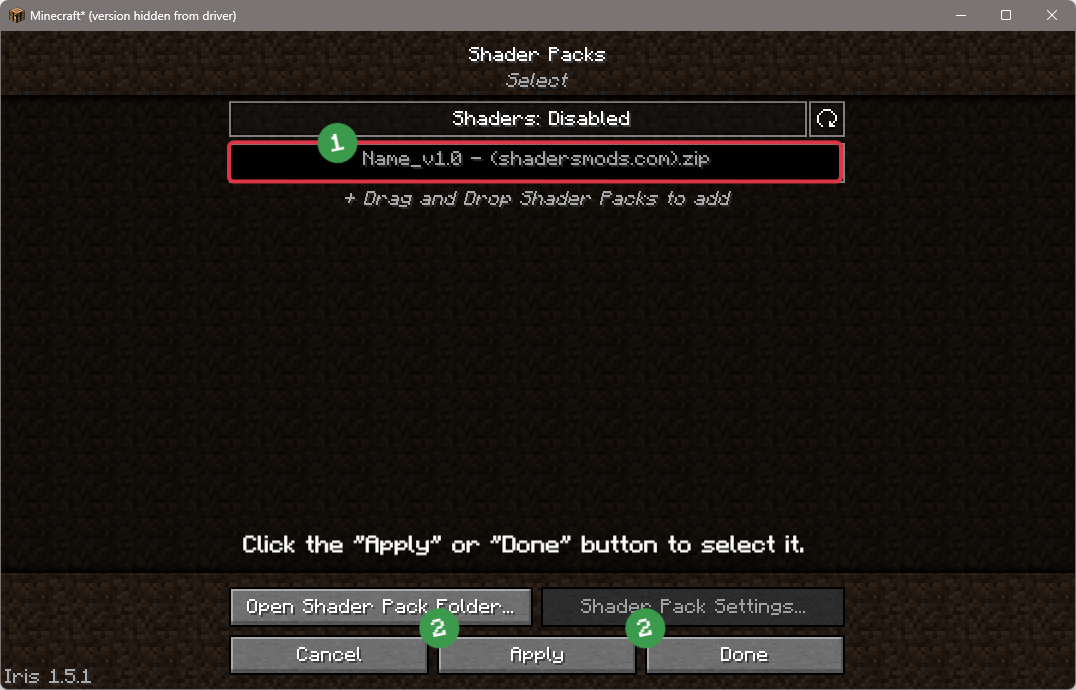
Select Stazza’s Super Shaders
Choose Stazza’s Super shader pack from the list of available shaders in the options menu.


How to install Stazza’s Super Shaders with Forge and Optifine?
Quick Installation Guide
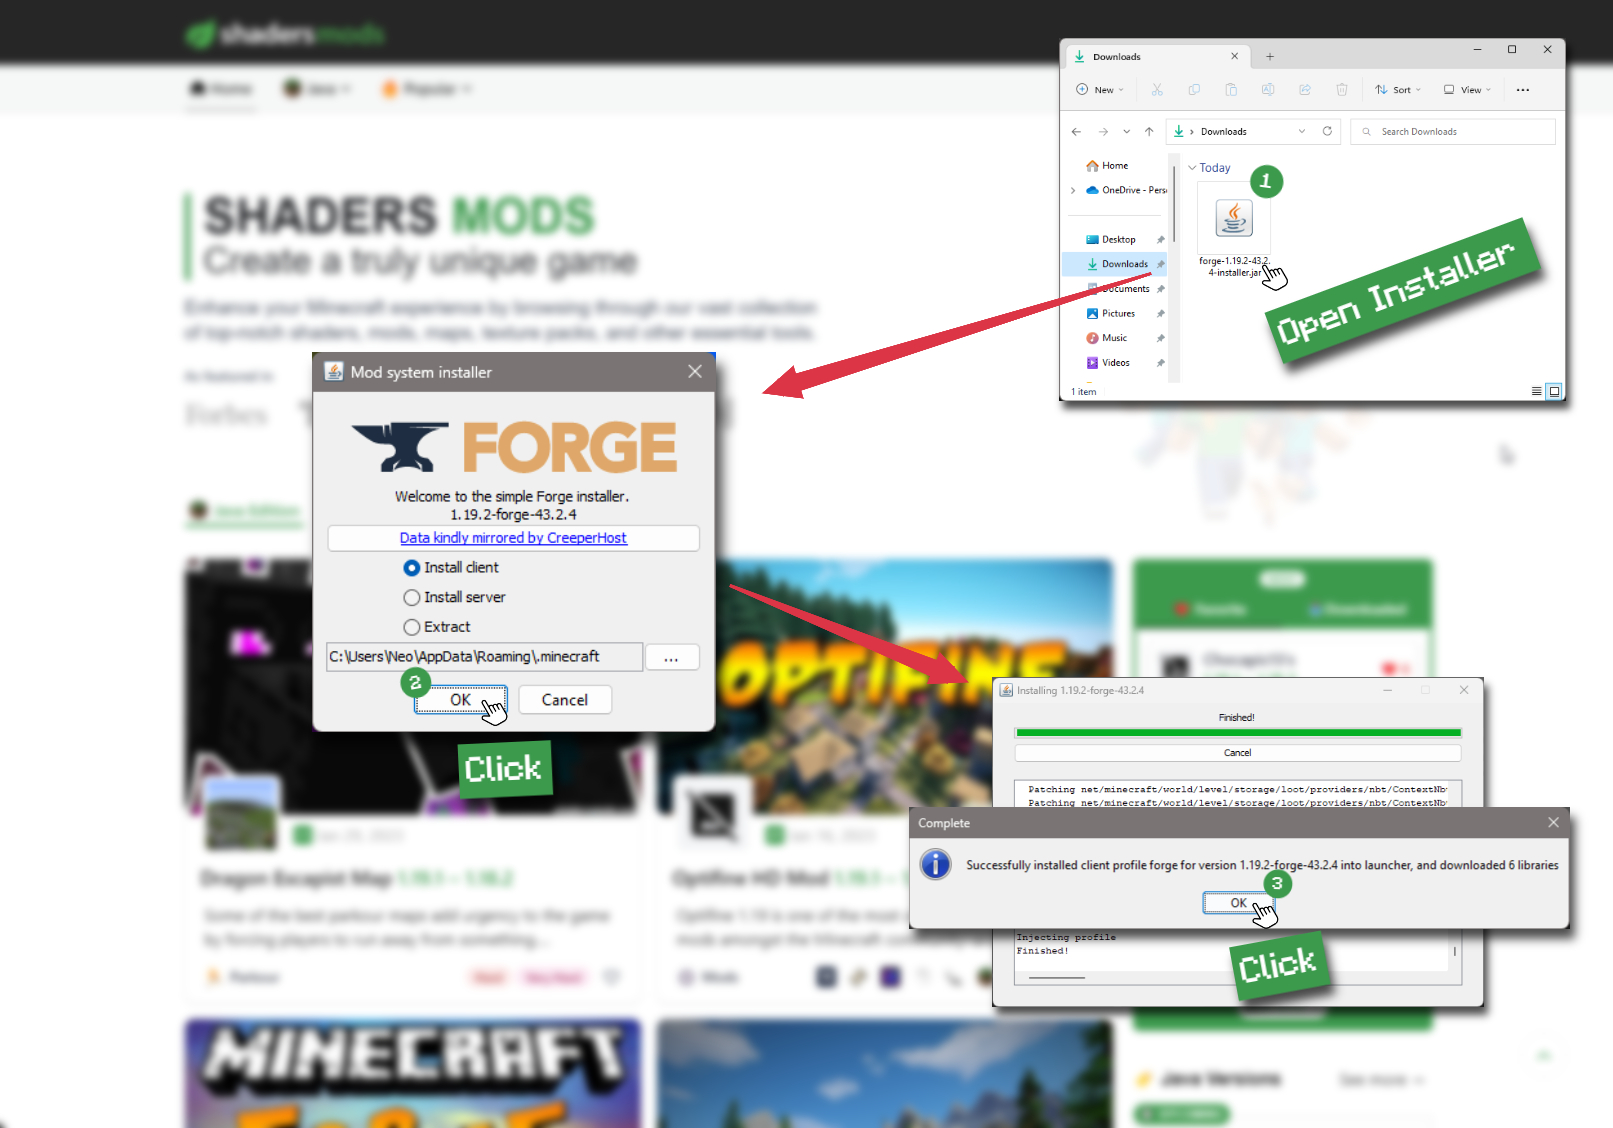
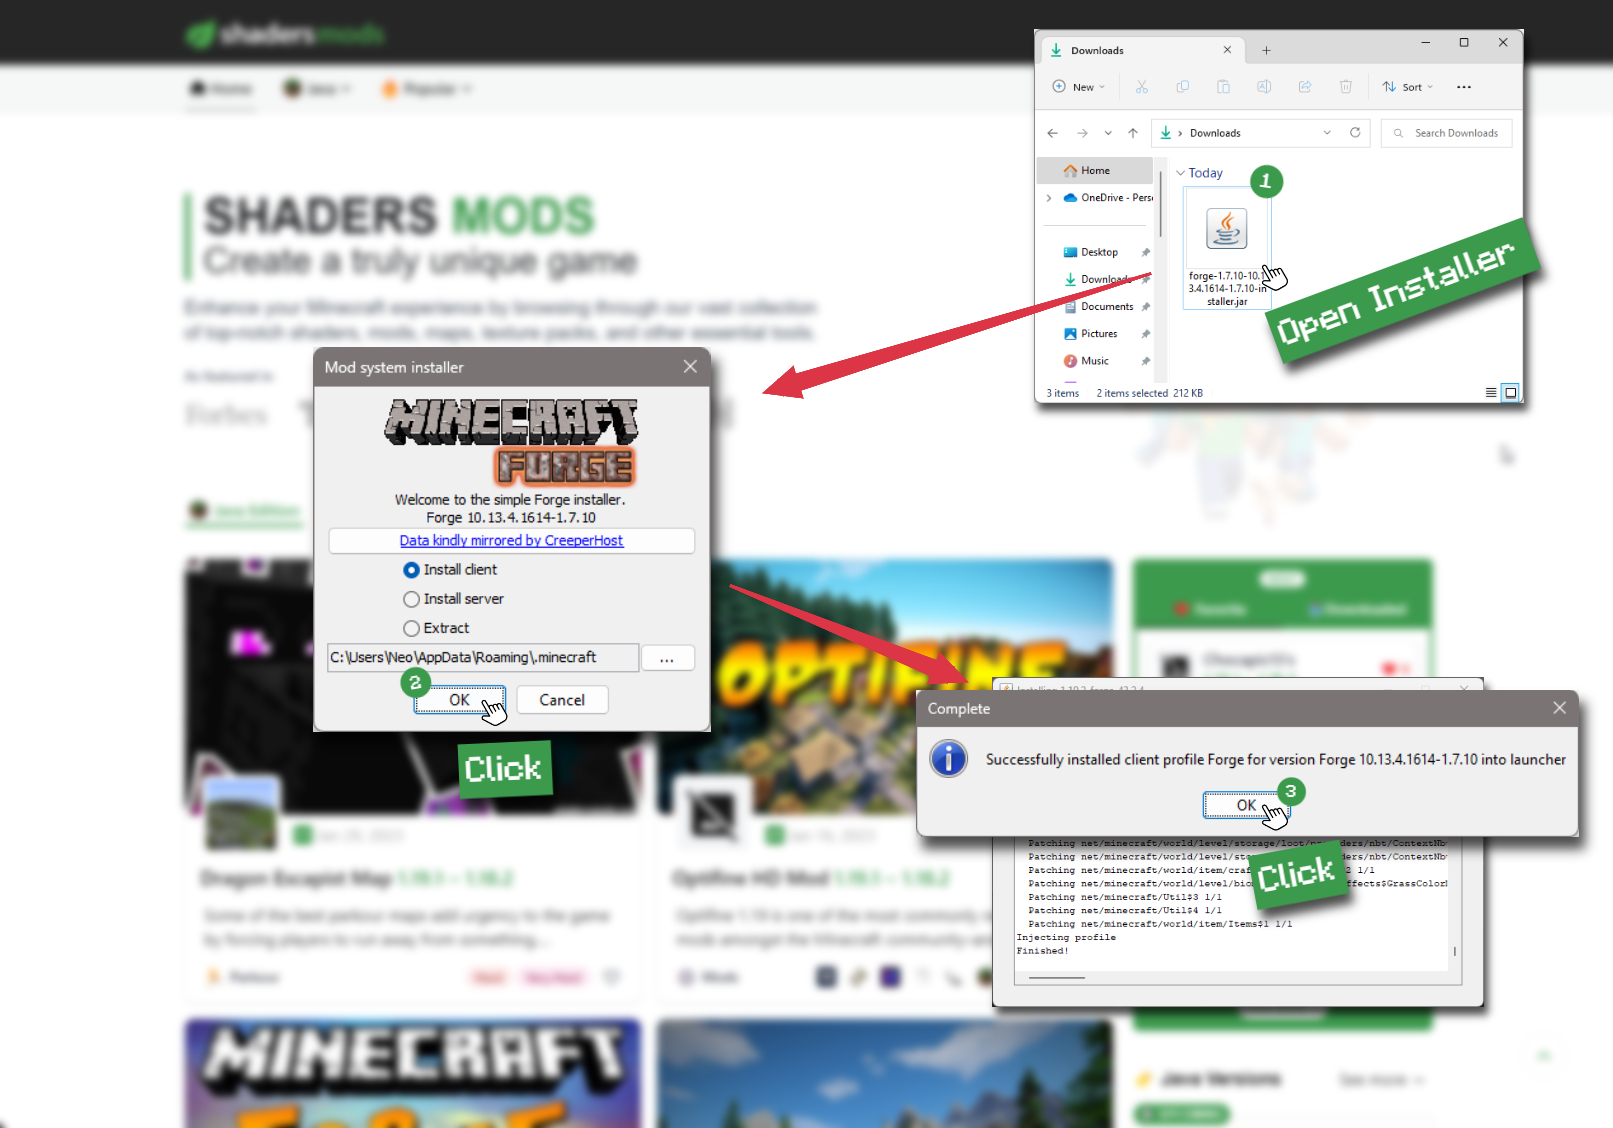
Install Forge
Obtain the latest version of Forge that is compatible with your Minecraft version.
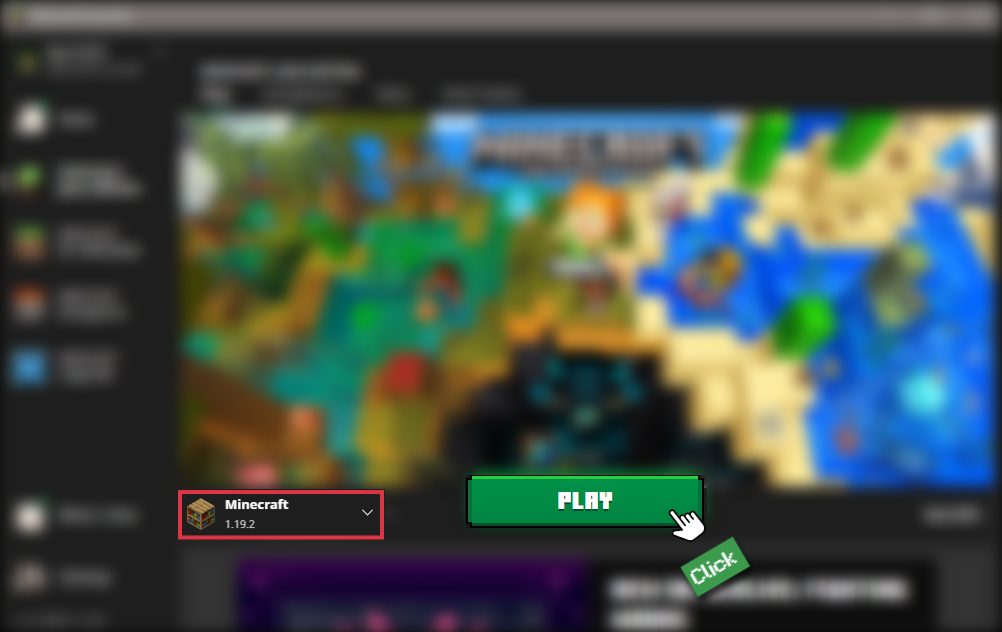
Download Minecraft ForgeLaunch Minecraft
Start the Minecraft launcher and select the version of Minecraft you want to install Forge on. Run the game once by clicking on the "Play" button to create necessary files for Forge.
Install Forge Client
Double-click on the Forge installer jar file and choose "Install Client" in the window that appears.
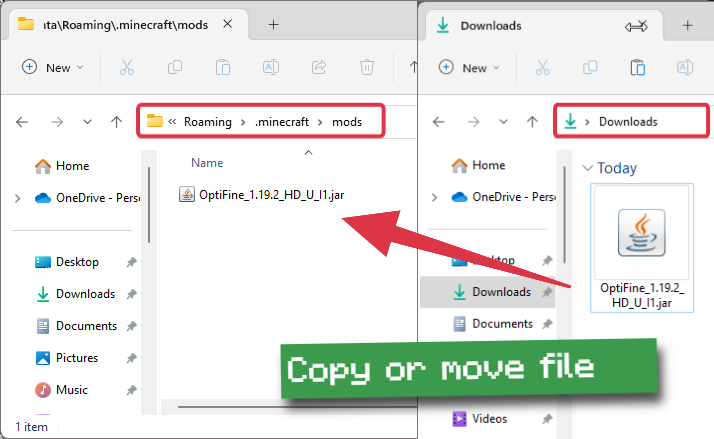
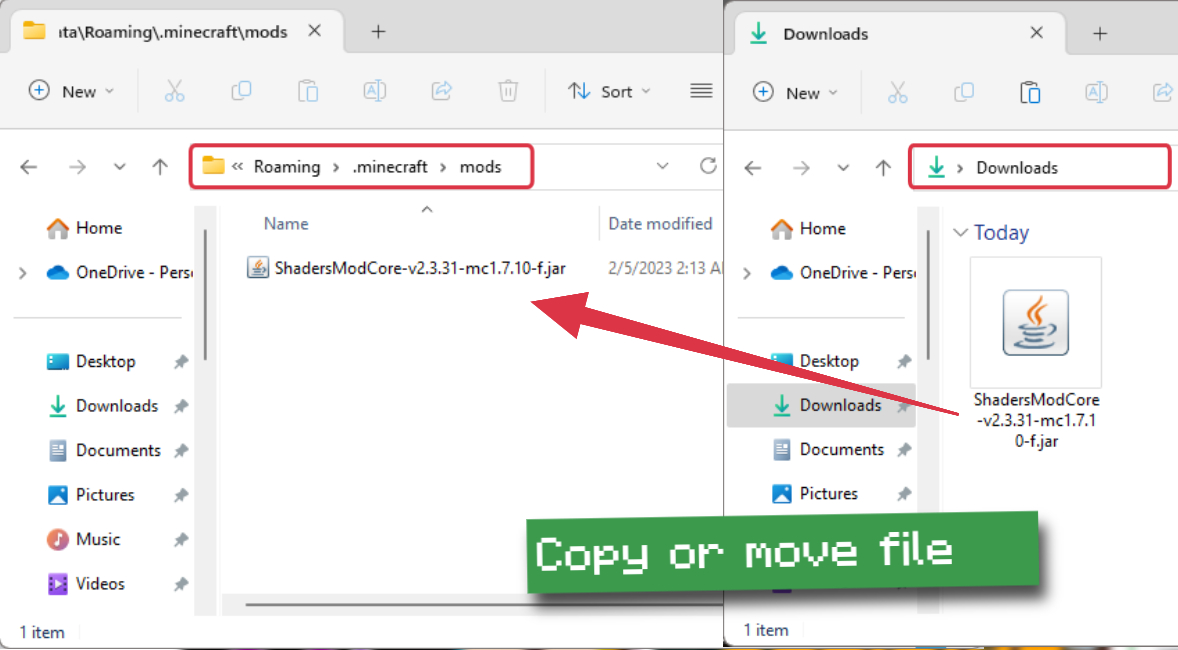
Install Optifine
Download the Optifine jar file after Forge is installed. Move the Optifine jar file to the mods folder in the .minecraft directory.
Download Optifine
Launch Forge Profile
Launch Minecraft using the "Forge" profile, Optifine will be automatically loaded along with Forge.
Install Chocapic13's Shaders
Now the installation is the same as from the above Optifine instructions, just follow the steps starting from step 5.

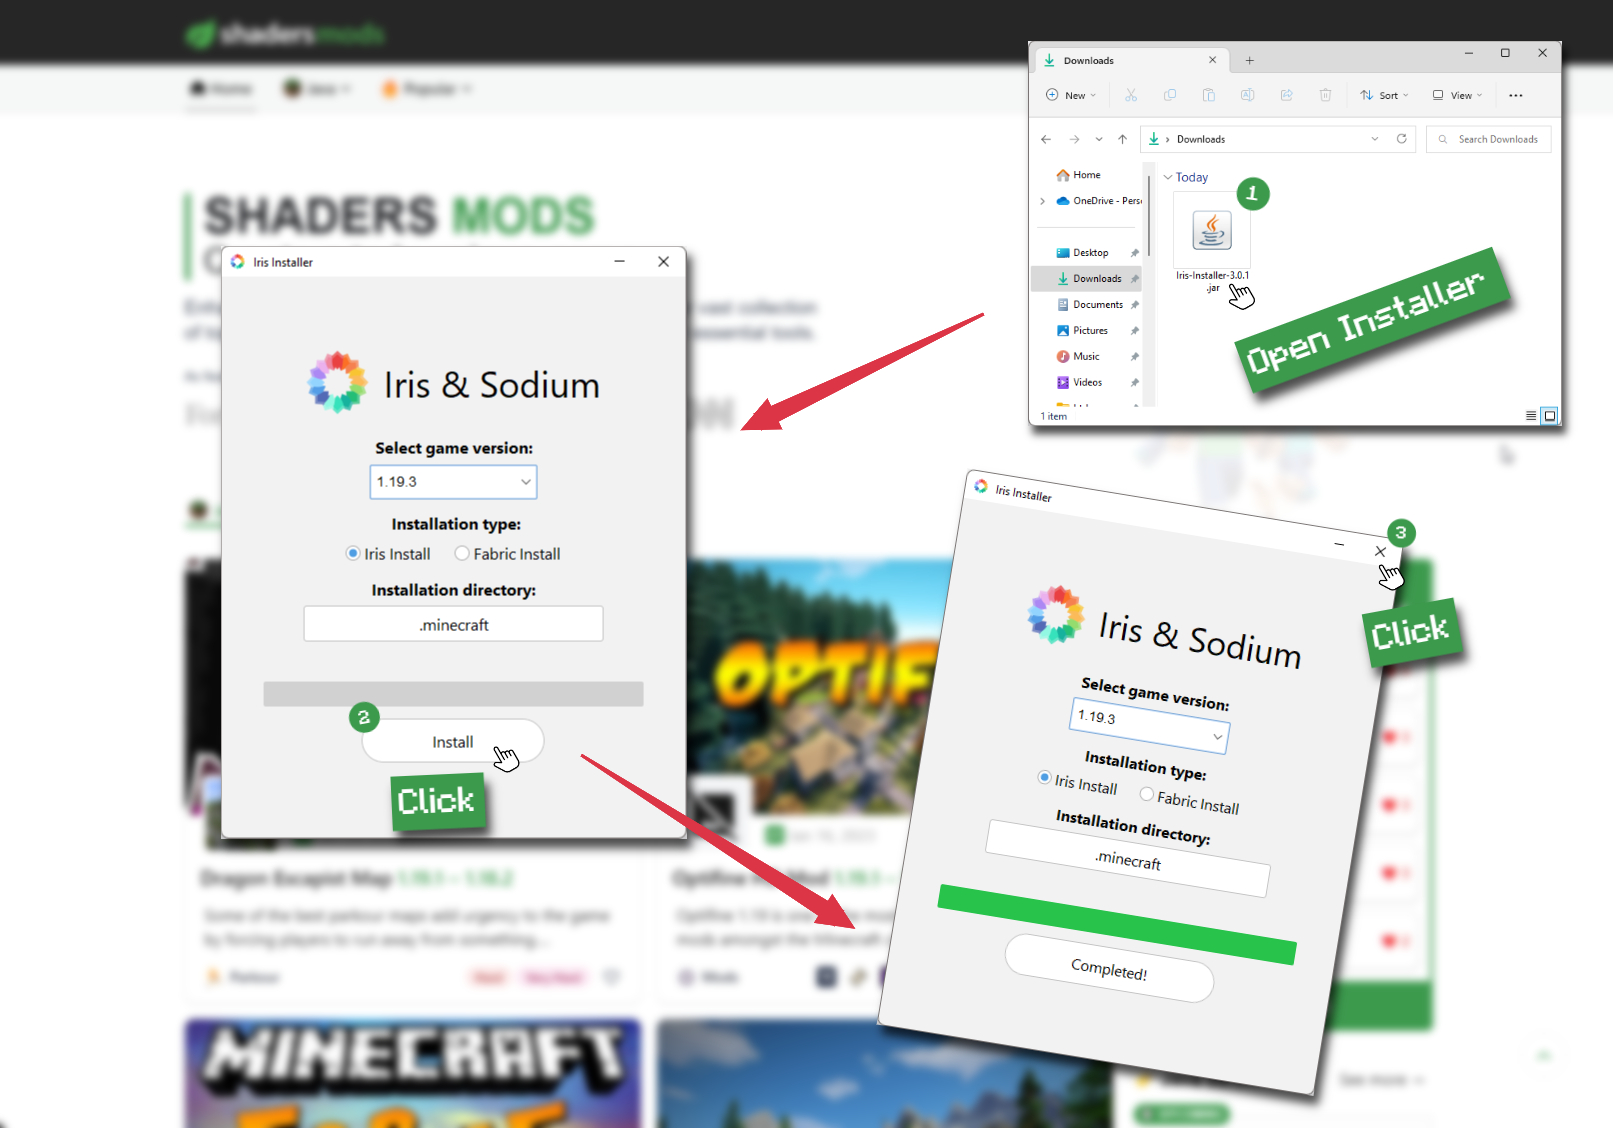
Iris Installation Guide
Note
Your device must have Java installed to run the Iris installer.
Quick Java Installation Guide
Download Java
Download the Java installer from the official website here.
Open Installer
Once you have downloaded the file, run it and click the Install button.
How to install Stazza’s Super Shaders with Iris?
Download Iris Shaders
Find the latest version of the Iris Shaders installer and download it.
Download Iris InstallerInstall Iris Shaders
Open the downloaded jar file, and choose the preferred game version and installation type.
⯈ Iris Install:
If you don't plan on using any other mods with Iris, choose this option.⯈ Fabric Install:
Choose this option if you want to use Iris with Fabric and other mods. The Iris jar files will be copied to the mods folder within the .minecraft directory.
Start Installation
After selecting the game version and installation type, click the "Install" button to start the installation process.
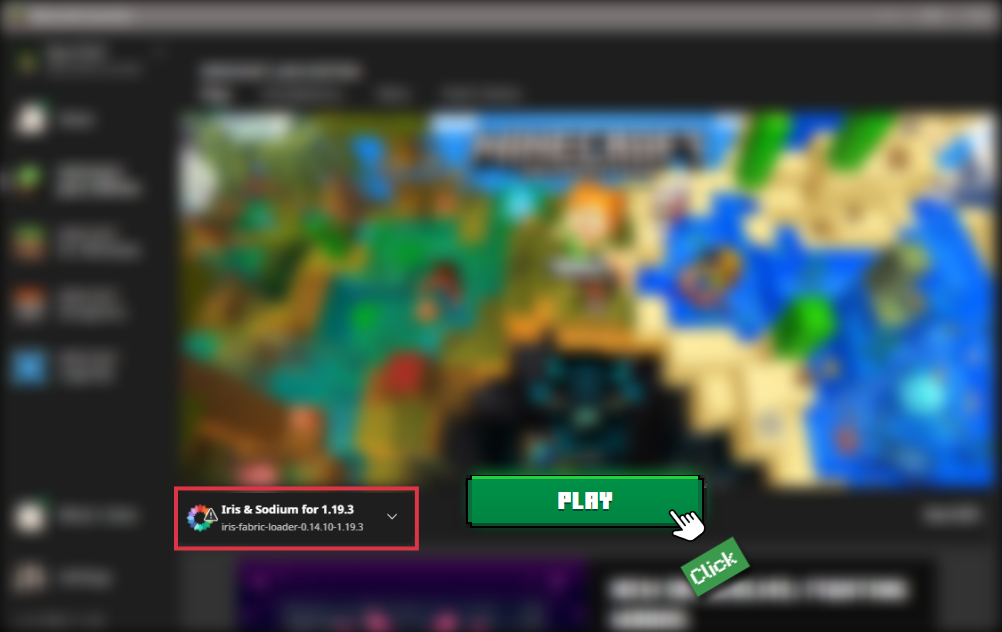
Launch Minecraft
Start the Minecraft launcher and make sure you have the Iris profile selected.
Note
Select the Fabric profile if you opt for the Fabric installation type.
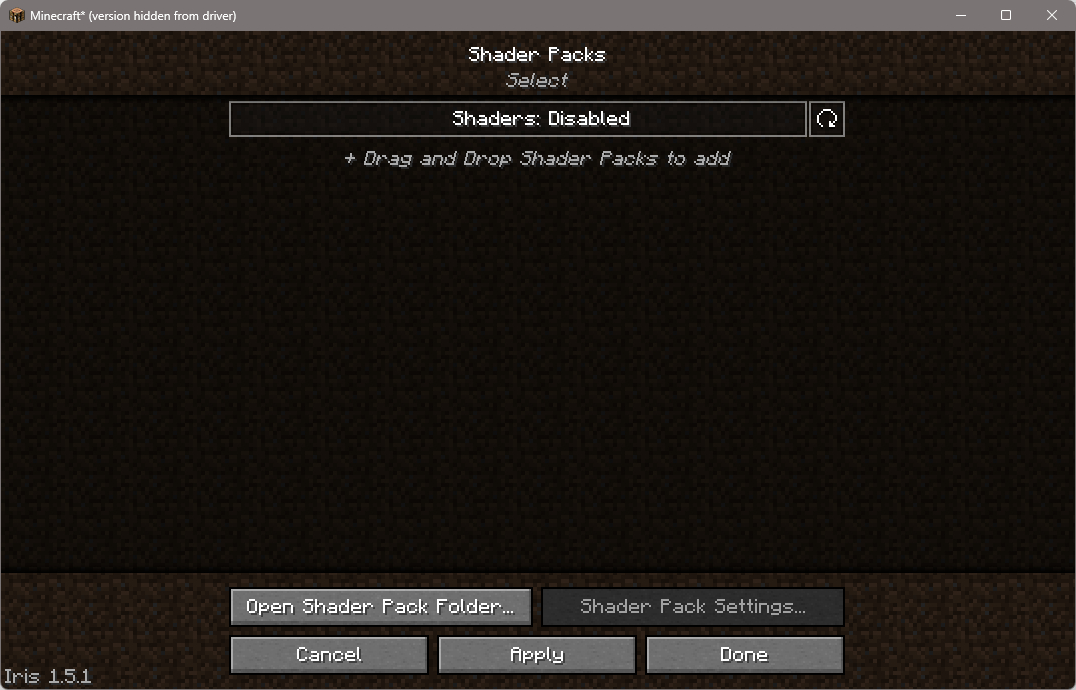
In-game Shader Menu
Open the Minecraft game and go to Options > Video Settings > Shader Packs to access the shaders menu.
Tip
To simplify the process, simply drag and drop the shader ZIP file directly into the Minecraft window, bypassing the next two steps.
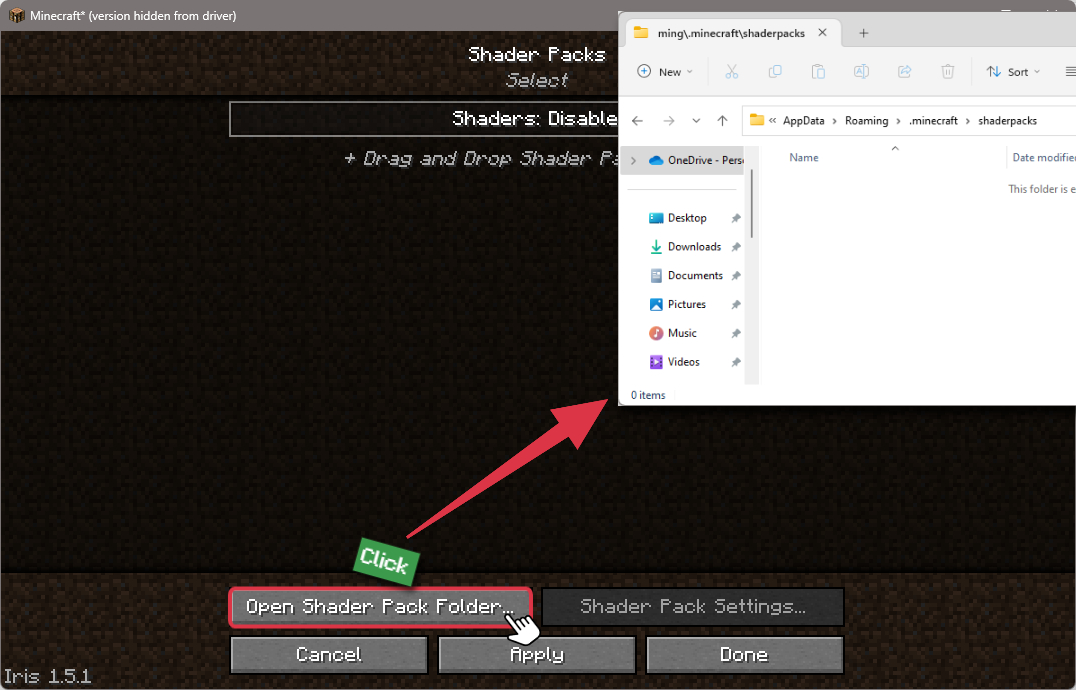
Open shaderpacks folder
Click on the "Open Shader Pack Folder" button to access the folder where shaders are stored.
Install Stazza’s Super Shaders
Copy or move the shaders zip file into the shaderpacks folder.
Select Stazza’s Super Shaders
Choose installed shader pack from the list of available shaders in the options menu and click the "Apply" or "Done" button to select it.
Tip
When the shader pack is selected, its name will be changed to yellow.
GLSL Installation Guide
Warning
How to install Stazza’s Super Shaders with GLSL Shaders Mod?
Install Forge
Download the latest version of Forge that is compatible with your Minecraft version.
Download Minecraft ForgeLaunch Minecraft
Start the Minecraft launcher and select the version of Minecraft you want to install Forge on. Run the game once by clicking on the "Play" button to create the necessary files for Forge.
Install Forge Client
Double-click on the Forge installer jar file and choose "Install Client" in the window that appears.
Install GLSL Shaders Mod
Download the GLSL jar file after Forge is installed. Move the GLSL jar file to the mods folder in the .minecraft directory.
Download GLSL Shaders
Launch Forge Profile
Launch Minecraft using the "Forge" profile, and GLSL Shaders will be automatically loaded along with Forge.
In-game Shaders menu
Go to Options > Shaders to access the shaders menu.
Open shaderpacks folder
Click on the "Open shaderpacks folder" button to open the folder where shaders are stored.
Install Stazza’s Super Shaders
Copy or move the downloaded shaders zip file into the shaderpacks folder.
Select Stazza’s Super Shaders
Choose Stazza’s Super shader pack from the list of available shaders in the options menu.


📥 Stazza’s Super Shaders — Download
Something You Should Know
- Our links are only from the official developer, so you can be sure they are secure.
- No modifications or edits are made to the files.
Stazza’s Super v5.0 Shaders:
DOF_HQ has a better DOF transition but lower FPS, while V5.0 has a smoother transition but a basic DOF.
Stazza’s Super v4.1 Shaders:
This versions is based on Chocapic's 4.8.1 Shader
Stazza’s Super v4.0 Shaders:
Stazza’s Super v1.0 Lite Shaders:
The Lite version is based on Chocapic's V4 medium shader.
🔄 Update Logs
V5.0
- Volumetric Light Based on Robobo’s shaders
- New colour ToneMap, Shaders option to return to Default colour if you like the old one better
- New lighting and colour tone to nights
- Shadows now pass through water onto the terrain underneath
- Stars at night time
- all new Bloom thanks to the creator of BSL Shaders
- New look to water along with “Basic” Caustics
- Desaturation Option to desaturate the colour or make everything Black and White
- Added DISTANT_BLUR to blur objects that are far away
- Added custom Shader Options for 1.8.9+ (also works on 1.9 and .1.9.2)
- Removed Dirty lens that could be seen when looking at Torches
- changed how 2D god rays look (Colour) and increased sun glow
- Fixed indoor light/shadows
- Fixed clouds reflecting on lower sky line
- A few other small improvements and changes that I most likly have missed
V4.1
New Features
- Changed watercolor and transparency, as well as added increased waves when raining
- Improved specular/rain effects on ground
- Increased tone map color and lighting brightness
- New 2D clouds from Chocapic’s V5 shader with my own touch to them
- The standard version of the shader still has the old 2D clouds that have had some improvements, as these clouds are more efficient and have no FPS hit.
- Plus has the new 2D clouds
- New Dirty lens from DeDelner (KUDA Shaders) when looking at torches/glow stones
- New Sky Colour
- New animated shadows (from Chocapic’s V5 shader) for waving entities like grass, leaves, and vines
- A new addition to the Lens Flare, star-shaped beams of light from the sun
Bug Fixes
- Fixed rain particles flickering during the nighttime
- Fixed POM color tone mapping
Lite v1.0
- Dynamic Tone Mapping
- Dynamic Torch System
- New water from Chocapic13’s 4.8 shader
- Lens Flare
- New and improved Procedural clouds!
- MotionBlur and DOF (off by default), and both can be turned on at the same time.
- Cool new raindrops on screen (but they come with a bug during the transition from clear to rain with lighting/color problems)
- Double the FPS of my last standard version.
Comments (26)
i think download Optifine -_-