

Voyager 2.0 Shaders 1.20, 1.19.4 → 1.18.2
Voyager 2.0 is an improvement of the Voyager shader pack, with Optifine, Iris, and other mods support.
| Developer | 👤symbiome67 |
|---|---|
| Style | 🌅Realistic |
| Support GPUs | |
| Loaders | |
| Performance Impact | High |
| Settings | 105 |
| Presets | 🛠️ Low+4 |
| Features | Ambient Occlusion |
| Created | May 25, 2021 |
| Updated | Apr 10, 2023 |
| Stats |
|
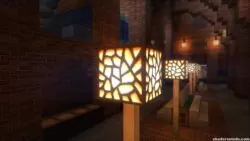
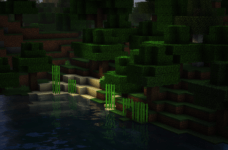
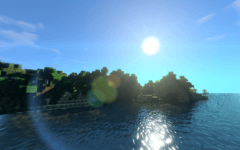
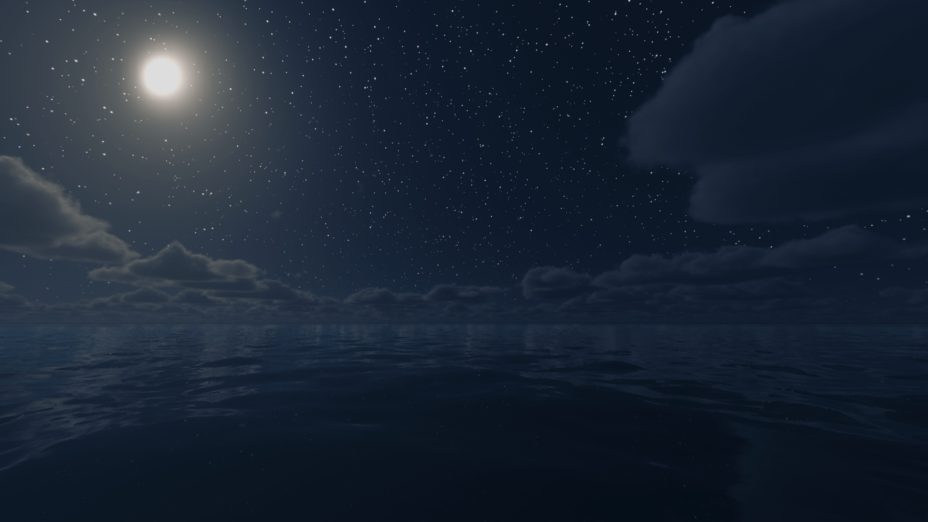
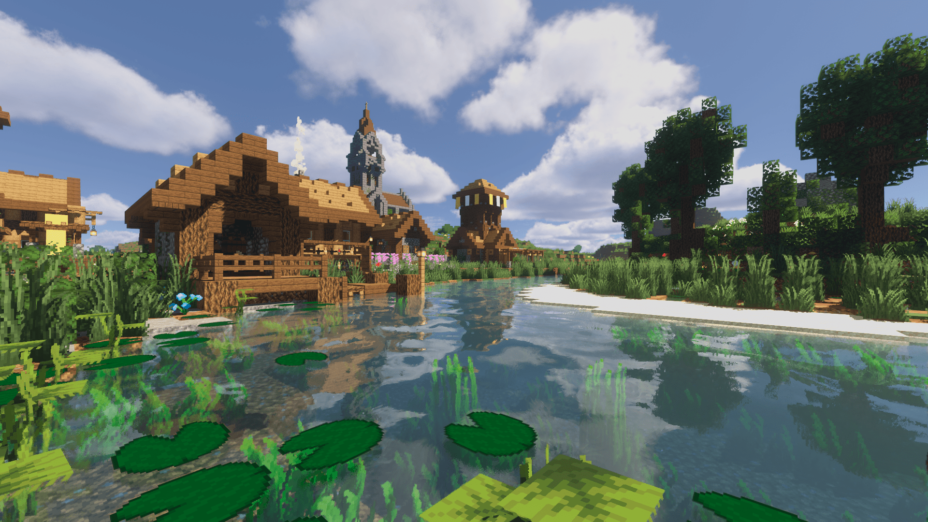
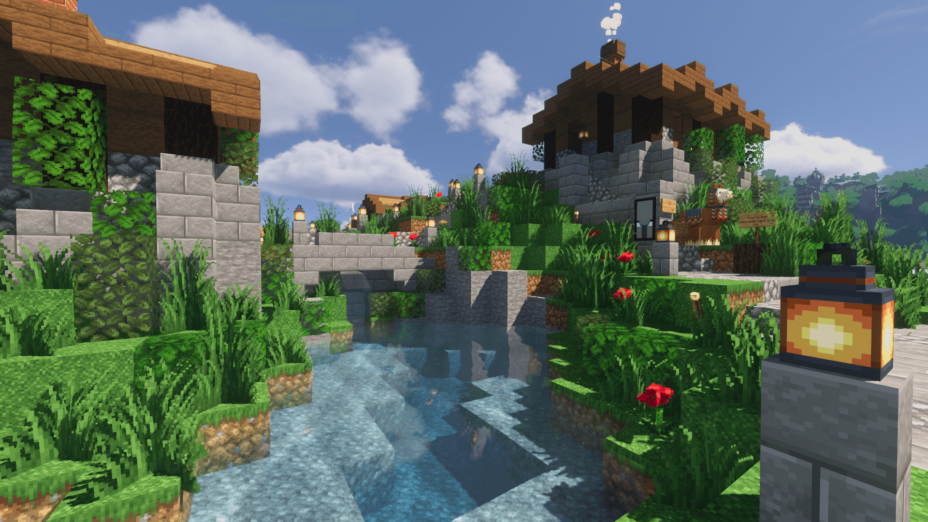
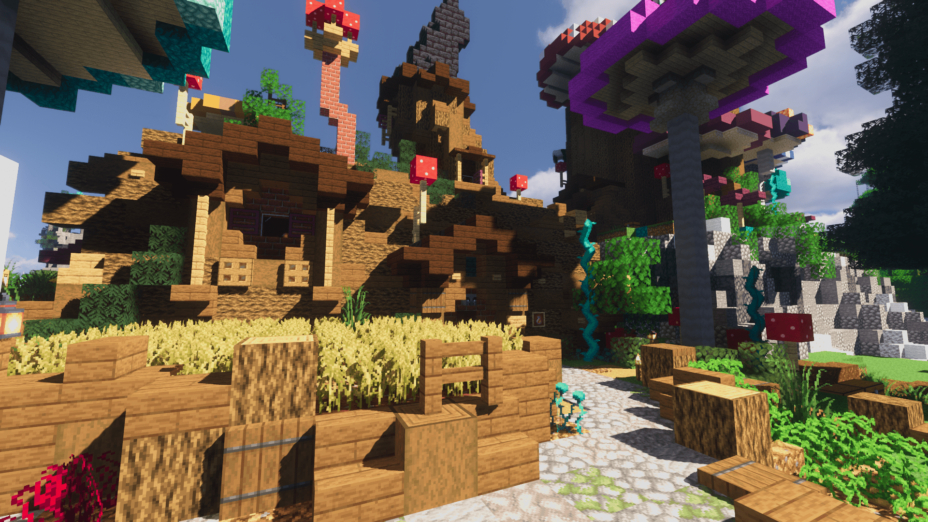
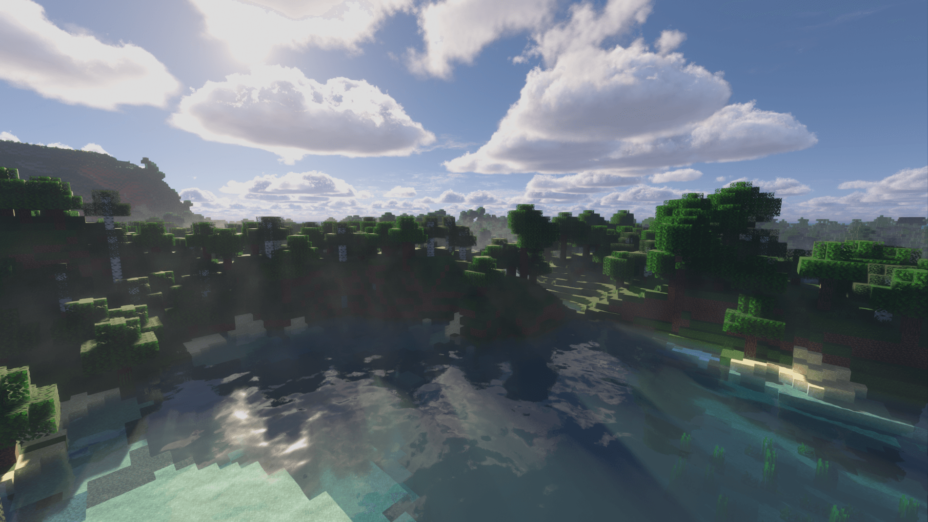
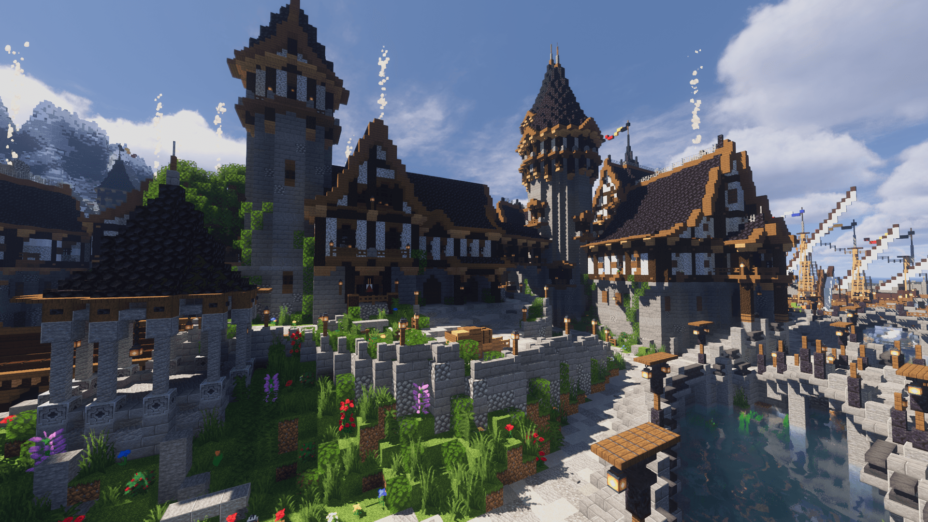
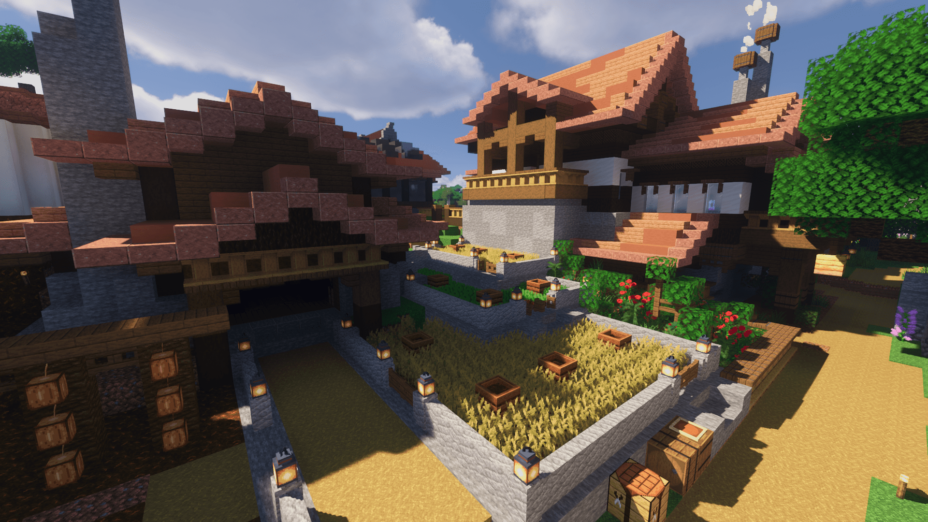
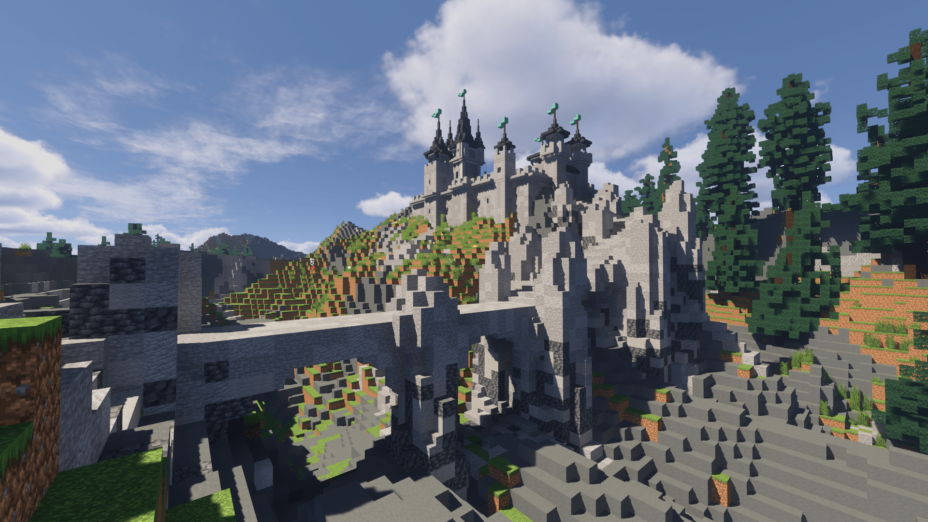
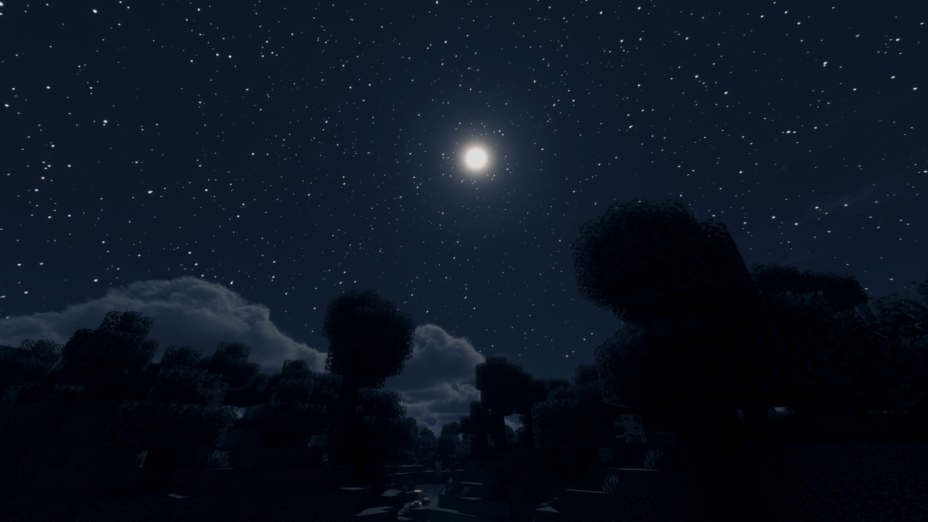
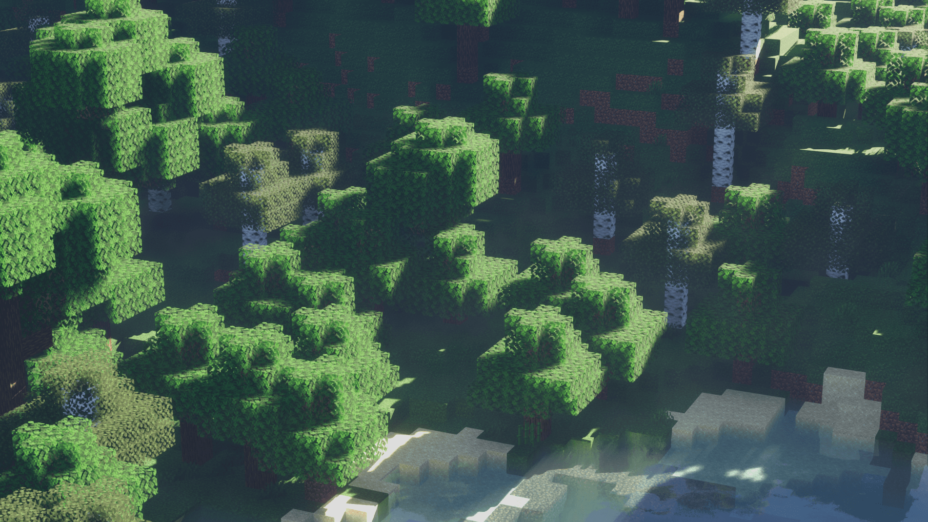
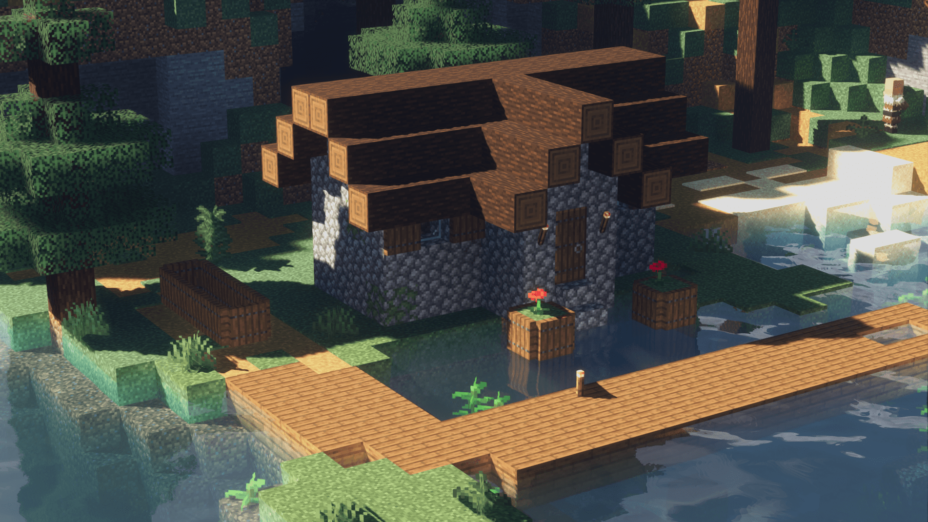
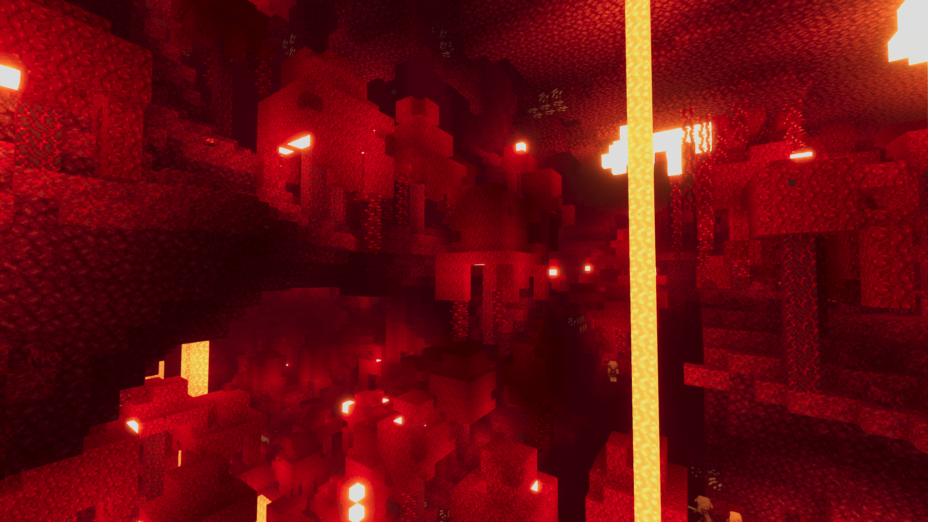
Voyager 2.0 Shaders is the second, more recent version of the Voyager Shader Pack, which is a couple of years old now. The newer 2.0 is still getting regular updates, with a few coming out a few days ago. It’s not just a compatibility thing either, since Voyager Shader 2.0 adds some new features to the classic Voyager pack; brighter greens and blues make grass and water really pop and stand out, and this is even better thanks to wavering and wiggling effects that make the whole world look like it’s breathing. Shadows aren’t especially detailed, but they do move along with the position of the sun or moon in the sky, so they’re dynamic, at least.
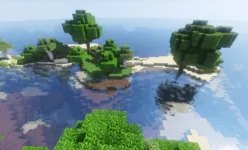
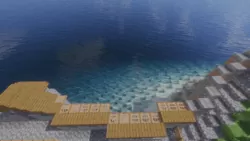
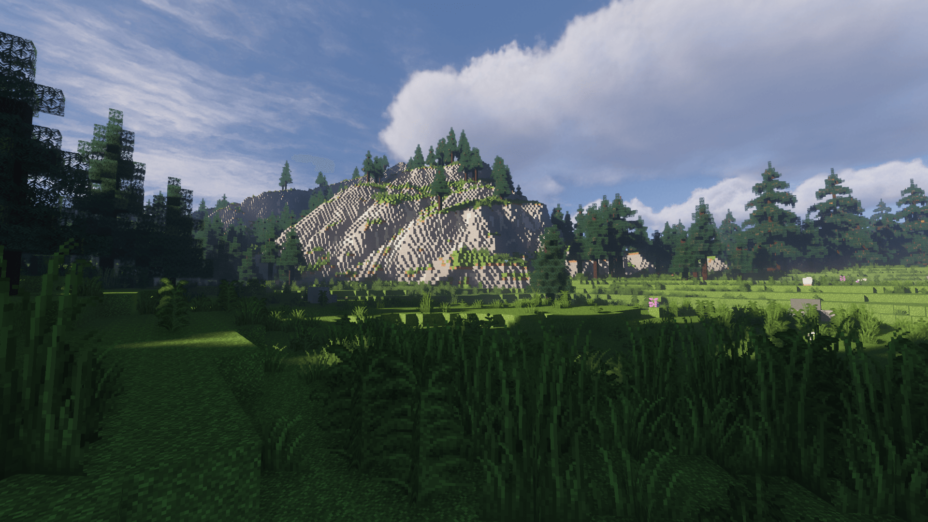
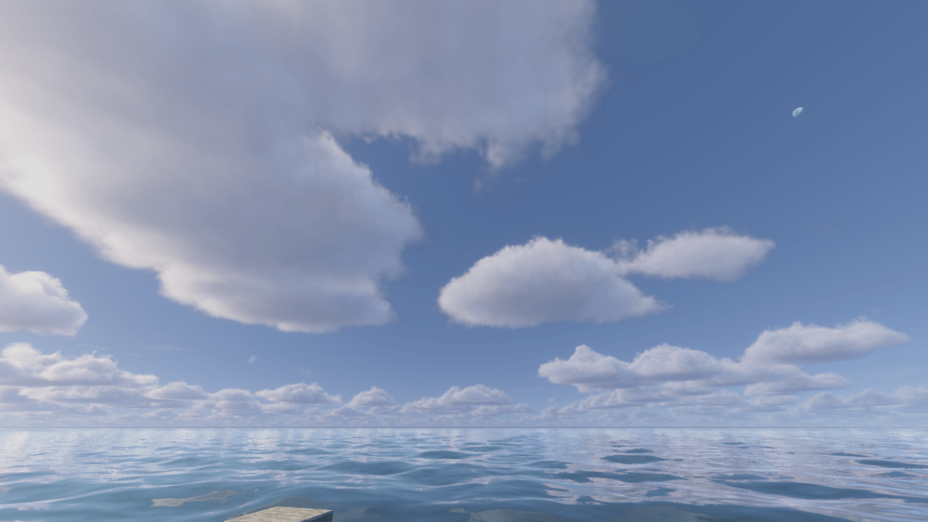
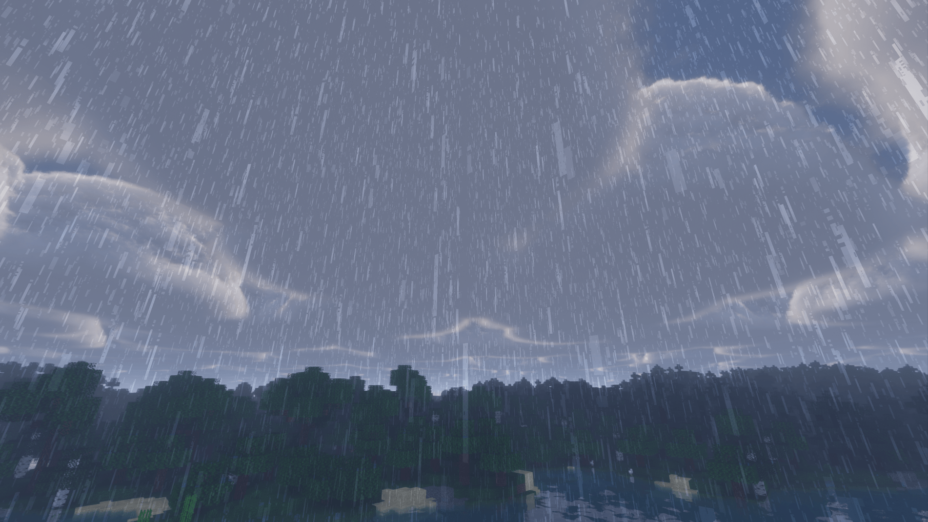
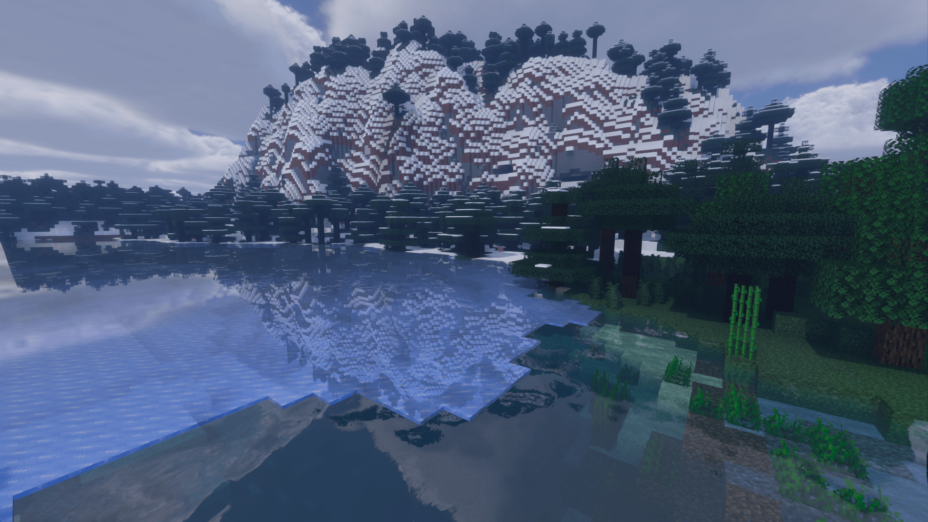
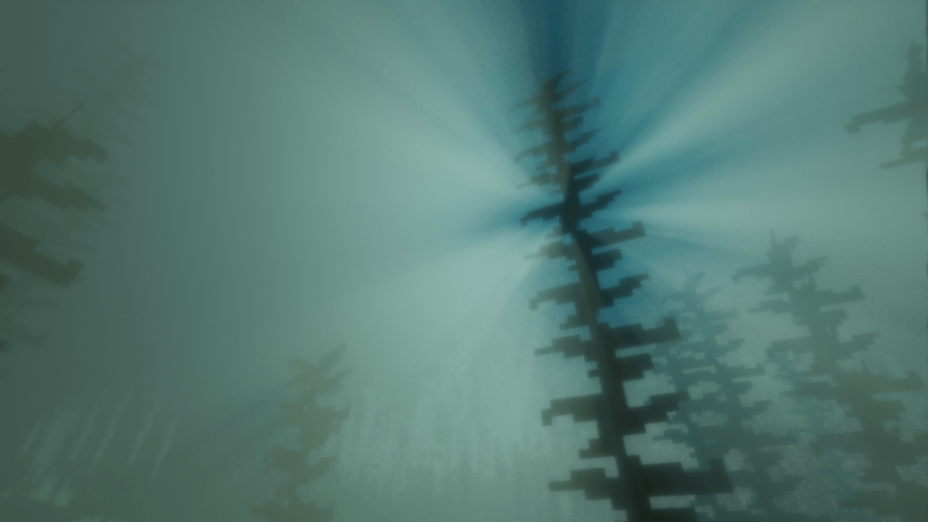
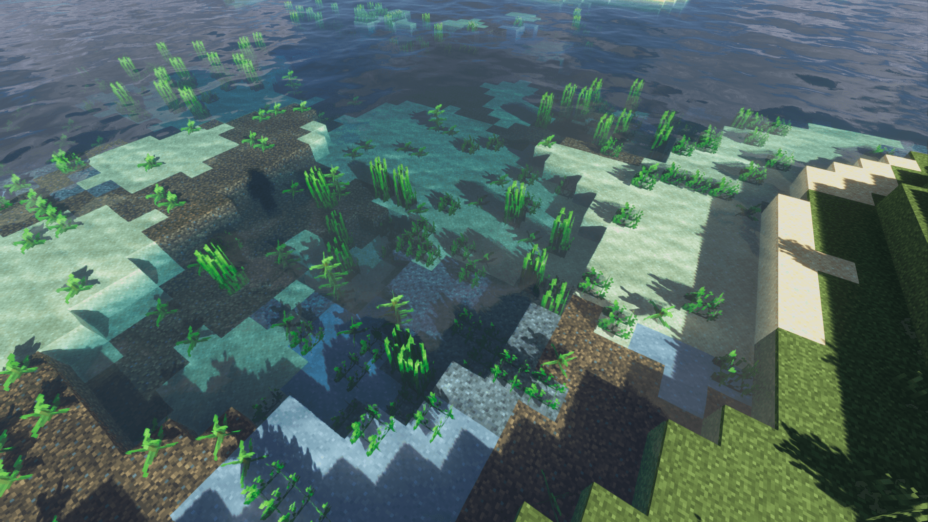
This means that the same structure or environment, observed at different times of day, will have an assortment of appearances. Voyager Shaders feature volumetric clouds too. They’re big and puffy, looking like real clouds you’d see if you went outside and looked up at the sky. They billow and move just like real clouds, and functionally, they cast shadows of their own that move as they, and the sun, go through their movement cycles. Reflections are a thing, too, allowing for mirrored surroundings as long as it isn’t raining or too dark to see.
For Voyager Shader 2.0, you need a very specific version of Optifine and Iris because of compatibility issues. If you’re using Minecraft 1.17 or newer, you’ll need Optifine HD U G9 or a new version. For 1.16 and older, use Optifine HD U G8. For even older versions of Minecraft, consider using the original Voyager shader pack instead. With the good number of options available, you should be able to find a version that works for your setup, then tweak it to suit your needs; it’s very easy to customize with just some clicks.
- 1.20
- 1.19.4
- 1.19.3
- 1.19.2
- 1.19.1
- 1.19
- 1.18.2
- 1.18.1
- 1.18
- 1.17.1
- 1.17
- 1.16.5
- 1.16.4
- 1.16.3
- 1.16.2
- 1.16.1
- 1.16
Note
Supported Mods
- Biome O Plenty
- Botania
- Abnormals atmospheric
- Abnormals autumnity
- Abnormals environmental
- Abnormals neapolitan
- Abnormals update aquatic
- Abnormals bussier bees
- Earth mob mod
- Desolation
- Astral sorcery
- Farmer’s delight
- Oh the biomes you’ll go
- Ecotones
- Terrestria
- Wild world
- Dynamic trees
Features
Over 1 new features are available in Voyager 2.0 Shaders to enhance your gaming experience.
📊 Performance Impacts
Decrease in performance can vary from device to device, driver version, and many other factors, you should test yourself on your machine for the best result.
-
- None
- No performance decreases
-
- Small
- ~5%
-
- Medium
- ~10%
-
- High
- ~25%
-
- Extreme
- +50%
There are 5 profiles pre-built into Voyager 2.0 Shaders to adjust the level of intensity of these effects.
| Profiles |
Low |
Medium |
High |
Ultra |
Extreme |
|---|---|---|---|---|---|
Sharpen | |||||
Ambient occlusion | |||||
Quality | |||||
Clouds shadow | |||||
Quality | |||||
Global illumination | |||||
Quality | |||||
INDIRECT_FILTER | |||||
Parallax waves | |||||
Planar clouds | |||||
Quality | |||||
SCREEN_SPACE_SHADOW | |||||
Quality | |||||
Shadow type | |||||
Resolution | |||||
Temporal anti aliasing | |||||
TERRAIN_REFLECTION | |||||
Volumetric clouds | |||||
Quality | |||||
Volumetric fog | |||||
Quality | |||||
Volumetric light | |||||
Quality | |||||
Caustics | |||||
Water fog | |||||
Quality | |||||
Waving vegetation |
Voyager 2.0 Shaders allow you to change more than 105 settings to suit your needs.
| Settings |
Description |
Options |
|---|---|---|
| Created by | Voyager shaders 2.0. Made in Alsace. Developped by SixSeven |
|
| Light settings | ||
| Sunlight brightness | Adjust the brightness of the sunlight |
|
| Moonlight brightness | Adjust the brightness of the moonlight |
|
| Blocklight brightness | Adjust the brightness of the blocklight |
|
| Blocklight temperature | Adjust the temperature color of the blocklight in Kelvin unit |
|
| Shadow brightness | Adjust the brightness of the shadow |
|
| Sun angle rotation | Adjust the sun path rotation. Positive number |
|
| Shadow settings | ||
| Shadow type | Select the smooth type of shadow |
|
| Quality | Select the quality of shadow. Higer value cost performances |
|
| Colored shadow | Colored shadow cast by translucent block |
|
| Resolution | Select the resolution of shadow. Higer value cost performances |
|
| Clouds shadow | Shadow cast by Volumetric clouds |
|
| Indirect settings | ||
| Global illumination |
| |
| Quality | Select the quality of Global illumination. Higer value cost performances |
|
| Radius |
| |
| Brightness |
| |
| Ambient occlusion | Make the corner a little more darker |
|
| Quality | Select the quality of SSAO only. Higer value cost performances |
|
| Atmosphere settings | ||
| Volumetric clouds settings | ||
| Volumetric clouds |
| |
| Quality | Adjust the quality of Volumetric clouds. Higher value cost performances |
|
| Altitude | Adjust the altitude of Volumetric clouds |
|
| Density | Adjust the density of Volumetric clouds |
|
| Time shift | Adjust the speed of Volumetric clouds |
|
| Thickness | Adjust the thickness of Volumetric clouds |
|
| Coverage | Adjust the coverage of Volumetric clouds |
|
| Weather coverage | Adjust the coverage of Volumetric clouds only in rainy or stormy weather |
|
| Clouds shadow | Shadow cast by Volumetric clouds |
|
| Planar clouds settings | ||
| Planar clouds |
| |
| Density | Adjust the density of Planar clouds |
|
| Time shift | Adjust the speed of Planar clouds |
|
| Coverage | Adjust the coverage of Planar clouds |
|
| Volumetric light settings | ||
| Volumetric light | Add godrays and a distant fog |
|
| Quality | Adjust the quality of Volumetric light. Higher value cost performances |
|
| Density | Adjust the density of Volumetric light |
|
| Volumetric fog settings | ||
| Volumetric fog |
| |
| Quality | Adjust the quality of Volumetric fog. Higher value cost performances |
|
| Morning fog | Allows to display the fog only in the morning |
|
| Altitude | Adjust the altitude of Volumetric clouds |
|
| Coverage | Adjust the coverage of Volumetric clouds |
|
| Thickness | Adjust the thickness of Volumetric clouds |
|
| Density | Adjust the density of Volumetric clouds |
|
| Time shift | Adjust the speed of Volumetric clouds |
|
| Atmosphere type | Here you can set the type of the atmosphere you want |
|
| SixSeven's planet | The shader icon, a gas planet located more than 14 million kilometers away |
|
| Terrain settings | ||
| Water settings | ||
| Waves settings | ||
| Parallax waves | Allows the waves to have a 3D rendering |
|
| Waves preset | Allows you to choose the type of waves |
|
| Frenquency |
| |
| Height |
| |
| Scale |
| |
| Time shift |
| |
| Water fog settings | ||
| Water fog |
| |
| Water color preset | Allows you to choose between several types of colors for the water fog |
|
| Quality | Adjust the quality of water fog. Higher value cost performances |
|
| Density | Adjust the density of water fog |
|
| Scattering R |
| |
| Attenuation R |
| |
| Scattering G |
| |
| Attenuation G |
| |
| Scattering B |
| |
| Attenuation B |
| |
| Caustics | When water refract the light |
|
| Intensiy | Adjust the Intensity of cauctics |
|
| Reflection settings | ||
| Specular format | Allows to choose the reflection format according to the resource pack. Lab PBR is a standard format of Shaderslabs. Seus PBR is an old format used by Seus and old shaders |
|
| Quality | Adjust the quality of the reflection. Higher value cost performances |
|
| Stained Glass reflection | Enable or disable the reflection on stained glass block and panes |
|
| Textures | Enables or disables textures |
|
| Waving vegetation | Allows you to activate or deactivate the movement of the Vegetation |
|
| Parallax | Allows textures to be rendered in 3D. Requires a compatible resource pack |
|
| Parallax depth | Allows you to adjust the depth of the parallax |
|
| Camera settings | ||
| Anti aliasing settings | ||
| Temporal anti aliasing |
| |
| Sharpen | Makes the image sharper |
|
| Intensity | Adjust the intensity of sharpen |
|
| Tonemap settings | ||
| Tonemap type | Select the type of tonemap you want |
|
| Post process settings | Select the post process preset you want. Warning : Deep fried is very bright |
|
| Saturation |
| |
| Vibrance |
| |
| Contrast |
| |
| Gain |
| |
| Gamma |
| |
| Lift |
| |
| Exposure settings | ||
| Exposure type | Allows you to change the type of exposure. The 3 options below only affect the exposure in Manual |
|
| Brightness | Adjust the brightness |
|
| Aperture |
| |
| Iso |
| |
| Shutter speed |
| |
| Depth of Field settings | ||
| Depth of Field | Adds a blurred background effect |
|
| Intensity | Adjust the intensity of depth of field |
|
| Focal |
| |
| Aperture |
| |
| Chromatic abberation |
| |
| Intensity |
| |
| Bloom | Adds a simple blur effect on any bright object |
|
| Intensity | Adjust the intensity of bloom |
|
| Underwater bloom | Adds a small blur effect when the player is underwater |
|
| Intensity | Adjust the intensity of underwater bloom |
|
| Motion Blur | Adds a blur effect when the camera is in motion |
|
| Intensity | Adjust the intensity of motion blur |
|
| Vignette | Adds thumbnails to the corners of the screen |
|
| Size | Adjust the size of vignette |
|
| Wide screen | Adds black borders at the end of the screen |
|
| Size | Adjust the size of wide screen |
|
| Gameplay settings | ||
| Australian mode | Reverse the camera. Can you beat Minecraft like a australian ? |
|
| Visual damage | Added a red flash when the player takes damage |
|
| Green night vision | Added a green filter typical of night vision goggles. This effect is activated if the player has the Night Vision potion effect |
|
| Hand animation | Animate the hand like on Bedrock edition |
|
How To Install Voyager 2.0 Shaders
- Support Forge / Vanilla
- Extra features
- Good performance
- Support Fabric / Quilt
- Better performance, depend on your hardware
Optifine Installation Guide
Note
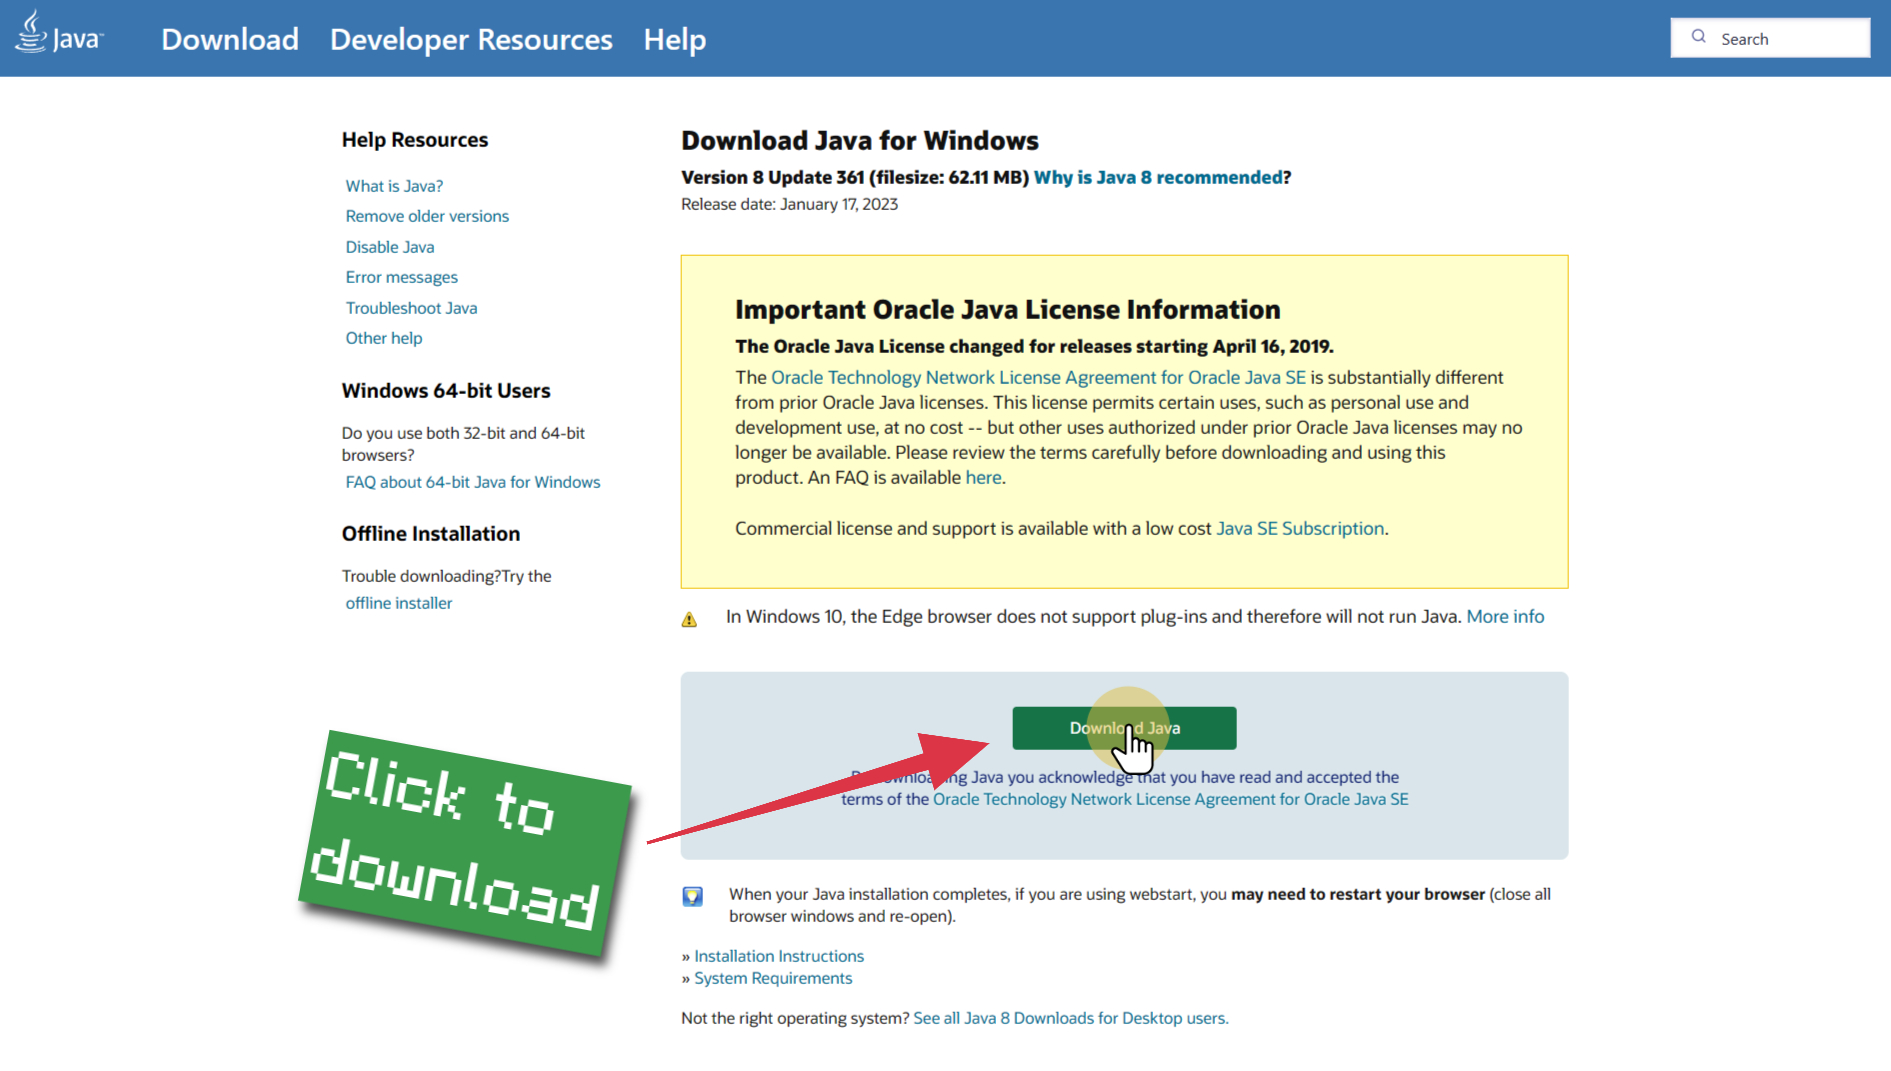
Your device must have Java installed to run the Forge and Optifine installers.
Quick Java Installation Guide
-
Download Java
Download the Java installer from the official website here.
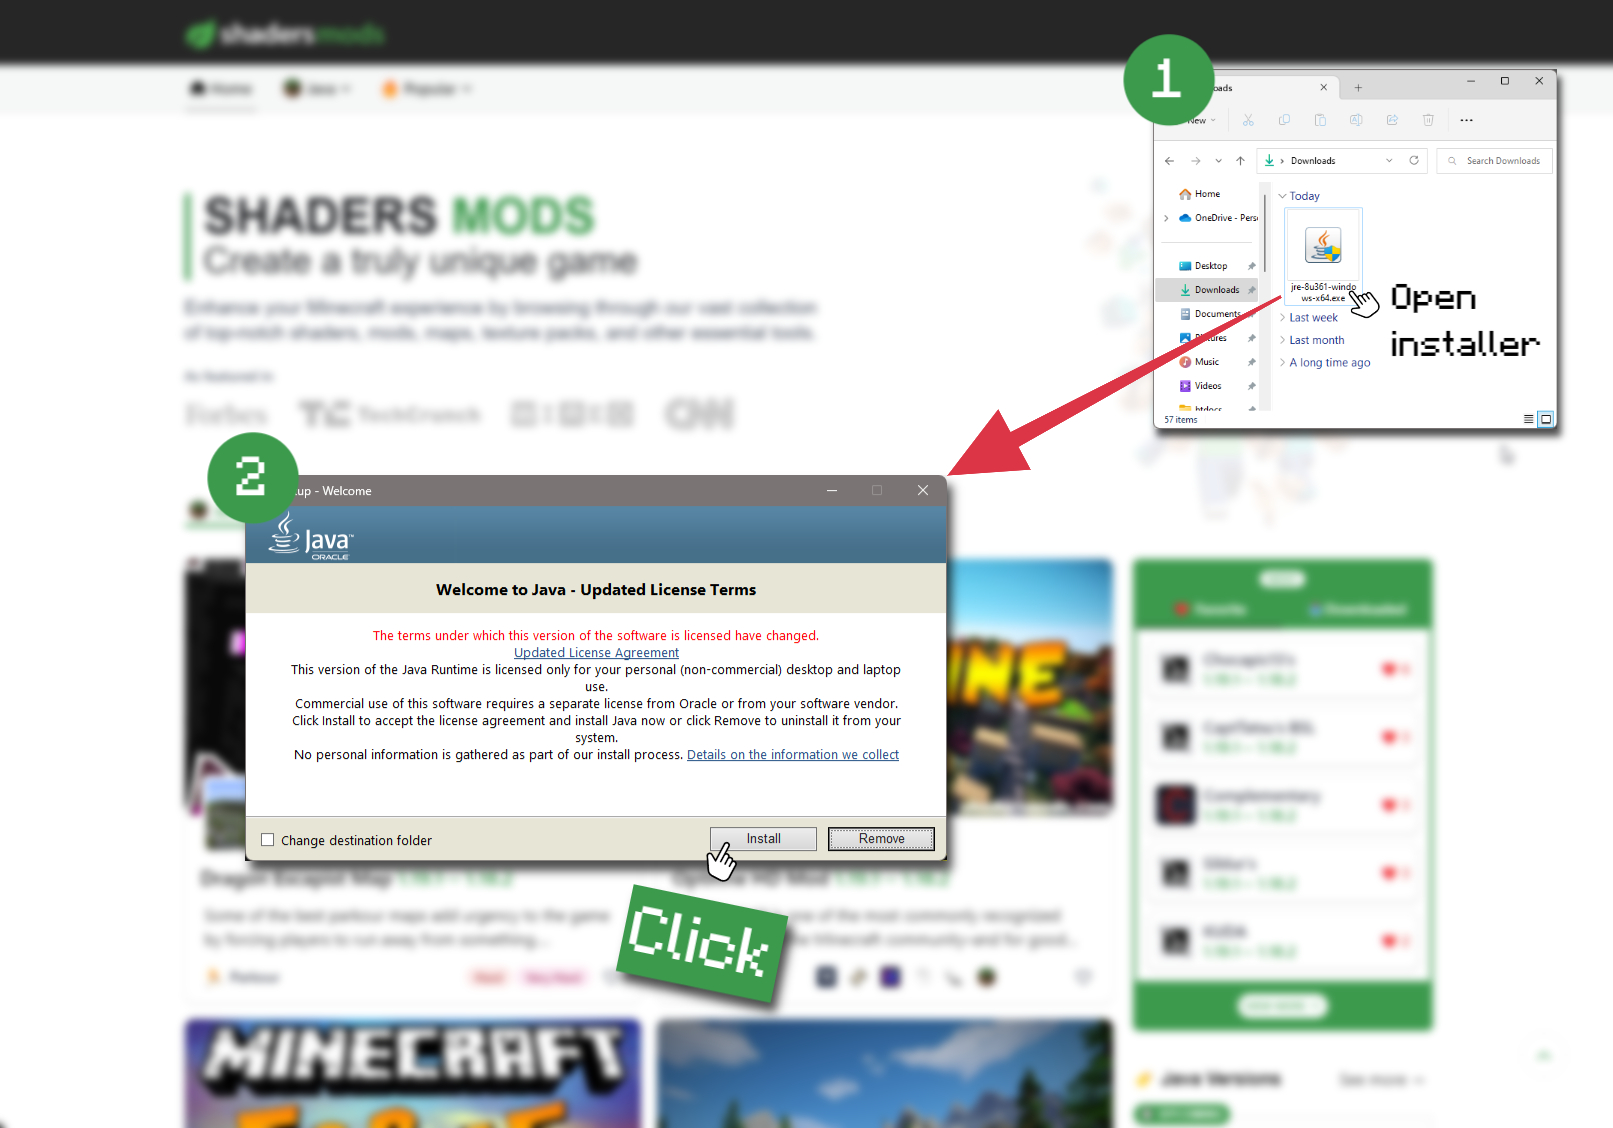
-
Open Installer
Once you have downloaded the file, run it and click the Install button.
How to install Voyager 2.0 Shaders with Optifine?
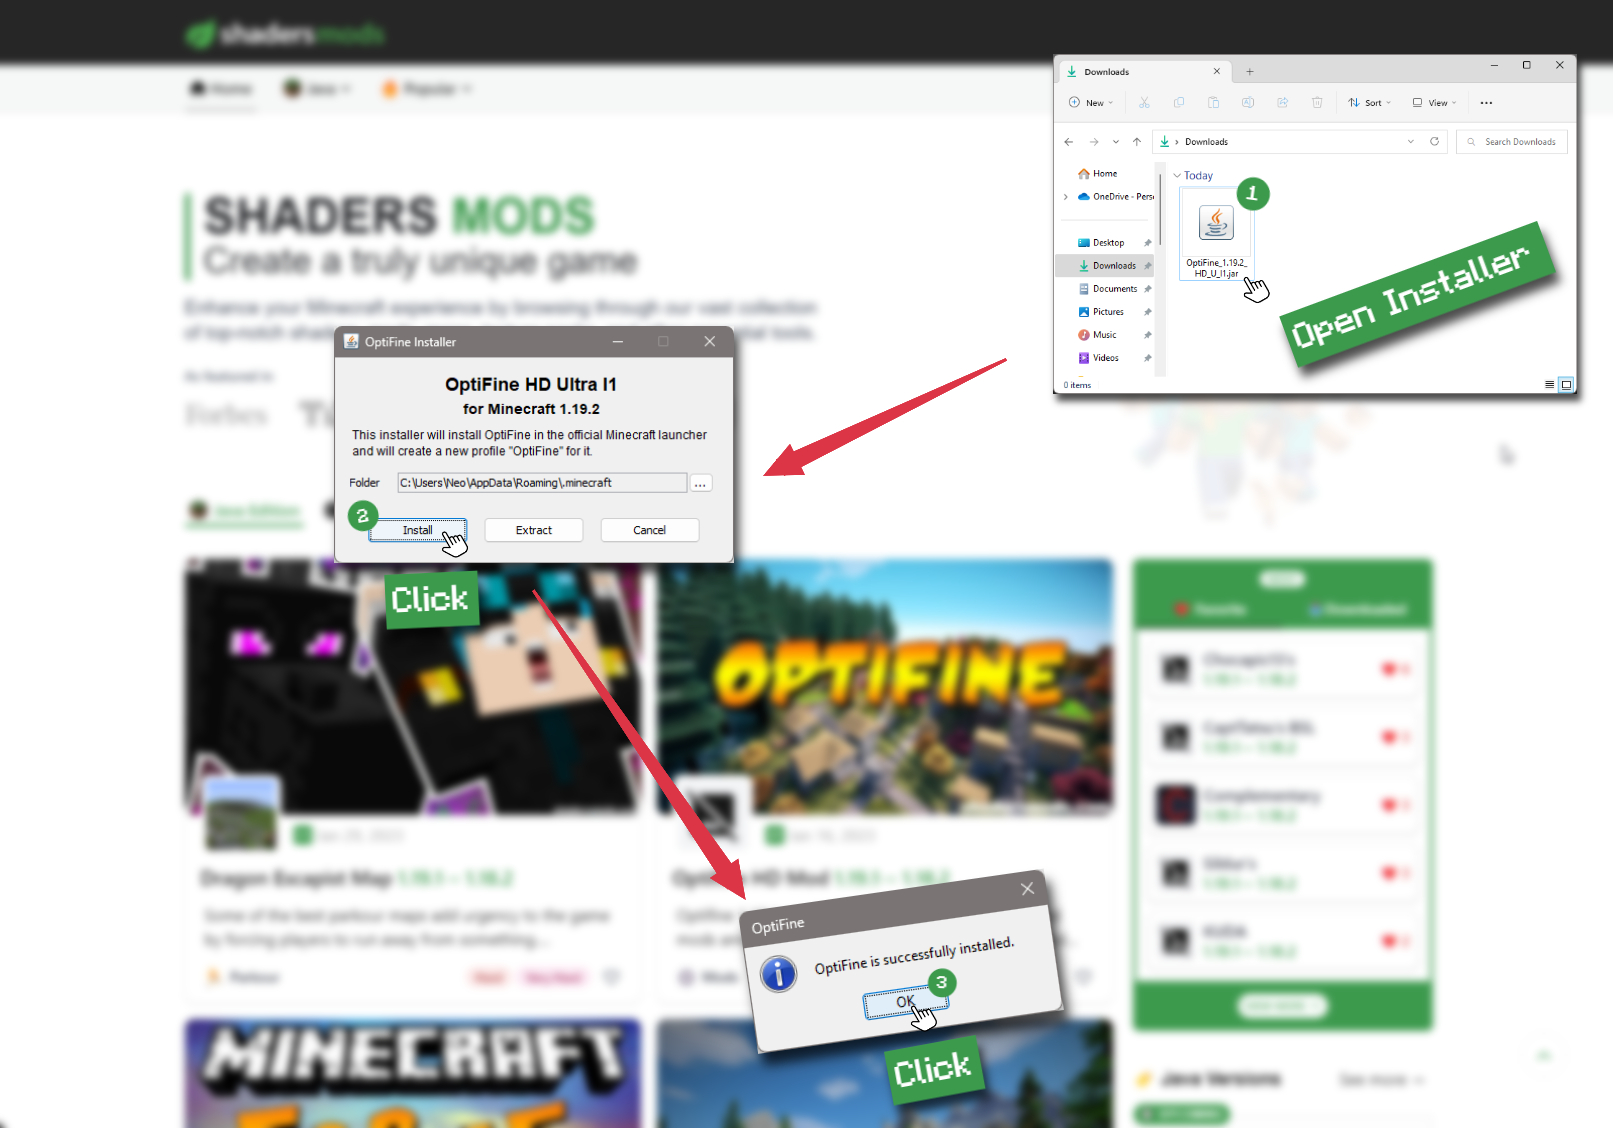
-
Download Optifine
Get the latest version of Optifine for your Minecraft version.
Download Optifine -
Install Optifine
Run the Optifine installer and follow the on-screen instructions to complete the installation.
-
Download Voyager 2.0 Shaders
Go to the download section and get shaders zip file. Unzip the file if necessary, as some shader developers may bundle multiple shader versions in one zip file.
-
Launch Minecraft
Start the Minecraft launcher and make sure you have the Optifine profile selected.

-
In-game Shaders menu
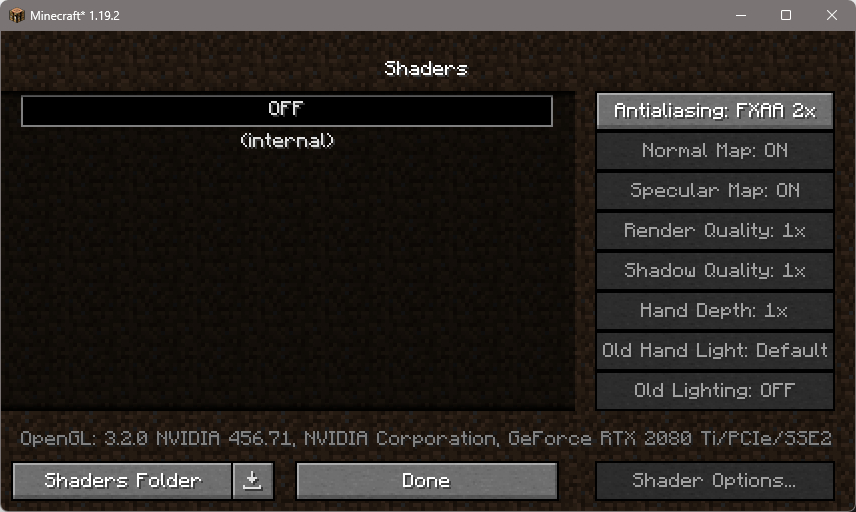
Go to Options > Video Settings > Shaders to access the shaders menu.
-
Open shaderpacks folder
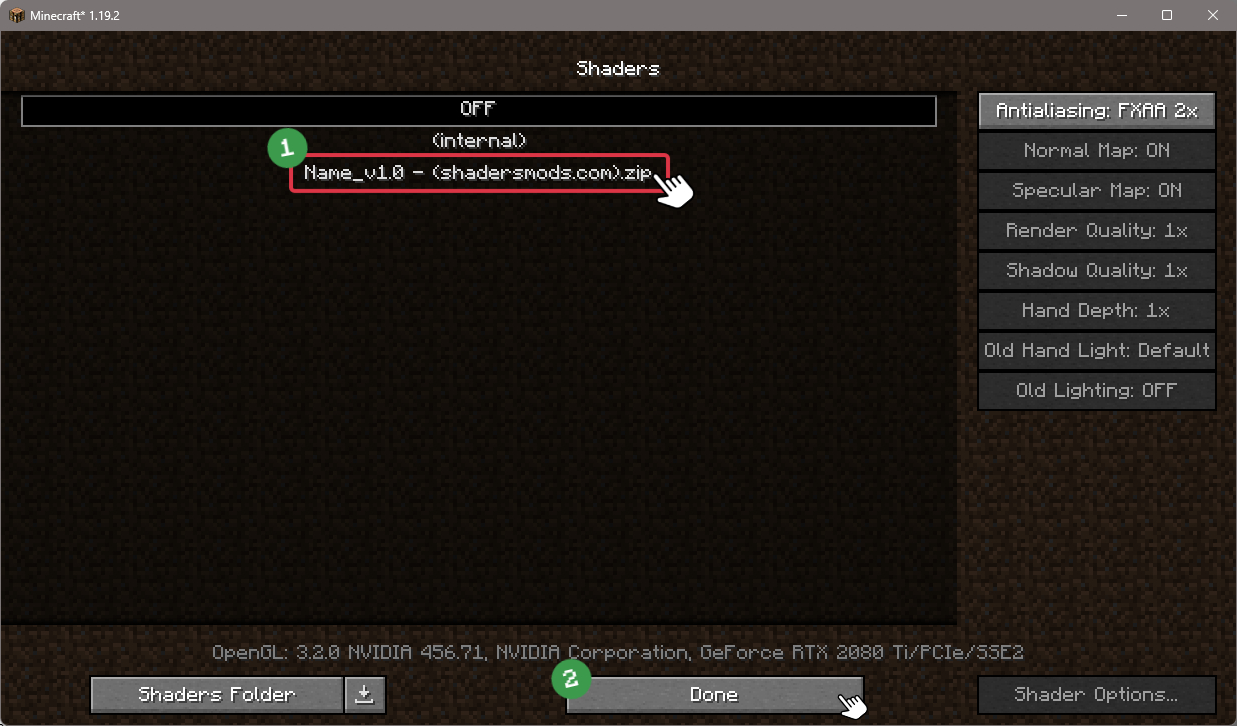
Click on the "Shaders Folder" button to open the folder where shaders are stored, so you can add or remove shaders as desired.

-
Install Voyager 2.0 Shaders
Copy or move the downloaded Voyager 2.0 shaders zip file into the shaderpacks folder.

-
Select Voyager 2.0 Shaders
Choose Voyager 2.0 shader pack from the list of available shaders in the options menu.
How to install Voyager 2.0 Shaders with Forge and Optifine?
Quick Installation Guide
-
Install Forge
Obtain the latest version of Forge that is compatible with your Minecraft version.
Download Minecraft Forge -
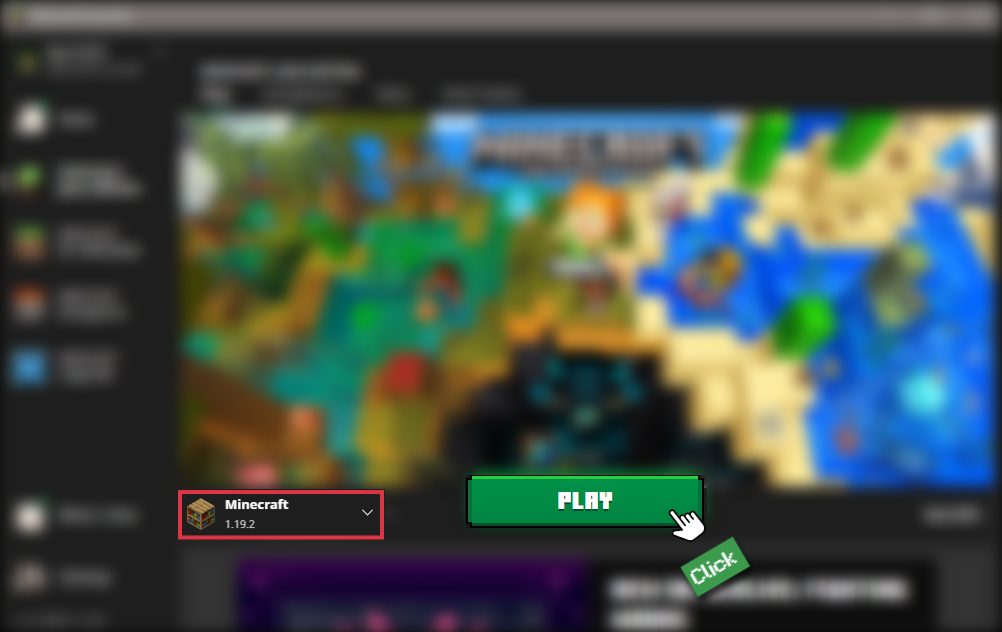
Launch Minecraft
Start the Minecraft launcher and select the version of Minecraft you want to install Forge on. Run the game once by clicking on the "Play" button to create necessary files for Forge.
-
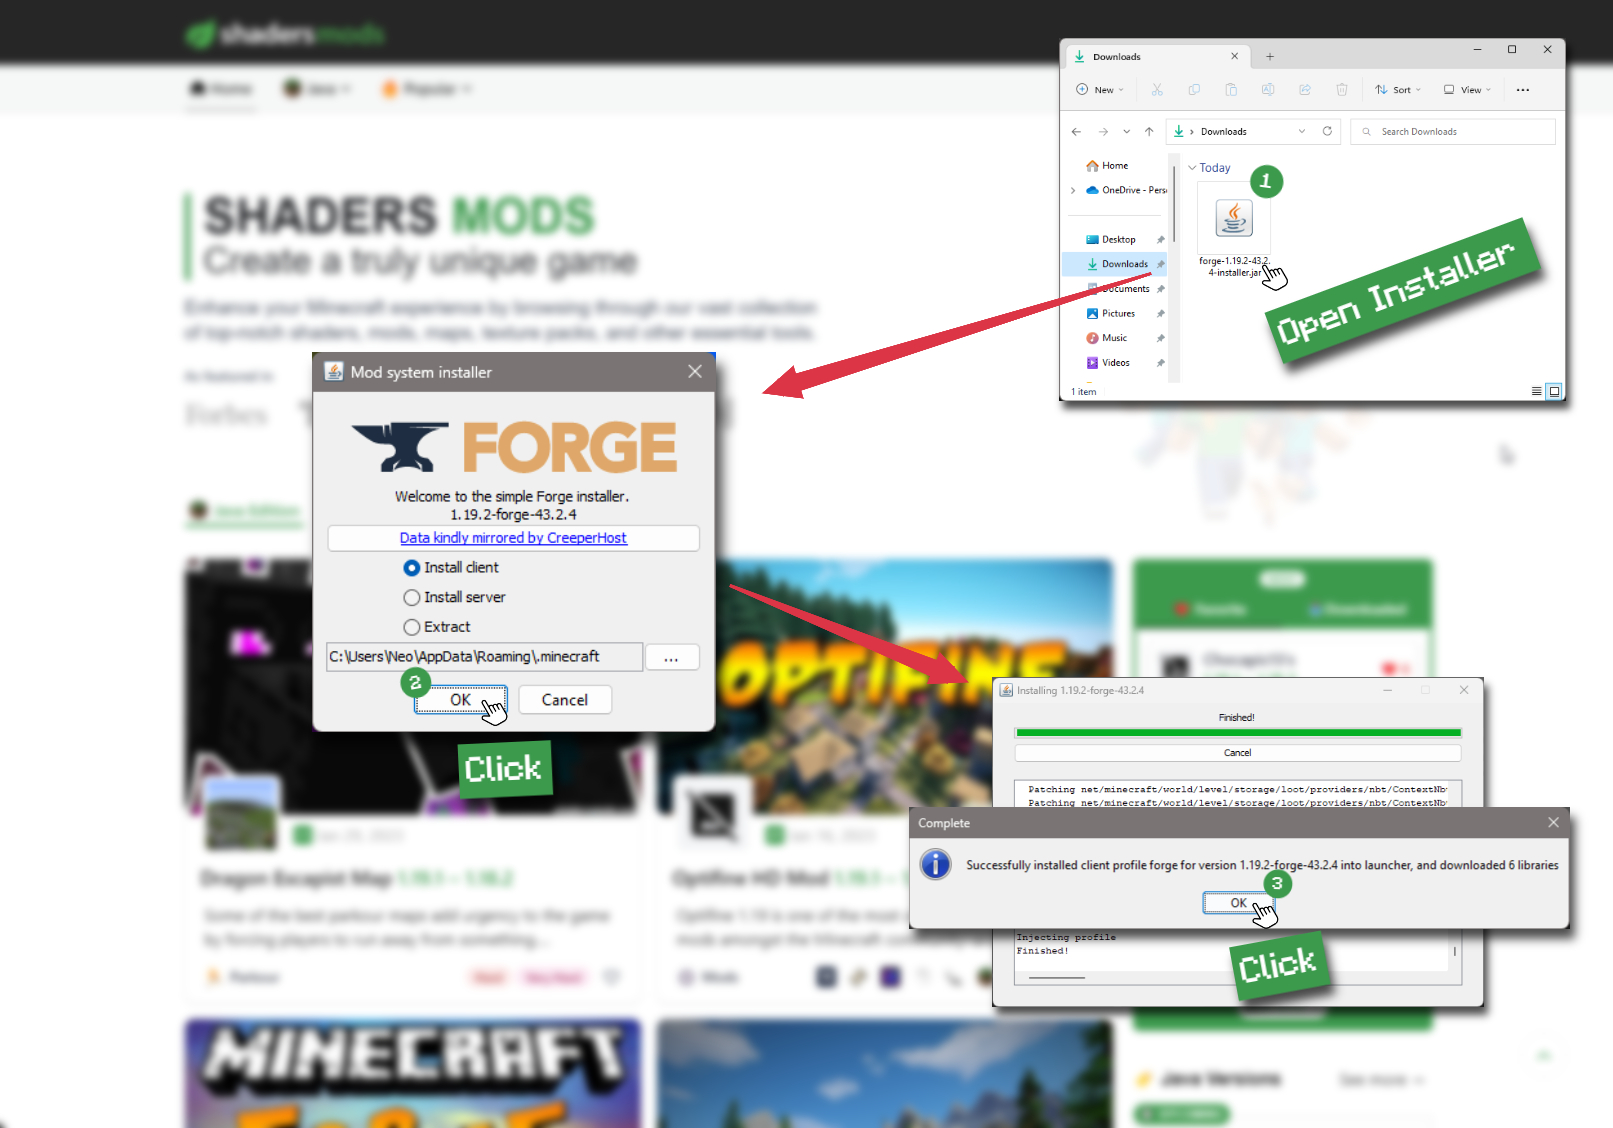
Install Forge Client
Double-click on the Forge installer jar file and choose "Install Client" in the window that appears.
-
Install Optifine
Download the Optifine jar file after Forge is installed. Move the Optifine jar file to the mods folder in the .minecraft directory.
Download Optifine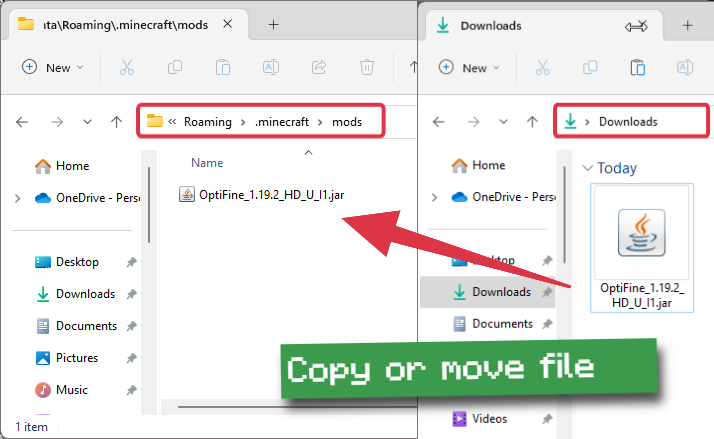
-
Launch Forge Profile
Launch Minecraft using the "Forge" profile, Optifine will be automatically loaded along with Forge.

-
Install Chocapic13's Shaders
Now the installation is the same as from the above Optifine instructions, just follow the steps starting from step 5.
Iris Installation Guide
Note
Your device must have Java installed to run the Iris installer.
Quick Java Installation Guide
-
Download Java
Download the Java installer from the official website here.
-
Open Installer
Once you have downloaded the file, run it and click the Install button.
How to install Voyager 2.0 Shaders with Iris?
-
Download Iris Shaders
Find the latest version of the Iris Shaders installer and download it.
Download Iris Installer -
Install Iris Shaders
Open the downloaded jar file, and choose the preferred game version and installation type.
⯈ Iris Install:
If you don't plan on using any other mods with Iris, choose this option.⯈ Fabric Install:
Choose this option if you want to use Iris with Fabric and other mods. The Iris jar files will be copied to the mods folder within the .minecraft directory.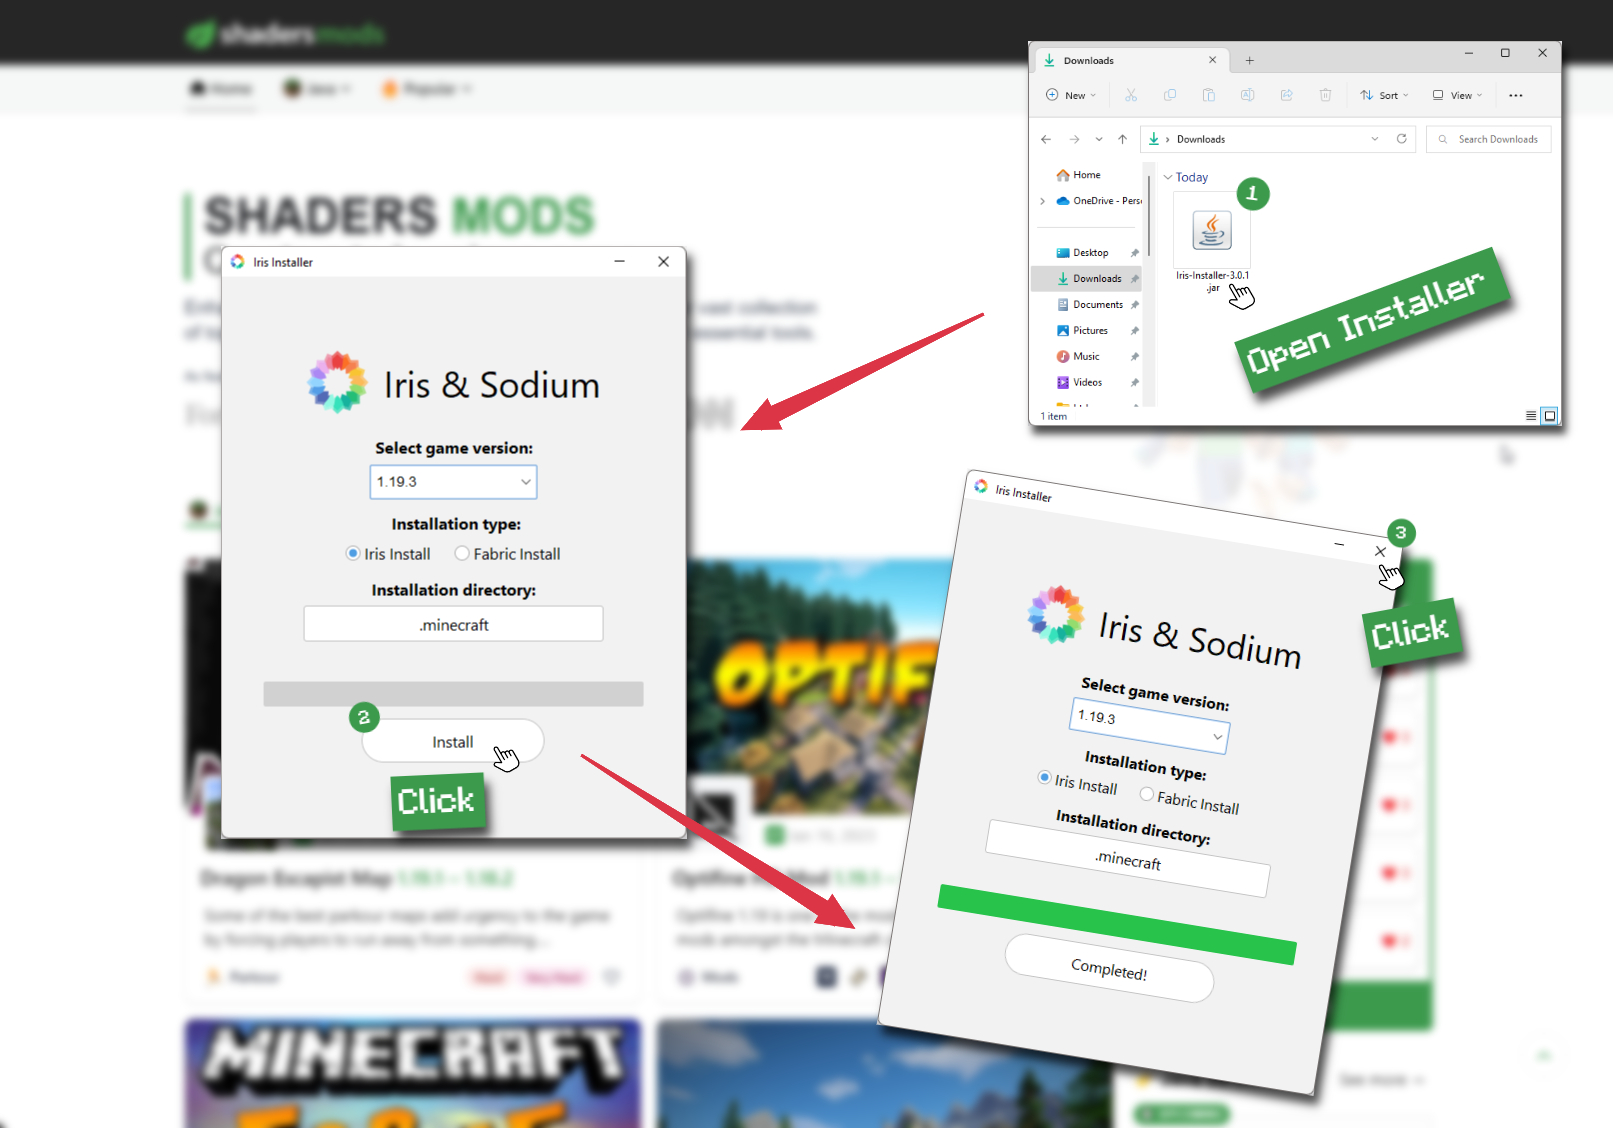
-
Start Installation
After selecting the game version and installation type, click the "Install" button to start the installation process.
-
Launch Minecraft
Start the Minecraft launcher and make sure you have the Iris profile selected.
Note
Select the Fabric profile if you opt for the Fabric installation type.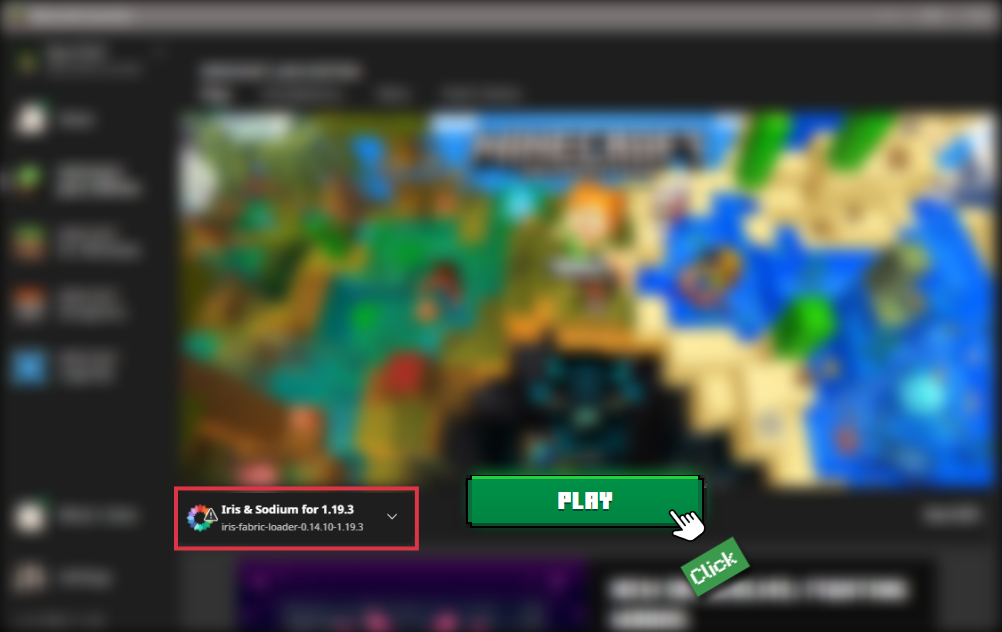
-
In-game Shader Menu
Open the Minecraft game and go to Options > Video Settings > Shader Packs to access the shaders menu.
Tip
To simplify the process, simply drag and drop the shader ZIP file directly into the Minecraft window, bypassing the next two steps.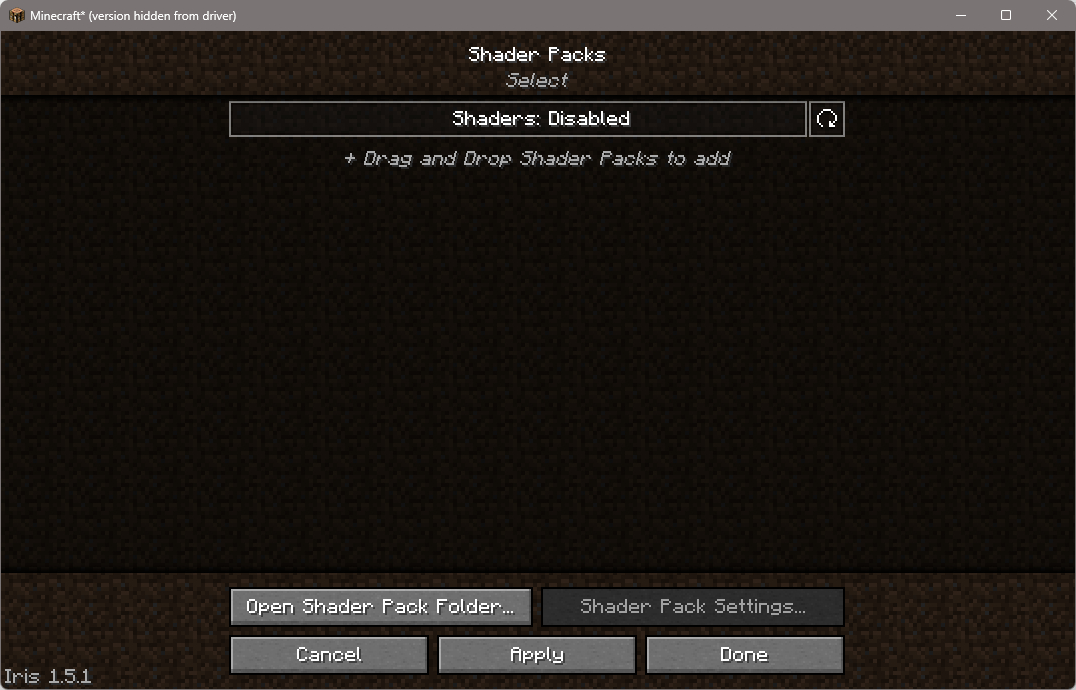
-
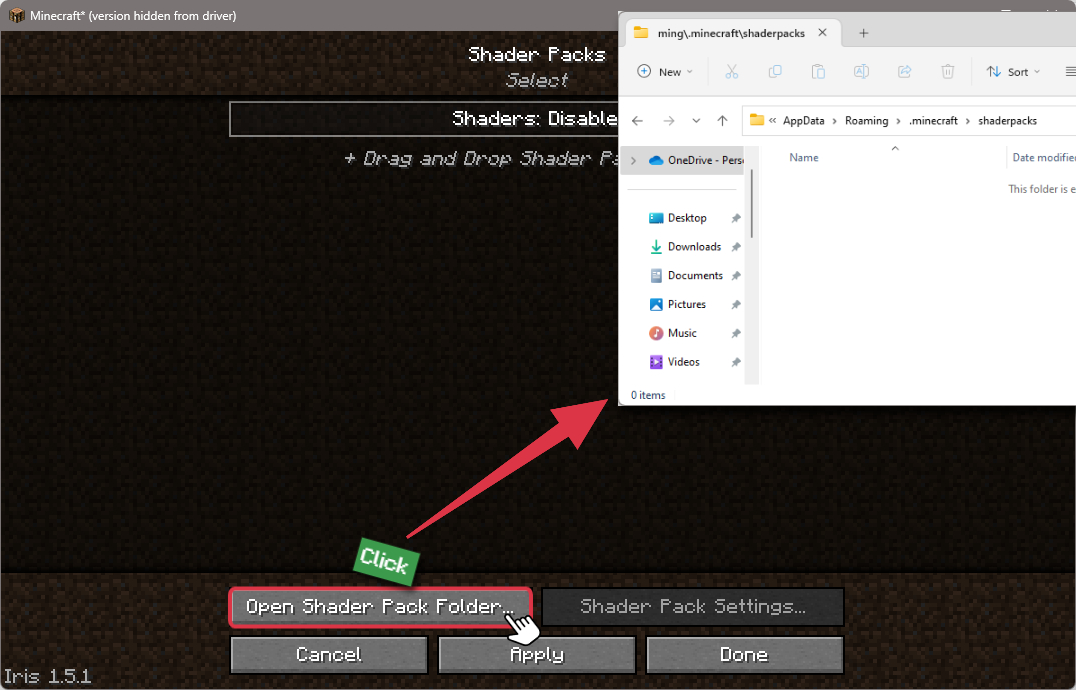
Open shaderpacks folder
Click on the "Open Shader Pack Folder" button to access the folder where shaders are stored.
-
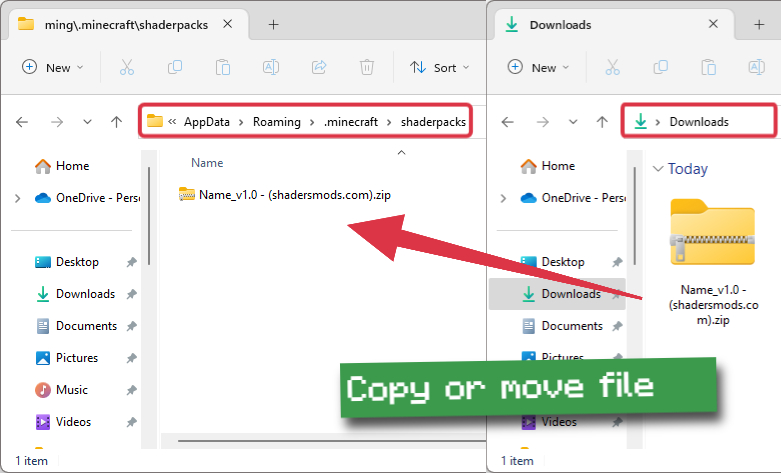
Install Voyager 2.0 Shaders
Copy or move the shaders zip file into the shaderpacks folder.
-
Select Voyager 2.0 Shaders
Choose installed shader pack from the list of available shaders in the options menu and click the "Apply" or "Done" button to select it.
Tip
When the shader pack is selected, its name will be changed to yellow.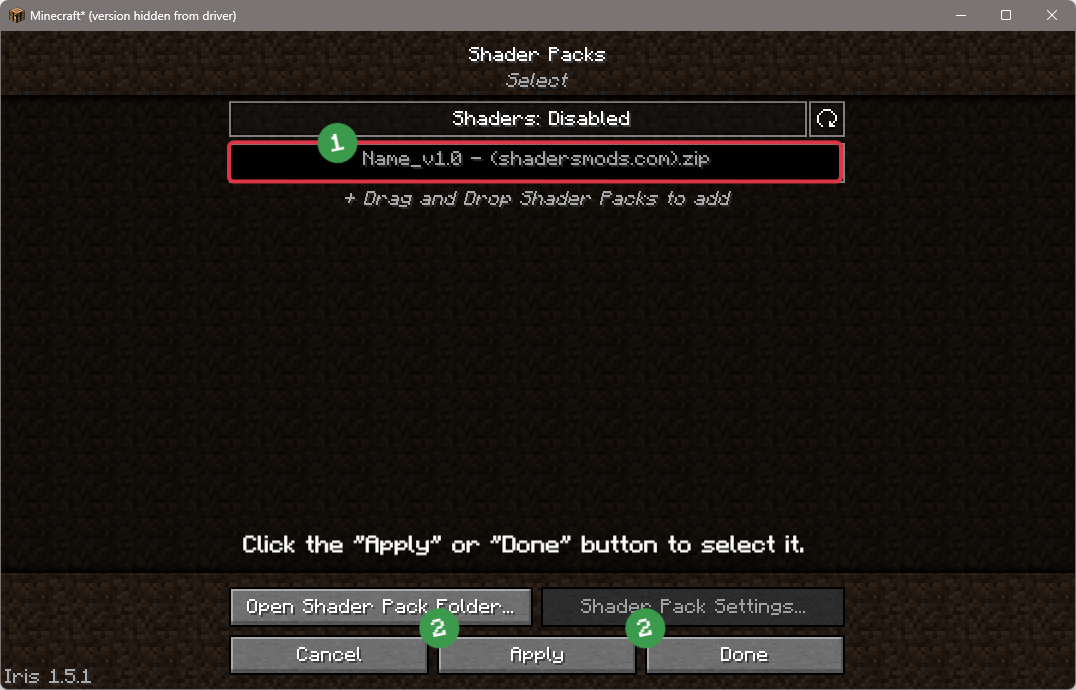
📥 Voyager 2.0 Shaders — Download
Something You Should Know
- Our links are only from the official developer, so you can be sure they are secure.
- No modifications or edits are made to the files.
🔄 Update Logs
v2.0.6
- Update for 1.19.4
- Update for 1.20+
- Improve performances of Volumetric clouds, Planar clouds, Volumetric light, Volumetric fog and Atmospheric scattering
- Improve temporal anti-aliasing
- Fix Sunlight ggx brdf
- Fix Lab PBR emissive texture
v2.0.5
- Updated to 1.19+
- Improved quality of life
- Compatible with Iris shaders mod (version 1.4+)
- Added cave fog and bloomy fog (affecting volumetric light and fog)
- Added No Waves preset in water waves settings
- Tweaked atmosphere and sunlight color
- Tweaked volumetric fog shape
- Reworked Spherical Harmonic and calculated sunlight into SH
- Motion blur is enabled by default
- Clouds shadow is disabled by default
- Fixed Lab PBR hardcoded metal
- Fixed hand-depth lighting
- Fixed water shadow color on translucent block
- Fixed bright distant white dot appearing in sunrise/sunset