
Kadirxo Shaders 1.16.5 → 1.15.2
| Developer | 👤kadir_nck |
|---|---|
| Style | 🚀Lagless |
| Support GPUs | |
| Loaders | |
| Performance Impact | Low |
| Settings | 16 |
| Features | Sun Rays+20 |
| Created | Feb 4, 2015 |
| Updated | Oct 23, 2017 |
| Stats |
|
The Kadirxo Shaders by kadir_nck is one of the older shader packs, but thanks to the latest update, it works just fine with Minecraft’s latest release. All you need to do is grab a compatible version of the GLSL Shaders Mod by Karyonix, Optifine, or Iris Shaders, install it, and then you’ll be ready to install Kadirxo Shaders and start using it in the game.
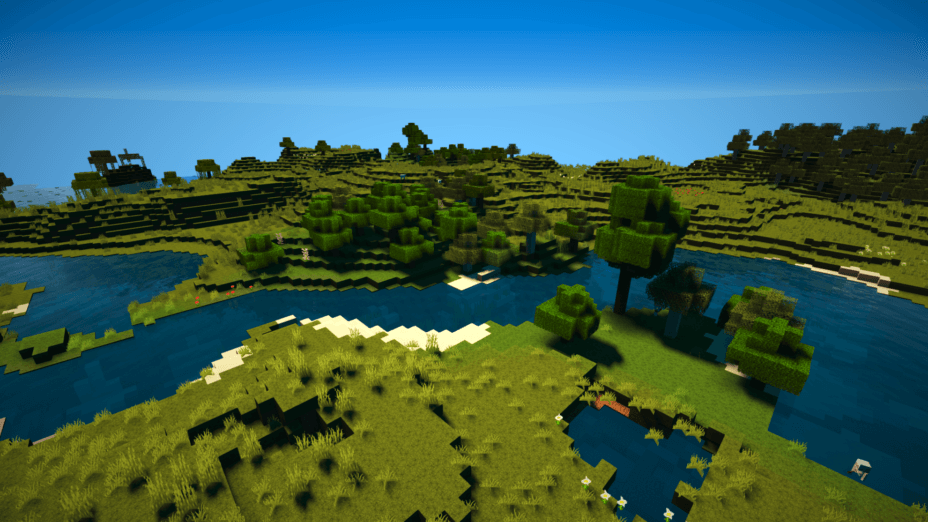
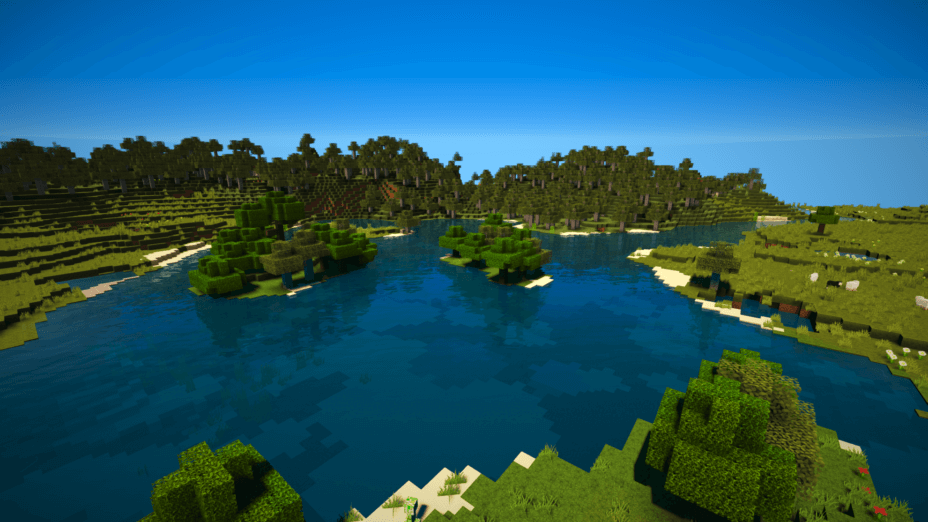
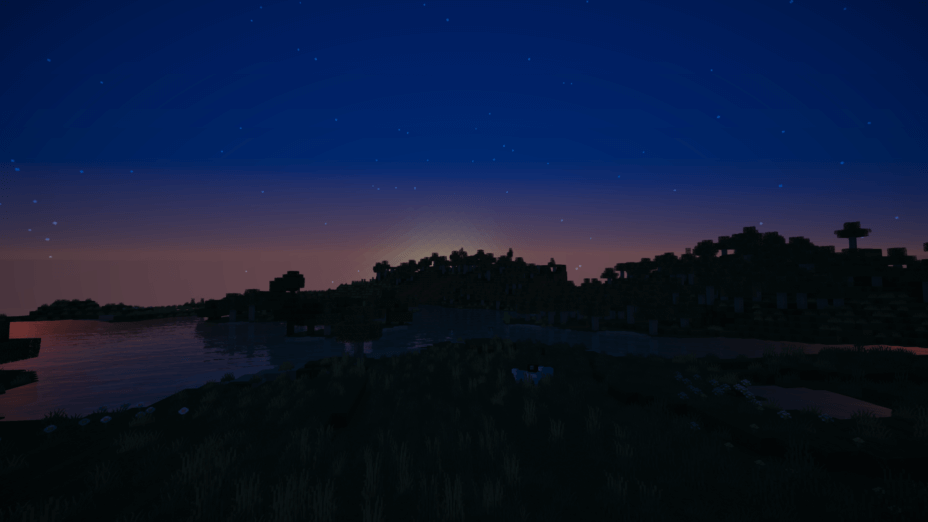
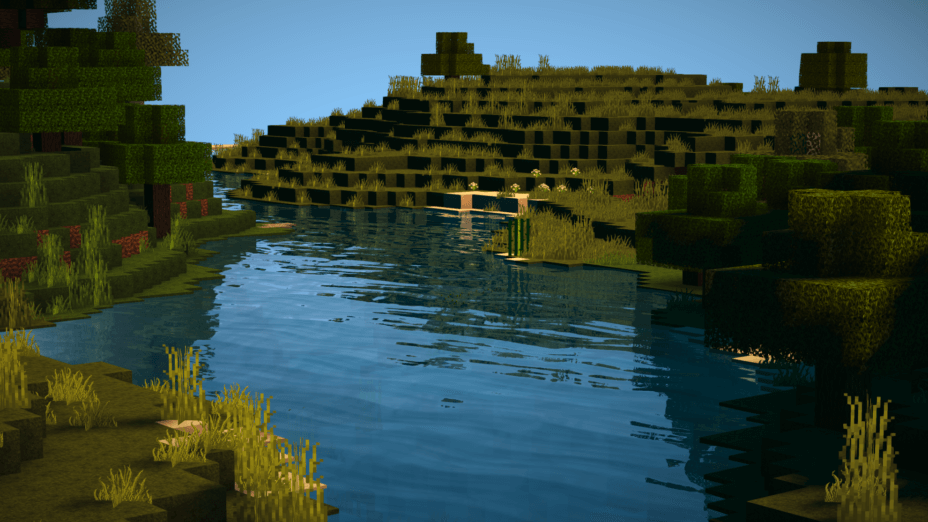
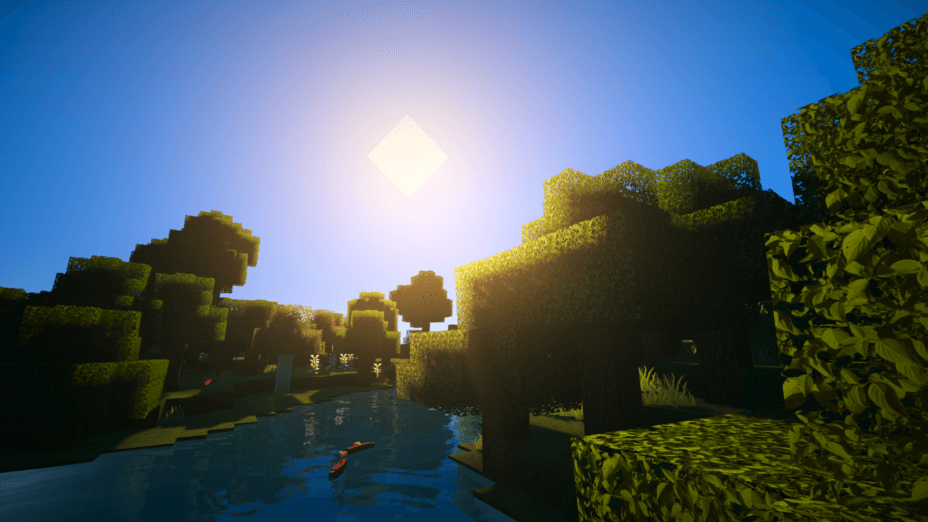
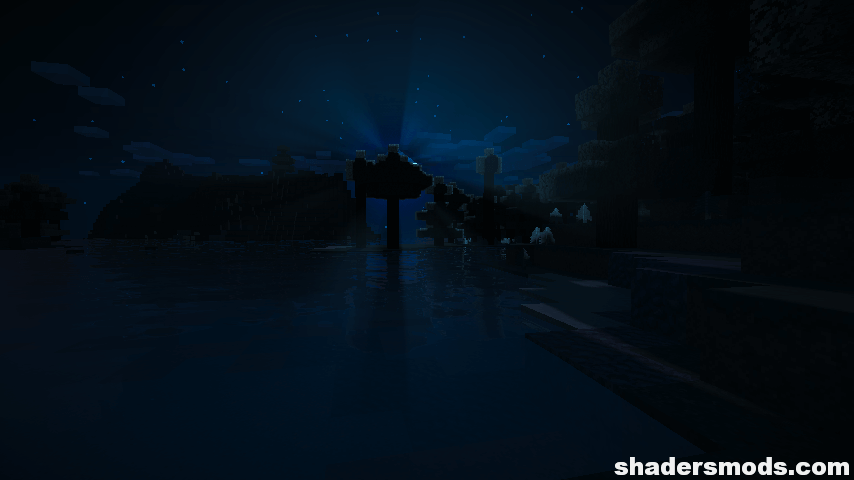
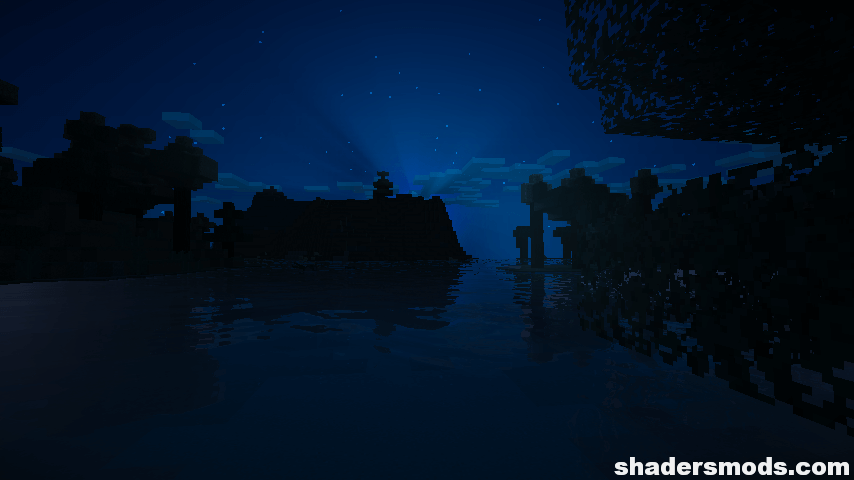
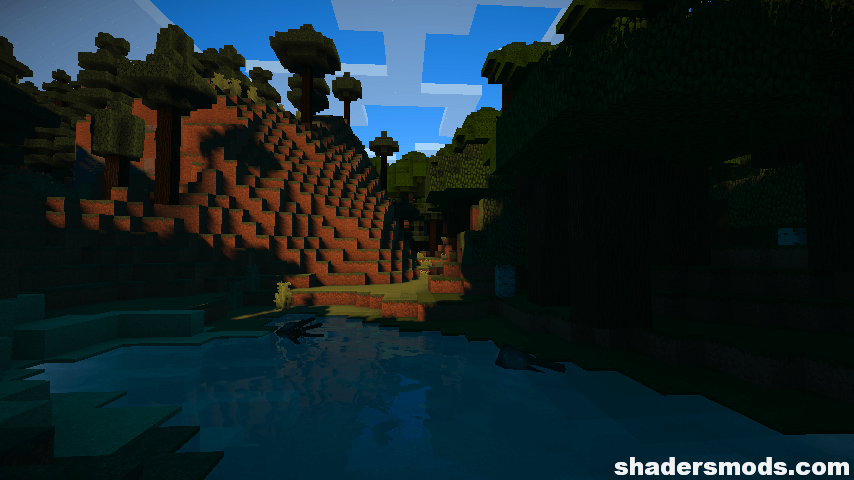
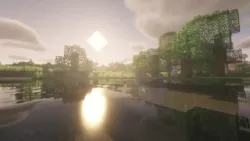
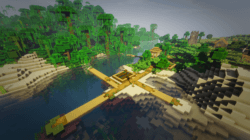
There are the usual lighting and shading effects, as well as waving or moving tree foliage and grass, which make the world look more alive as if winds are blowing and rattling everything. Shadows and underground spaces without light seem to be even darker than normal.
Of course, improved visuals and enhanced effects like these don’t just happen out of nowhere. The Kadirxo shader pack will place heavier burdens on your computer than it’s used to carrying when playing Minecraft, so you may notice some slowdown or hiccups unless you’ve got a good graphics card to support all these better graphics. Because Minecraft is a simplistic game, good here doesn’t mean the same thing as good for, like, Crysis 3. A GT 500 series card or better will probably do the trick for you, but relying on internal motherboard graphics to support this shader pack would be foolish.
Overall the Kadirxo Shader mod is definitely recommended. It has everything people look for in shader packs, and it’s also compatible with the latest Minecraft versions, so it’s got that wide range of usability that players often look for in their mods. There are the usual little bugs, like that thing where enchanted items don’t have their normal aura when holding them in your hand, but bugs like these tend to happen with like 95% of shader packs out there, so it’s no bad mark against the Kadirxo shader pack.
- 1.16.5
- 1.16.4
- 1.16.3
- 1.16.2
- 1.16.1
- 1.16
- 1.15.2
- 1.15.1
- 1.15
- 1.14.4
- 1.14.3
- 1.14.2
- 1.14.1
- 1.14
- 1.13.2
- 1.13.1
- 1.13
- 1.12.2
- 1.12.1
- 1.12
- 1.11.2
- 1.11.1
- 1.11
- 1.10.2
- 1.10.1
- 1.10
- 1.9.4
- 1.9.3
- 1.9.2
- 1.9.1
- 1.9
- 1.8.9
- 1.8.8
- 1.8.7
- 1.8.6
- 1.8.5
- 1.8.4
- 1.8.3
- 1.8.2
- 1.8.1
- 1.8
- 1.7.10
- 1.7.9
- 1.7.8
- 1.7.7
- 1.7.6
- 1.7.5
- 1.7.4
- 1.7.2
- 1.7
- 1.6.4
- 1.6.2
Features
Over 20 new features are available in Kadirxo Shaders to enhance your gaming experience.
📊 Performance Impacts
Decrease in performance can vary from device to device, driver version, and many other factors, you should test yourself on your machine for the best result.
- None
- No performance decreases
- Small
- ~5%
- Medium
- ~10%
- High
- ~25%
- Extreme
- +50%
-
- Atmospheric SkySmall
- Simulates realistic atmospheric scattering.
-
- BloomSmall
- Enhance the game's lighting and create a more realistic and immersive visual experience
-
- CustomizationNone
- Customize various aspects of the game's visual effects.
-
- Depth of FieldMedium
- Making objects closer to the camera appear sharp and in focus, while objects farther away appear out of focus and blurry.
-
- Lens FlareSmall
- Simulating the way light scatters and reflects inside a camera lens.
-
- LightMedium
- Enhance the game's overall visual quality.
-
- Parallax WaterMedium
- Enhances the realism of water by simulating the parallax effect.
-
- Realistic SkyMedium
- More realistic and immersive sky experience.
-
- Realistic WaterHigh
- More realistic and immersive water experience.
-
- ShadowsSmall
- Simulate how light is blocked and scattered by objects in the environment.
-
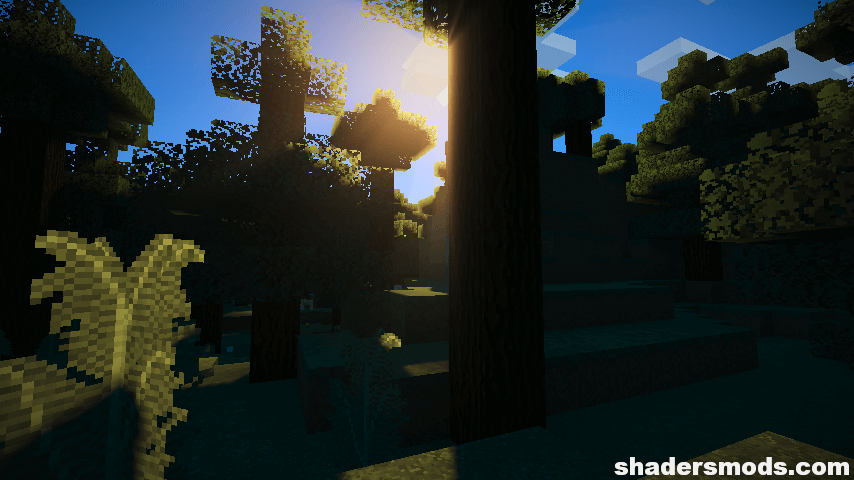
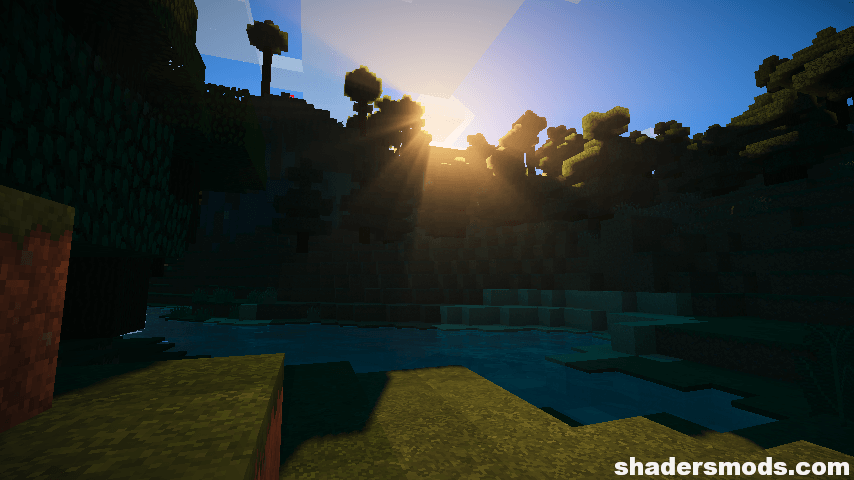
- Sun RaysMedium
- Simulate the appearance of sunlight streaming through trees leaves, objects, clouds, or other atmospheric conditions.
-
- SunriseSmall
- More realistic and immersive sunrise experience.
-
- SunsetSmall
- More realistic and immersive sunset experience.
-
- Volumetric LightHigh
- Simulating the scattering of light in the atmosphere and in the environment.
-
- Water ReflectionsMedium
- Simulating reflections on the surface of the water.
-
- Water WavesMedium
- Movement of waves on the surface of the water.
-
- Waving GrassSmall
- Simulating the way it moves and sways in the wind.
-
- Waving LavaSmall
-
- Waving PlantsSmall
- Simulating the way they move and sway in the wind.
-
- Waving TreesSmall
- Adds movement to the leaves and branches of trees, making them look more alive and realistic.
Kadirxo Shaders allow you to change more than 16 settings to suit your needs.
| Settings | Description | Options |
|---|---|---|
| BLOOM | Enable bloom effect |
|
| DOF | Enable depth of field (blur on non-focused objects), not compatible with motion blur! |
|
| DYNAMIC_HANDLIGHT | Emitting light around player when holding light-emitting item |
|
| GODRAYS | Enable godrays effect |
|
| LENS_EFFECTS | Enable lens flare effects |
|
| SHADOW_FILTER | Smooth shadow |
|
| WATER_REFLECTIONS |
| |
| WAVING_FIRE |
| |
| WAVING_FLOWERS |
| |
| WAVING_GRASS |
| |
| WAVING_LAVA |
| |
| WAVING_LEAVES |
| |
| WAVING_LILYPAD |
| |
| WAVING_VINES |
| |
| WAVING_WATER |
| |
| WAVING_WHEAT |
|
How To Install Kadirxo Shaders
- Support Forge / Vanilla
- Extra features
- Good performance
- Support Fabric / Quilt
- Better performance, depend on your hardware
- No modding required Support Forge
- No modding required Older versions of Minecraft are supported
Optifine Installation Guide
Note
Your device must have Java installed to run the Forge and Optifine installers.
Quick Java Installation Guide
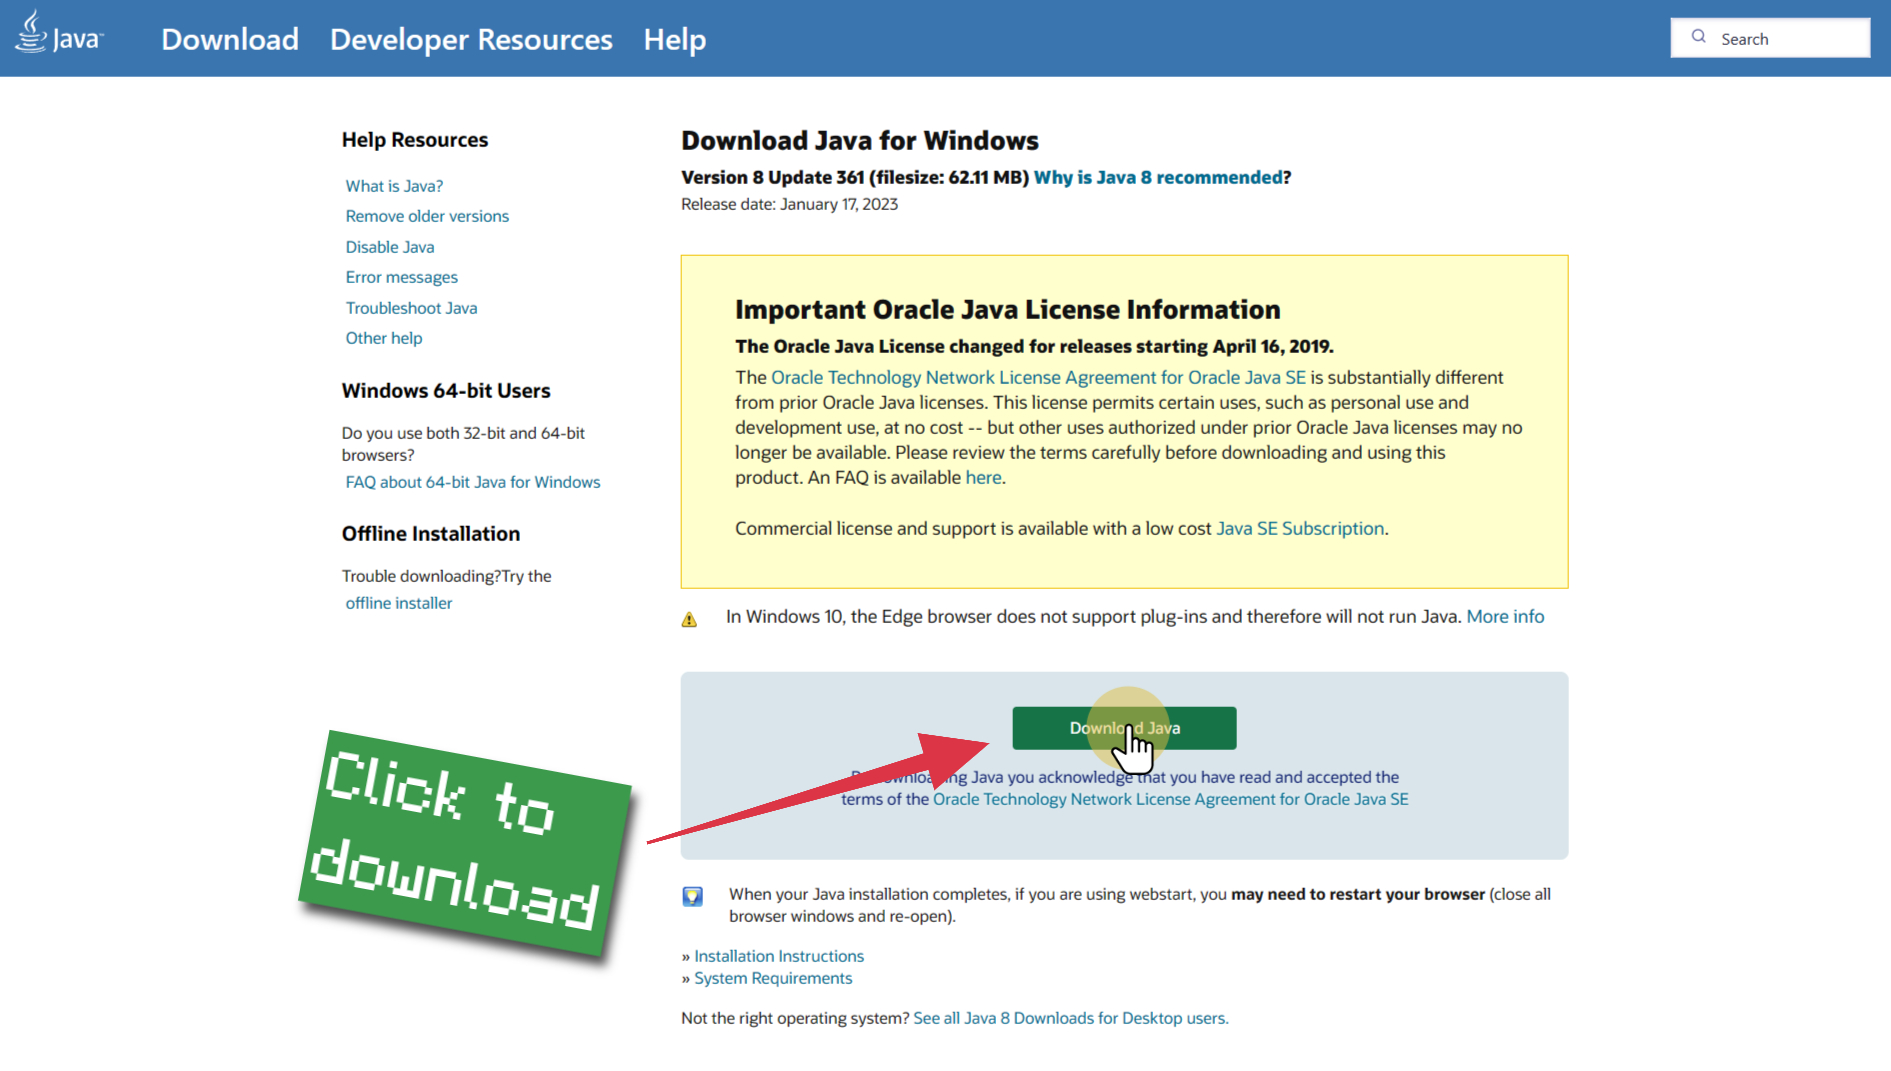
Download Java
Download the Java installer from the official website here.

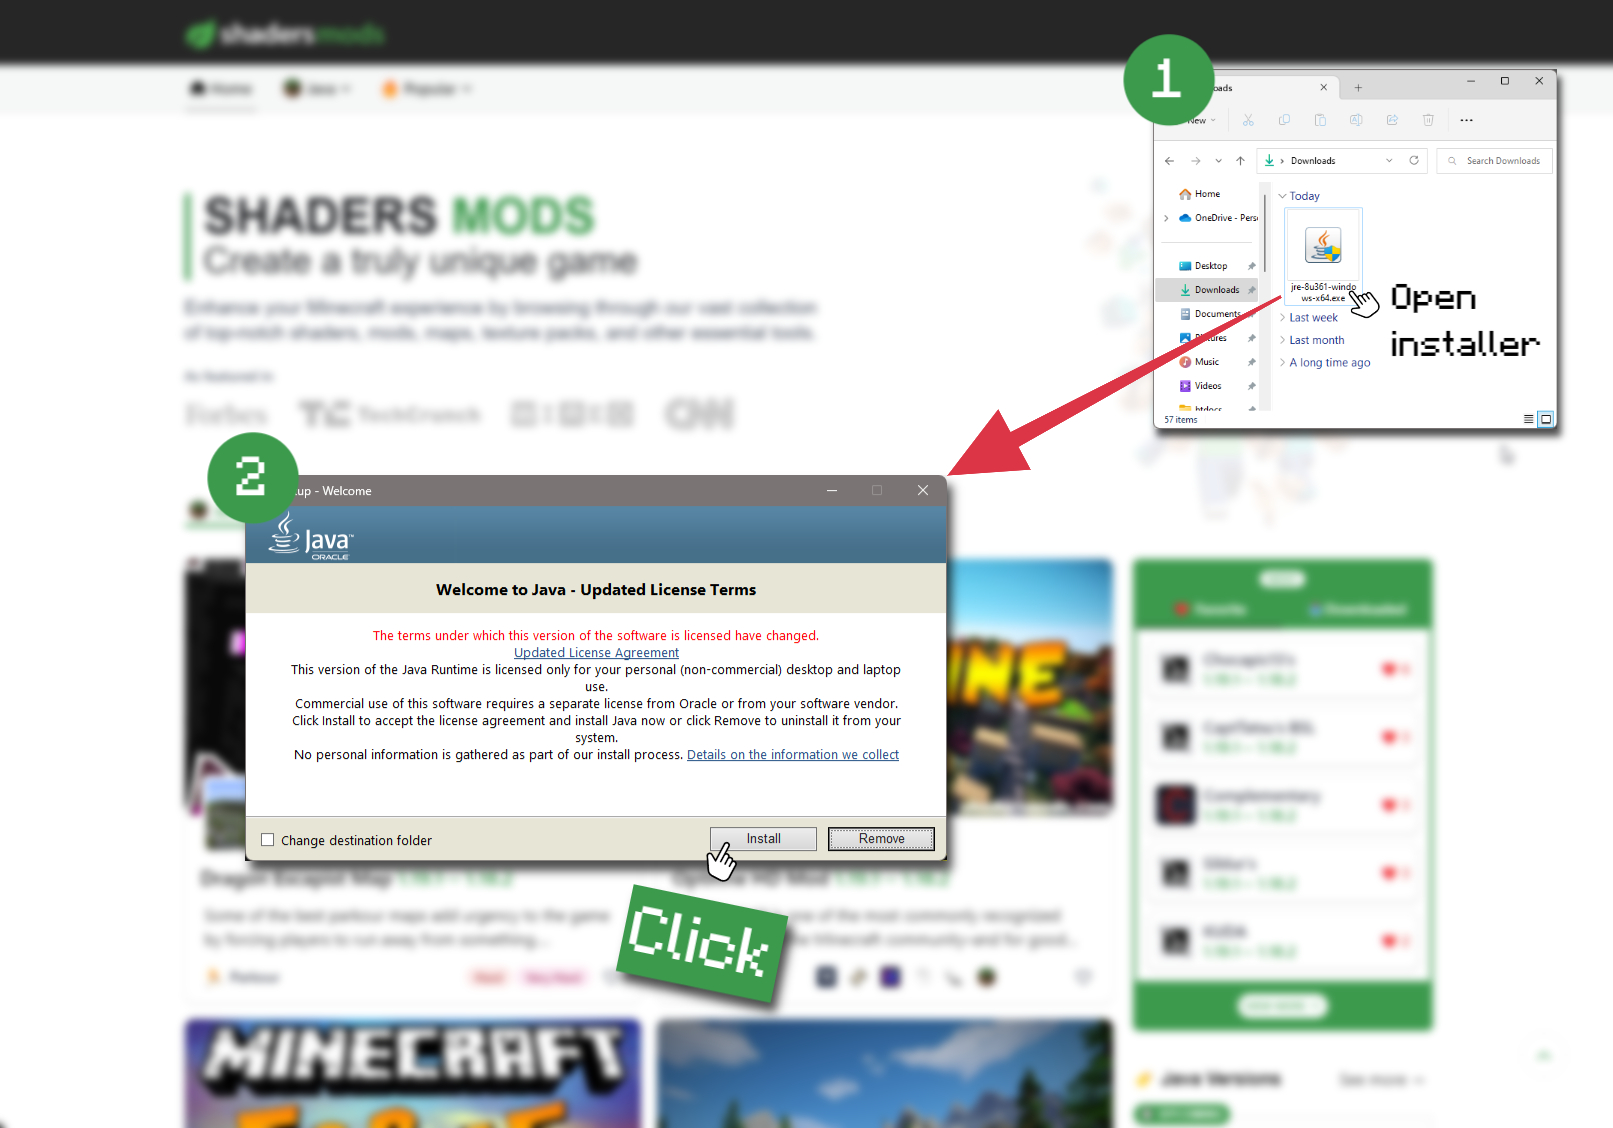
Open Installer
Once you have downloaded the file, run it and click the Install button.
How to install Kadirxo Shaders with Optifine?
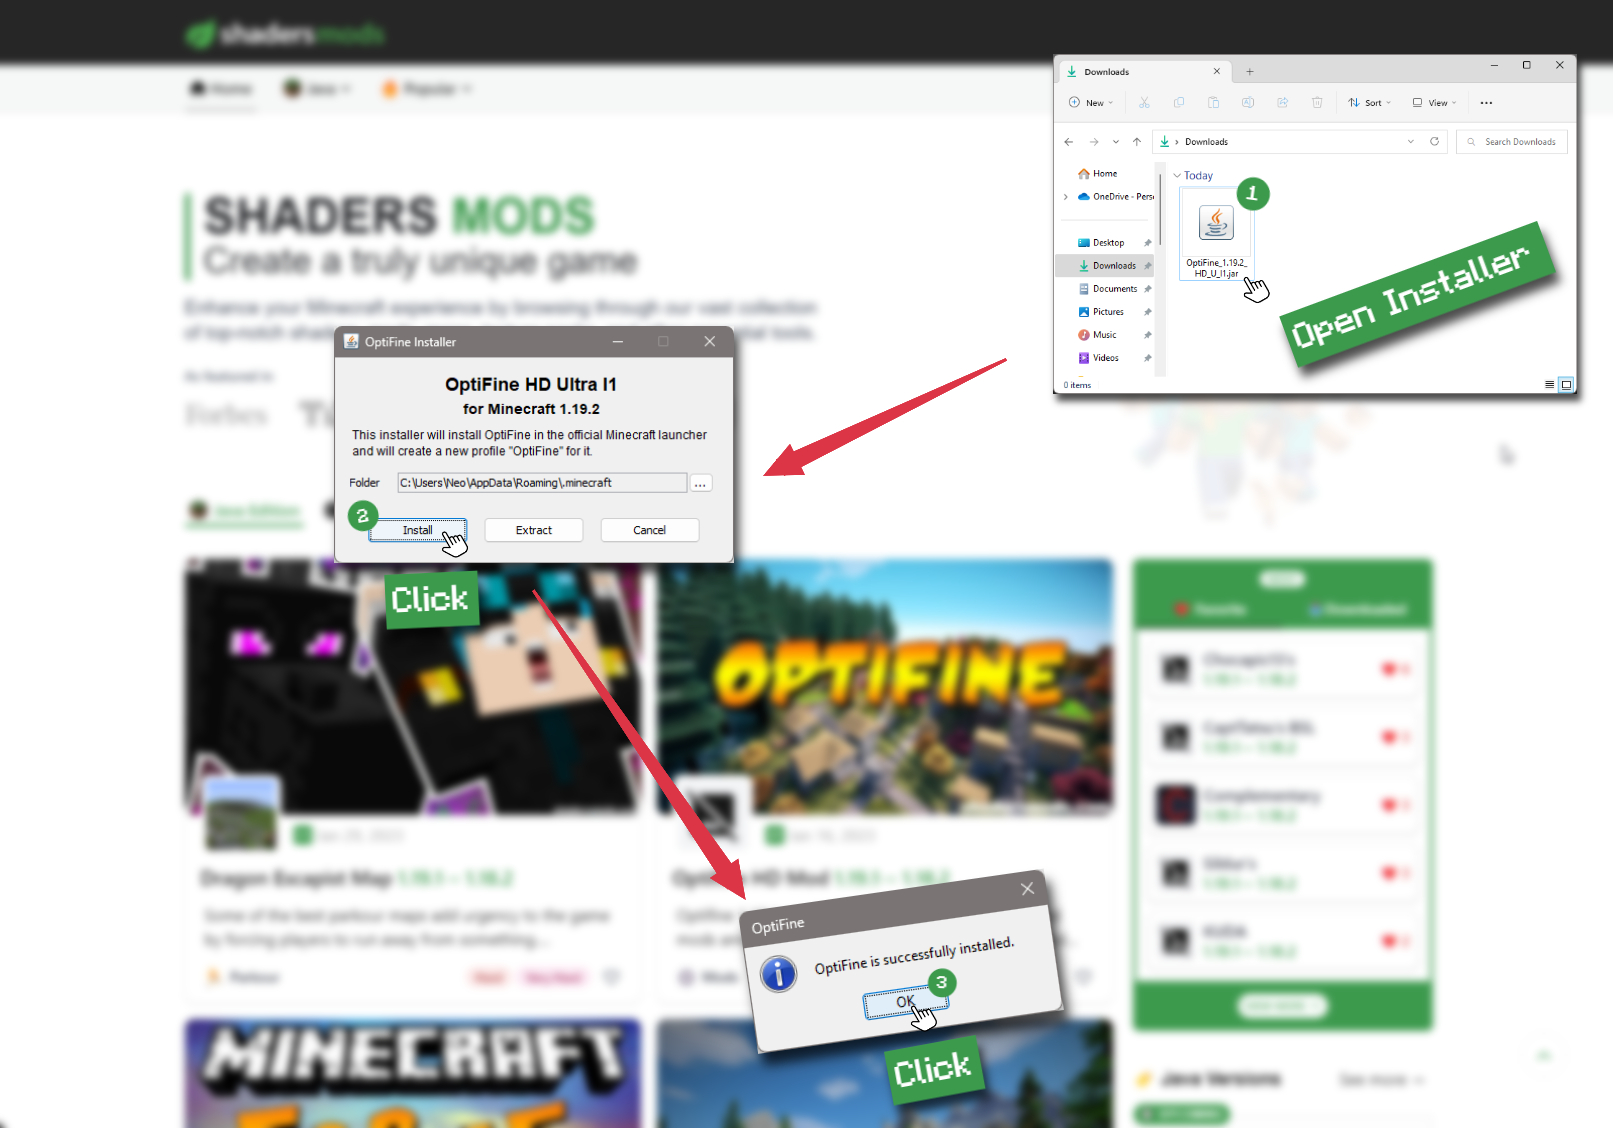
Download Optifine
Get the latest version of Optifine for your Minecraft version.
Download OptifineInstall Optifine
Run the Optifine installer and follow the on-screen instructions to complete the installation.
Download Kadirxo Shaders
Go to the download section and get shaders zip file. Unzip the file if necessary, as some shader developers may bundle multiple shader versions in one zip file.
Launch Minecraft
Start the Minecraft launcher and make sure you have the Optifine profile selected.
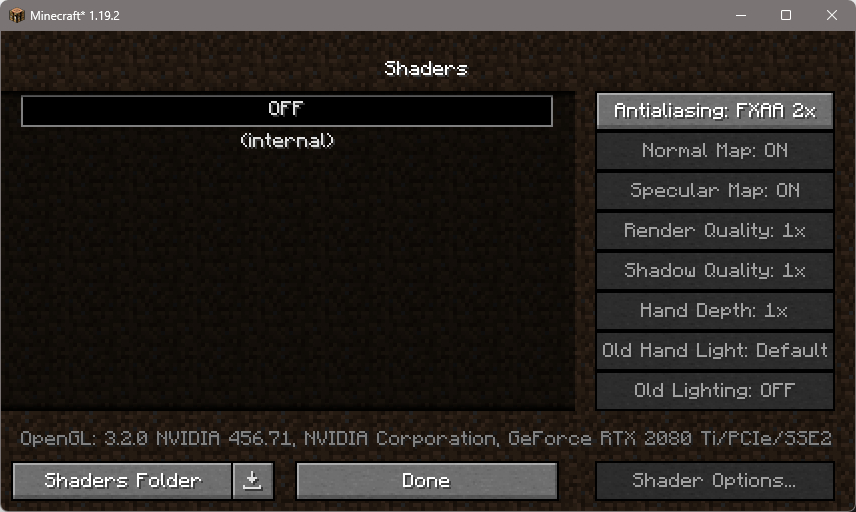
In-game Shaders menu
Go to Options > Video Settings > Shaders to access the shaders menu.
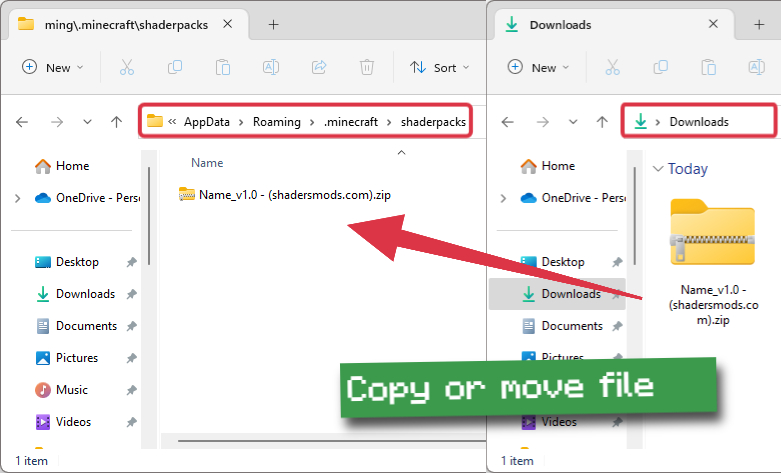
Open shaderpacks folder
Click on the "Shaders Folder" button to open the folder where shaders are stored, so you can add or remove shaders as desired.
Install Kadirxo Shaders
Copy or move the downloaded Kadirxo shaders zip file into the shaderpacks folder.
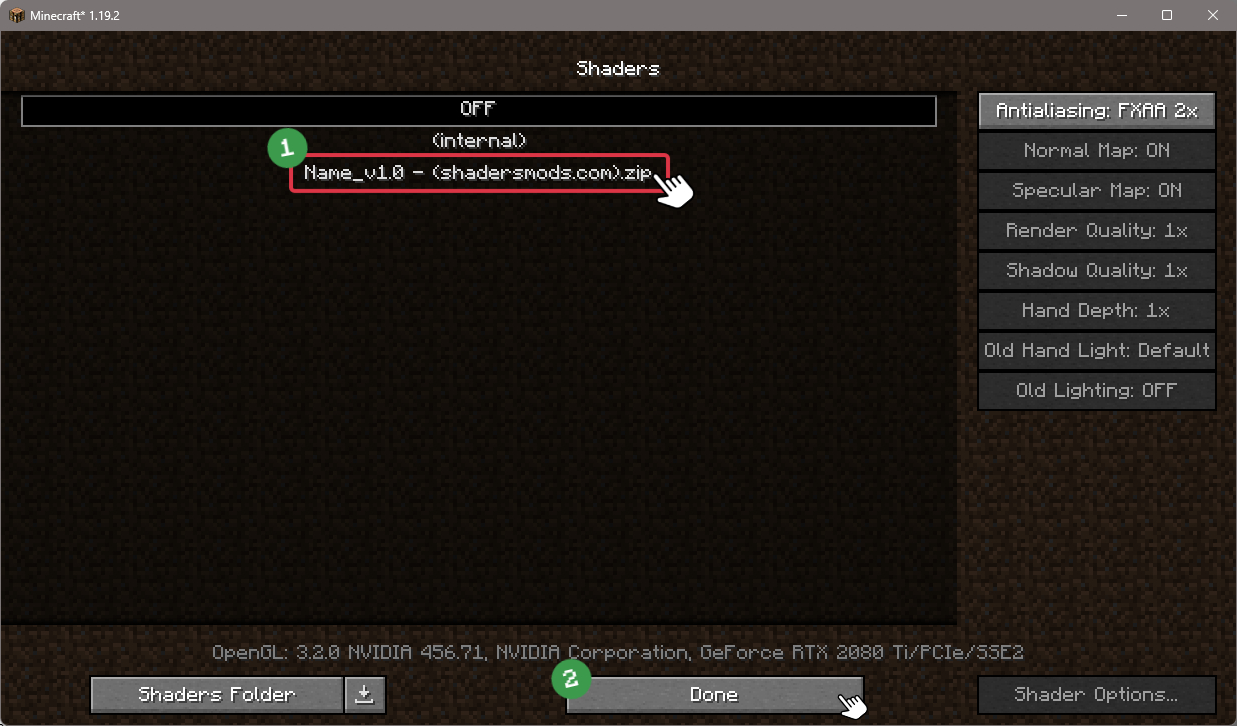
Select Kadirxo Shaders
Choose Kadirxo shader pack from the list of available shaders in the options menu.


How to install Kadirxo Shaders with Forge and Optifine?
Quick Installation Guide
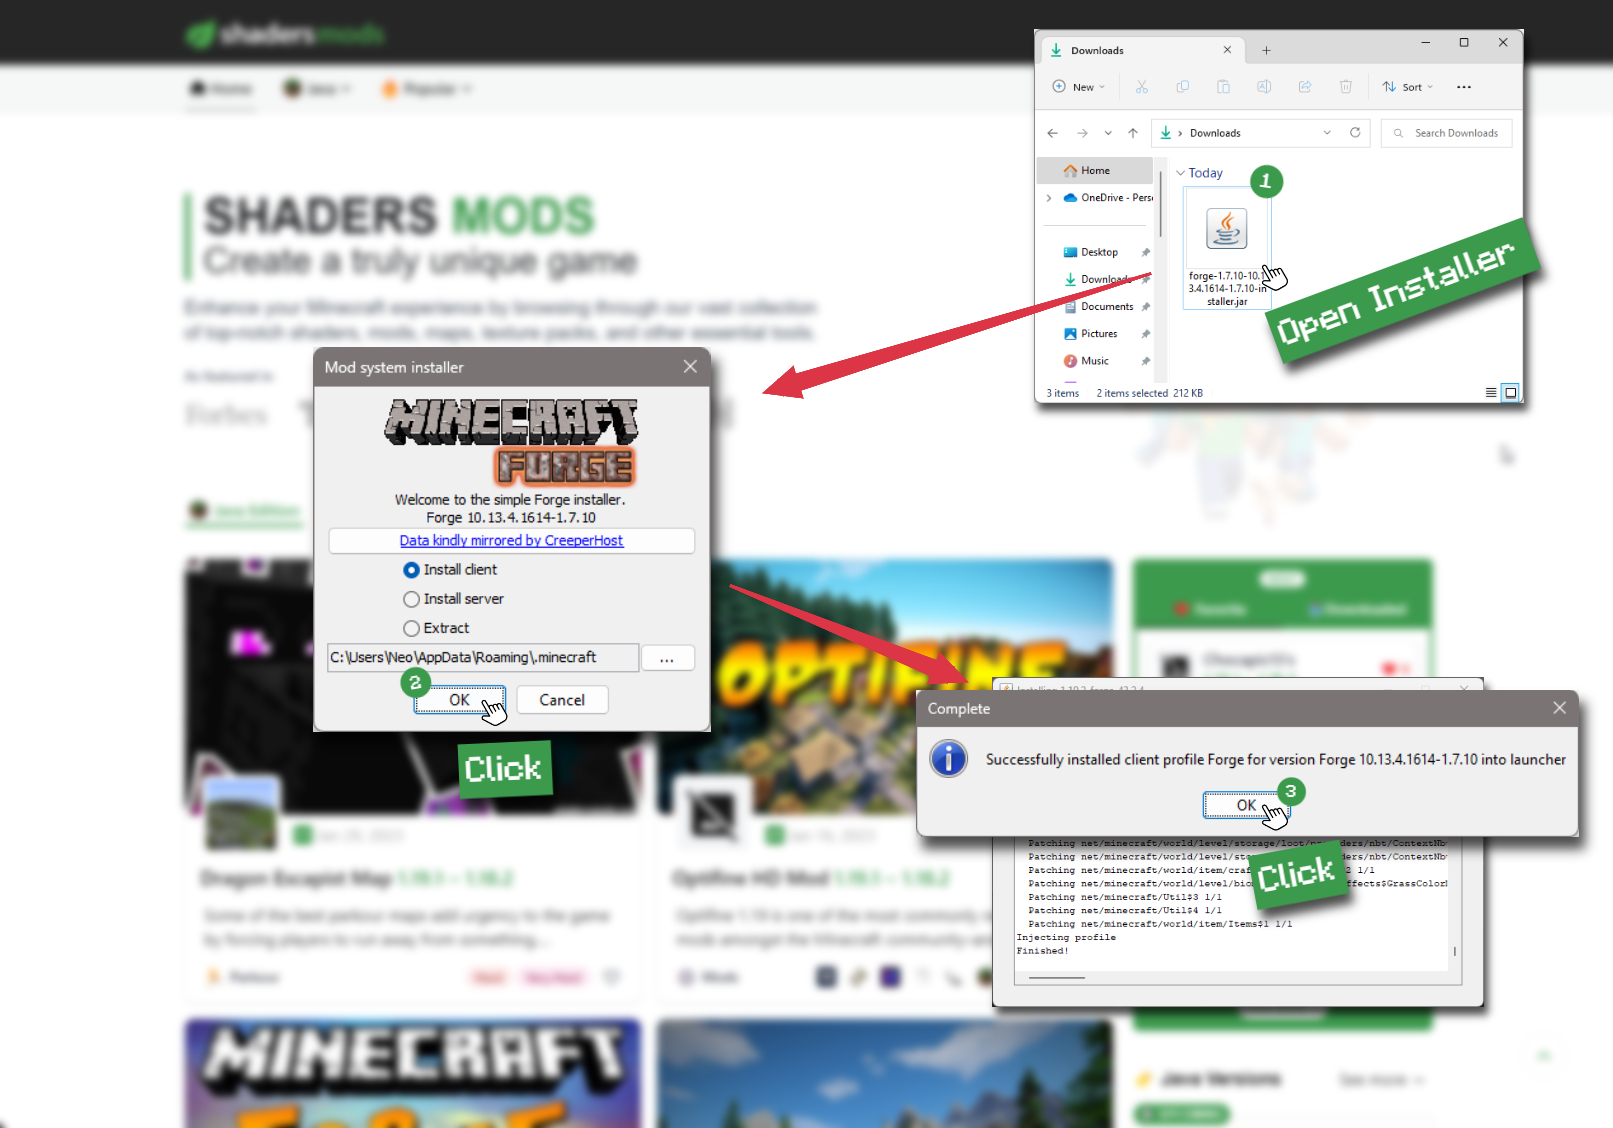
Install Forge
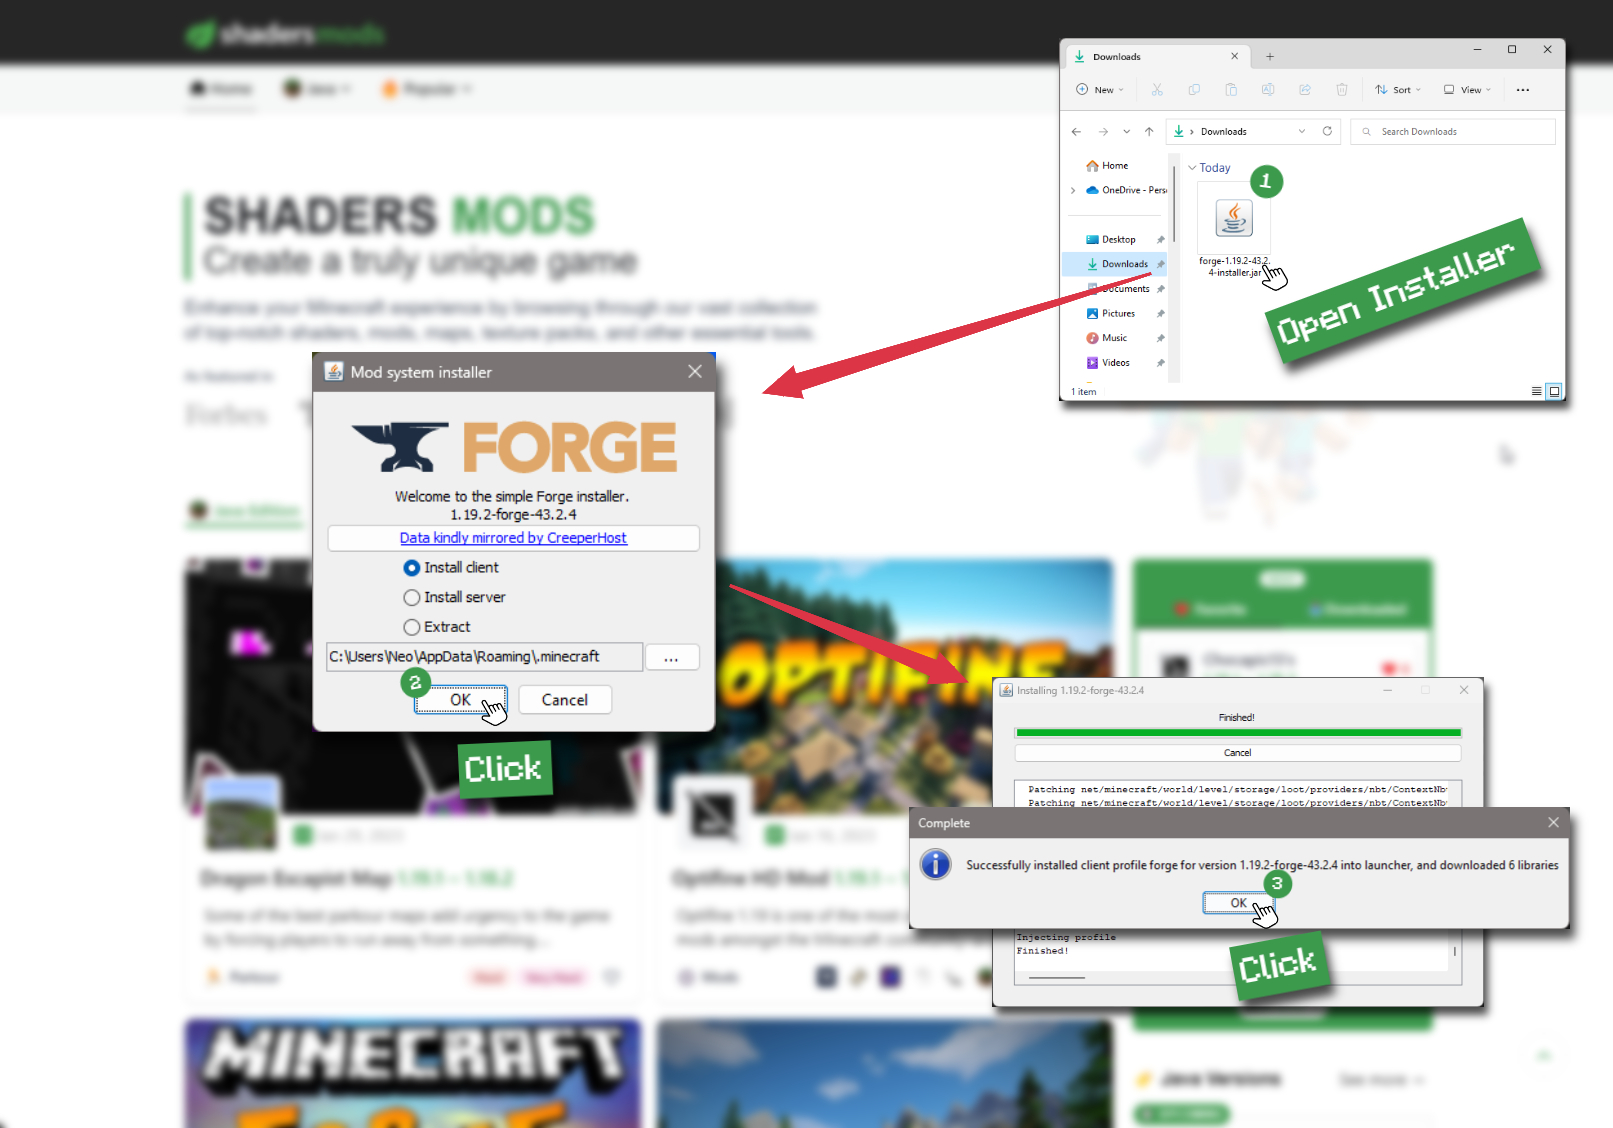
Obtain the latest version of Forge that is compatible with your Minecraft version.
Download Minecraft ForgeLaunch Minecraft
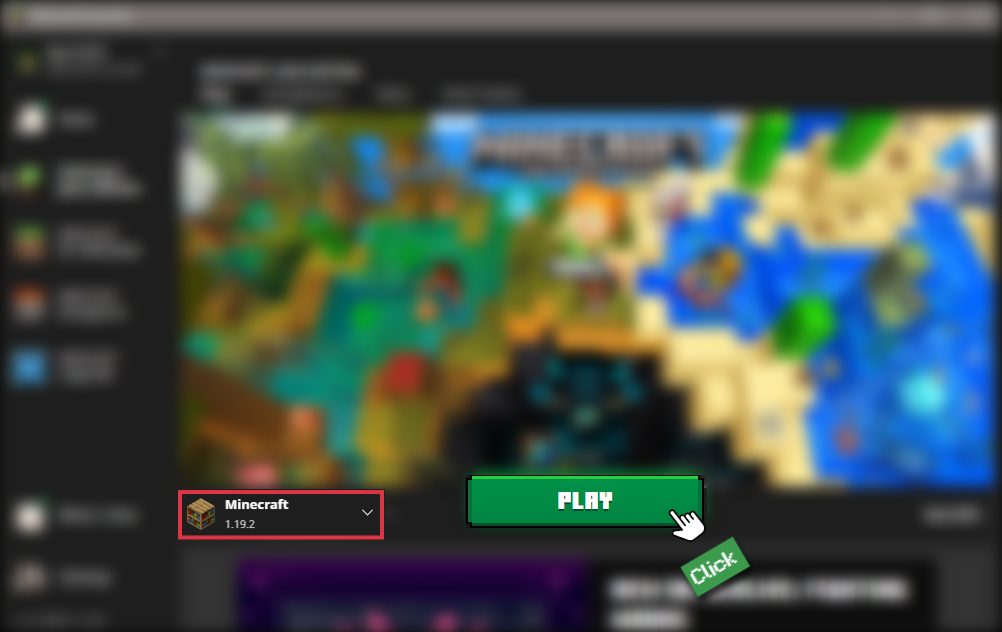
Start the Minecraft launcher and select the version of Minecraft you want to install Forge on. Run the game once by clicking on the "Play" button to create necessary files for Forge.
Install Forge Client
Double-click on the Forge installer jar file and choose "Install Client" in the window that appears.
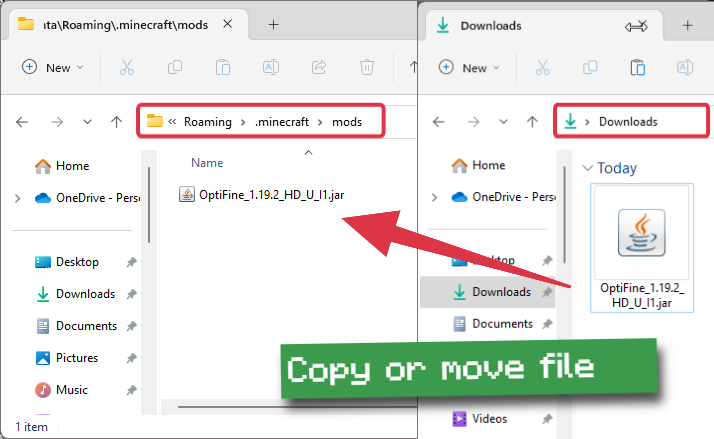
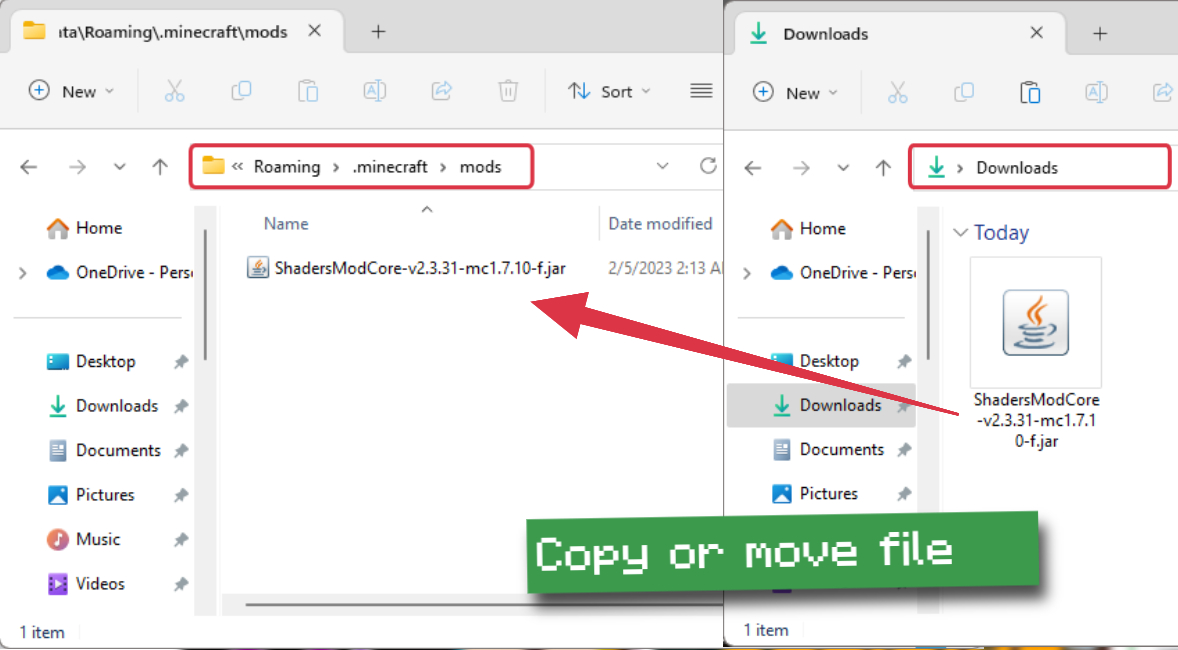
Install Optifine
Download the Optifine jar file after Forge is installed. Move the Optifine jar file to the mods folder in the .minecraft directory.
Download Optifine
Launch Forge Profile
Launch Minecraft using the "Forge" profile, Optifine will be automatically loaded along with Forge.
Install Chocapic13's Shaders
Now the installation is the same as from the above Optifine instructions, just follow the steps starting from step 5.

Iris Installation Guide
Note
Your device must have Java installed to run the Iris installer.
Quick Java Installation Guide
Download Java
Download the Java installer from the official website here.
Open Installer
Once you have downloaded the file, run it and click the Install button.
How to install Kadirxo Shaders with Iris?
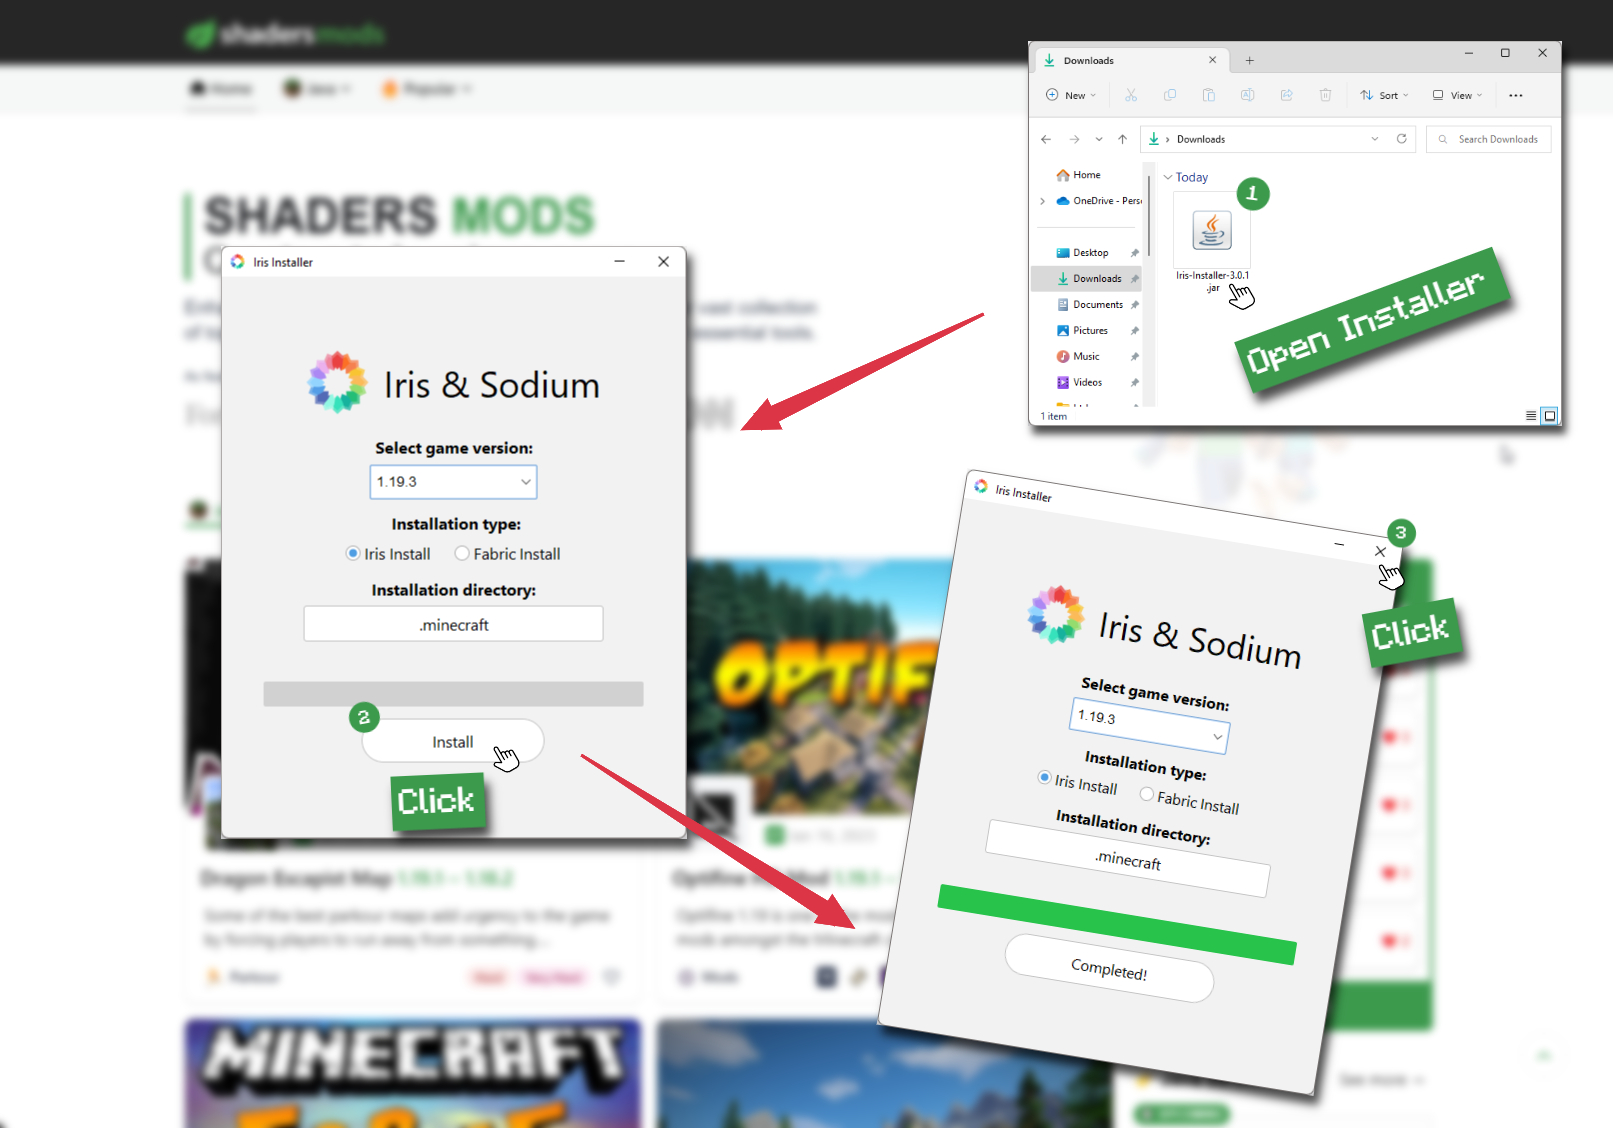
Download Iris Shaders
Find the latest version of the Iris Shaders installer and download it.
Download Iris InstallerInstall Iris Shaders
Open the downloaded jar file, and choose the preferred game version and installation type.
⯈ Iris Install:
If you don't plan on using any other mods with Iris, choose this option.⯈ Fabric Install:
Choose this option if you want to use Iris with Fabric and other mods. The Iris jar files will be copied to the mods folder within the .minecraft directory.
Start Installation
After selecting the game version and installation type, click the "Install" button to start the installation process.
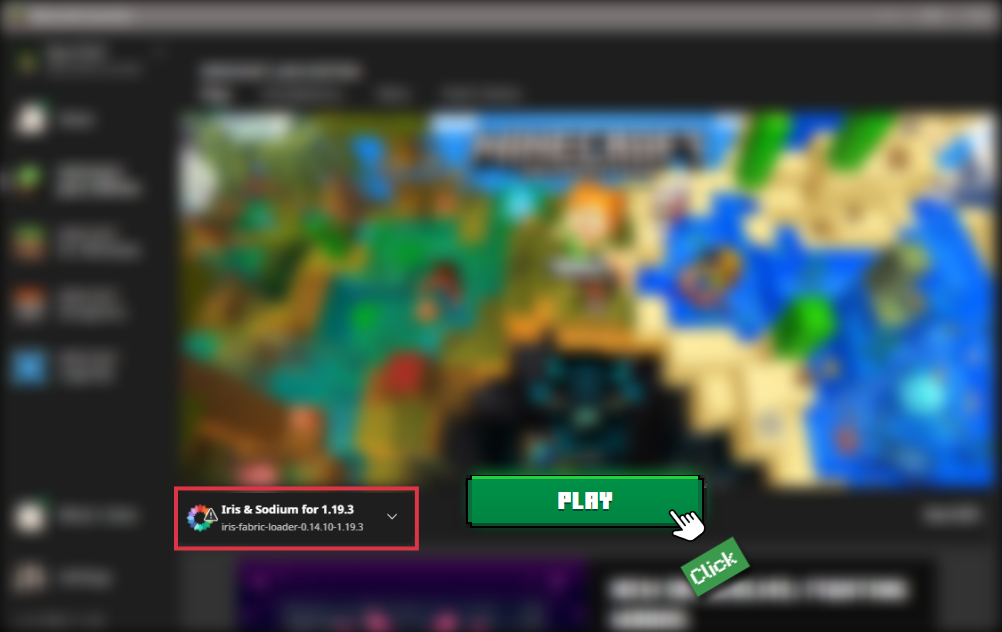
Launch Minecraft
Start the Minecraft launcher and make sure you have the Iris profile selected.
Note
Select the Fabric profile if you opt for the Fabric installation type.
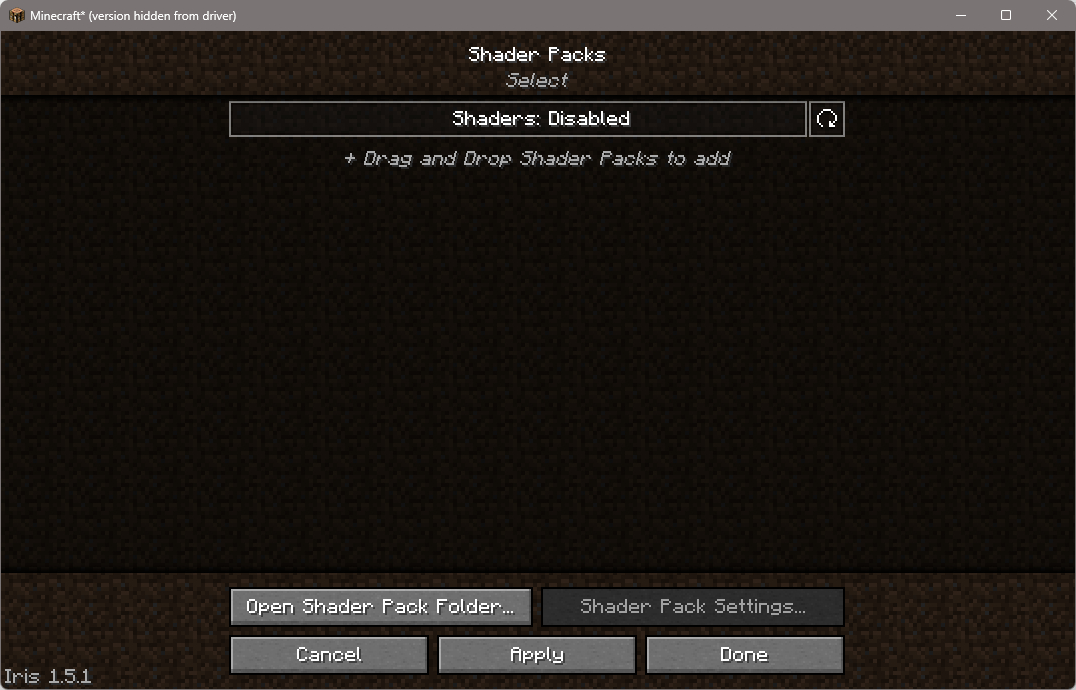
In-game Shader Menu
Open the Minecraft game and go to Options > Video Settings > Shader Packs to access the shaders menu.
Tip
To simplify the process, simply drag and drop the shader ZIP file directly into the Minecraft window, bypassing the next two steps.
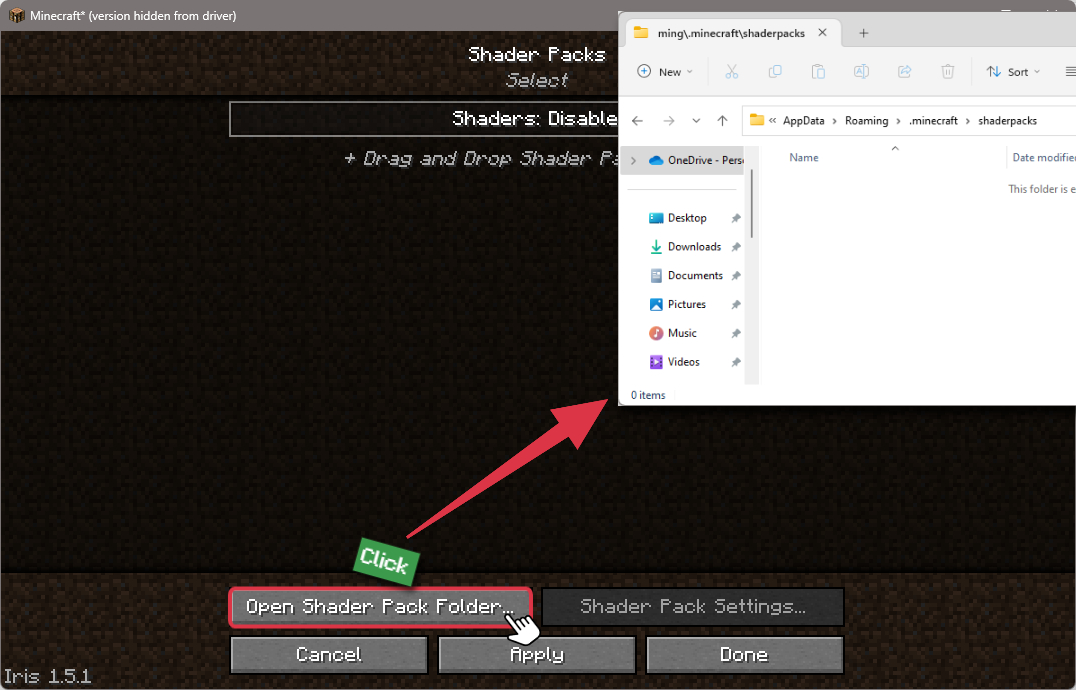
Open shaderpacks folder
Click on the "Open Shader Pack Folder" button to access the folder where shaders are stored.
Install Kadirxo Shaders
Copy or move the shaders zip file into the shaderpacks folder.
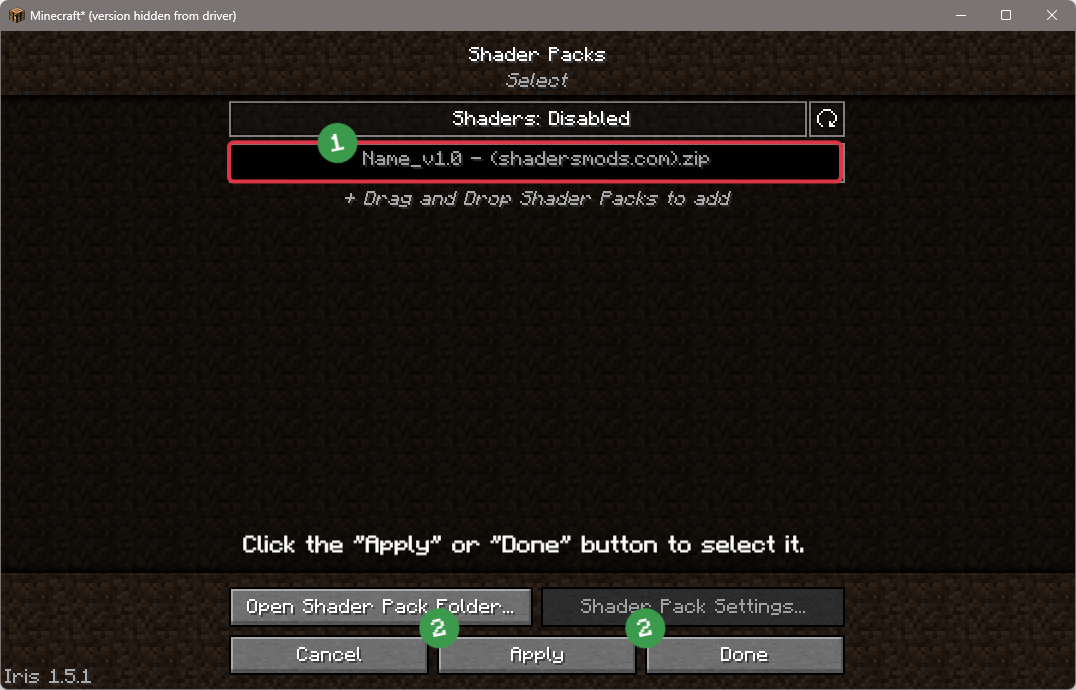
Select Kadirxo Shaders
Choose installed shader pack from the list of available shaders in the options menu and click the "Apply" or "Done" button to select it.
Tip
When the shader pack is selected, its name will be changed to yellow.
GLSL Installation Guide
Warning
How to install Kadirxo Shaders with GLSL Shaders Mod?
Install Forge
Download the latest version of Forge that is compatible with your Minecraft version.
Download Minecraft ForgeLaunch Minecraft
Start the Minecraft launcher and select the version of Minecraft you want to install Forge on. Run the game once by clicking on the "Play" button to create the necessary files for Forge.
Install Forge Client
Double-click on the Forge installer jar file and choose "Install Client" in the window that appears.
Install GLSL Shaders Mod
Download the GLSL jar file after Forge is installed. Move the GLSL jar file to the mods folder in the .minecraft directory.
Download GLSL Shaders
Launch Forge Profile
Launch Minecraft using the "Forge" profile, and GLSL Shaders will be automatically loaded along with Forge.
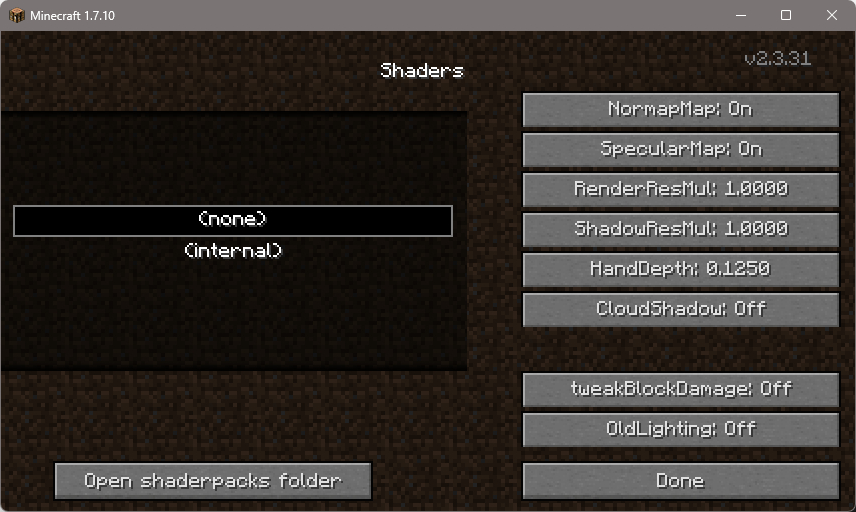
In-game Shaders menu
Go to Options > Shaders to access the shaders menu.
Open shaderpacks folder
Click on the "Open shaderpacks folder" button to open the folder where shaders are stored.
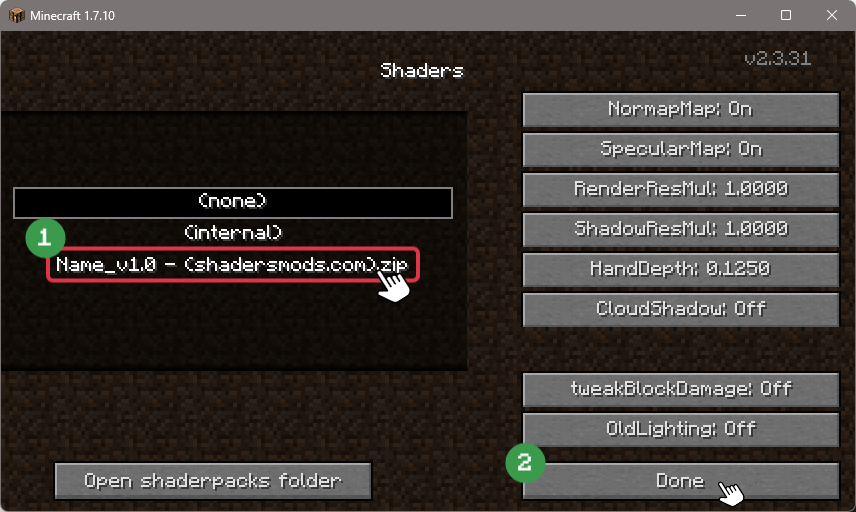
Install Kadirxo Shaders
Copy or move the downloaded shaders zip file into the shaderpacks folder.
Select Kadirxo Shaders
Choose Kadirxo shader pack from the list of available shaders in the options menu.


📥 Kadirxo Shaders — Download
Something You Should Know
- Our links are only from the official developer, so you can be sure they are secure.
- No modifications or edits are made to the files.

Comments (21)
Someone help, i am changing light settings but torches aren’t doing anything?
activate dynamic ligths
Shouldn’t be a problem sounds like your computer cost 1 pound. Shouldn’t be that much of a problem to buy another one.